

Spring Boot2
打开官网的快速开始进行操作
首先新建一个maven项目,使用
<?xml version="1.0" encoding="UTF-8"?>
<project xmlns="http://maven.apache.org/POM/4.0.0" xmlns:xsi="http://www.w3.org/2001/XMLSchema-instance"
    xsi:schemaLocation="http://maven.apache.org/POM/4.0.0 https://maven.apache.org/xsd/maven-4.0.0.xsd">
    <modelVersion>4.0.0</modelVersion>

    <groupId>com.example</groupId>
    <artifactId>myproject</artifactId>
    <version>0.0.1-SNAPSHOT</version>

    <parent>
        <groupId>org.springframework.boot</groupId>
        <artifactId>spring-boot-starter-parent</artifactId>
        <version>2.5.6</version>
    </parent>

    <!-- Additional lines to be added here... -->

</project>
替代pom.xml文件的内容,使用
<dependencies>
    <dependency>
        <groupId>org.springframework.boot</groupId>
        <artifactId>spring-boot-starter-web</artifactId>
    </dependency>
</dependencies>
引入SpringBoot依赖
需要在pom.xml中加入
<build>
    <plugins>
        <plugin>
            <groupId>org.springframework.boot</groupId>
            <artifactId>spring-boot-maven-plugin</artifactId>
            <version>2.5.5</version>
        </plugin>
    </plugins>
</build>
才能够正常的打包运行项目
Hello World
package Package1;

import org.springframework.boot.SpringApplication;
import org.springframework.boot.autoconfigure.SpringBootApplication;

// 代表这是一个springboot应用,这个类相当于主程序类
@SpringBootApplication
public class SpringBootApp {
    public static void main(String[] args) {
        // 固定的一个写法,含义是将spring程序运行起来
        SpringApplication.run(SpringBootApp.class, args);
    }
}
package Package1;

import org.springframework.stereotype.Controller;
import org.springframework.web.bind.annotation.RequestMapping;
import org.springframework.web.bind.annotation.ResponseBody;


@Controller
@ResponseBody
public class Test2 {
    @RequestMapping("/test")
    public String request1(){
        return "hello world";
    }
}
可以在resource目录下新建一个application.properties文件进行配置tomcat
官方文档中有关于这个文件能配置的内容
依赖管理
打开当前项目的父项目(<artifactId>spring-boot-starter-parent</artifactId>)的父项目(<artifactId>spring-boot-dependencies</artifactId>)
可以发现有个<properties></properties>标签,在在这个标签中有声明的一堆依赖的版本号的标签(通常称为自动版本仲裁),例如<mysql.version>8.0.27</mysql.version>,如果想要指定MySQL的版本,可以在自己的项目中添加一个相应的标签,例如
<properties>
    <mysql.version>8.0.27</mysql.version>
</properties>
此时可以修改版本了,这就是就近原则
注解
也有@Configuration、@Bean
如果一个类被@Configuration标注,那么这个类是一个配置类
如果被标注为配置类,那么这个类此时也会被放到IOC容器中
工厂方法:这个方法的最终目的是返回一个其他类的实例,如果这个方法被使用@Bean注解进行标注,那么此时会将与这个方法名相同的一个类会被加入到IOC容器,这类的类型就是这个方法的返回值
例如
package Package1;

import org.springframework.context.annotation.Bean;
import org.springframework.context.annotation.ComponentScan;
import org.springframework.context.annotation.Configuration;
import org.springframework.context.annotation.EnableAspectJAutoProxy;

import java.util.HashMap;
import java.util.Map;

@Configuration
@ComponentScan(basePackages = "Package1")
public class Config {
    @Bean()
    public Map<String, String> getMap1(){
        HashMap<String,String> map = new HashMap<>();
        map.put("key1", "value1");
        return map;
    }
}
package Package1;

import org.springframework.boot.SpringApplication;
import org.springframework.boot.autoconfigure.SpringBootApplication;
import org.springframework.context.ConfigurableApplicationContext;

// 代表这是一个springboot应用,这个类相当于主程序类
@SpringBootApplication
public class SpringBootApp {
    public static void main(String[] args) {
        // 固定的一个写法,含义是将spring程序运行起来
        ConfigurableApplicationContext run = SpringApplication.run(SpringBootApp.class, args);
        System.out.println(run.getBean("getMap1"));
    }
}
配置类本身也是一个组件
在@Configuration注解中,有一个boolean proxyBeanMethods() default true;的可选项,该项默认为true,代表此时所获取到的所有的对象都为单实例的,如果修改为false,代表获取到的为多实例的
如果为true代表组件的依赖
@import
@import(Class<?>[]),在容器中导入组件,通常针对第三方的jar包的组件,可以将其放到容器中,默认使用无参构造,例如导入DruidDataSource
@Import({DruidDataSource.class})
可以通过类型查找这个类型的所有组件的名字
 		System.out.println("-----查找某一类型的全部组件-----");
        for (String s : run.getBeanNamesForType(DruidDataSource.class)) {
            System.out.println(s);
        }
可以发现,由@import导入的组件的名字默认是全类名
@Conditional
conditional中文为有条件的,读音为kənˈdɪʃənl
是条件装配,只有符合某一条件时才进行组件注入
在这个注解底下,也派生了许多其他的注解
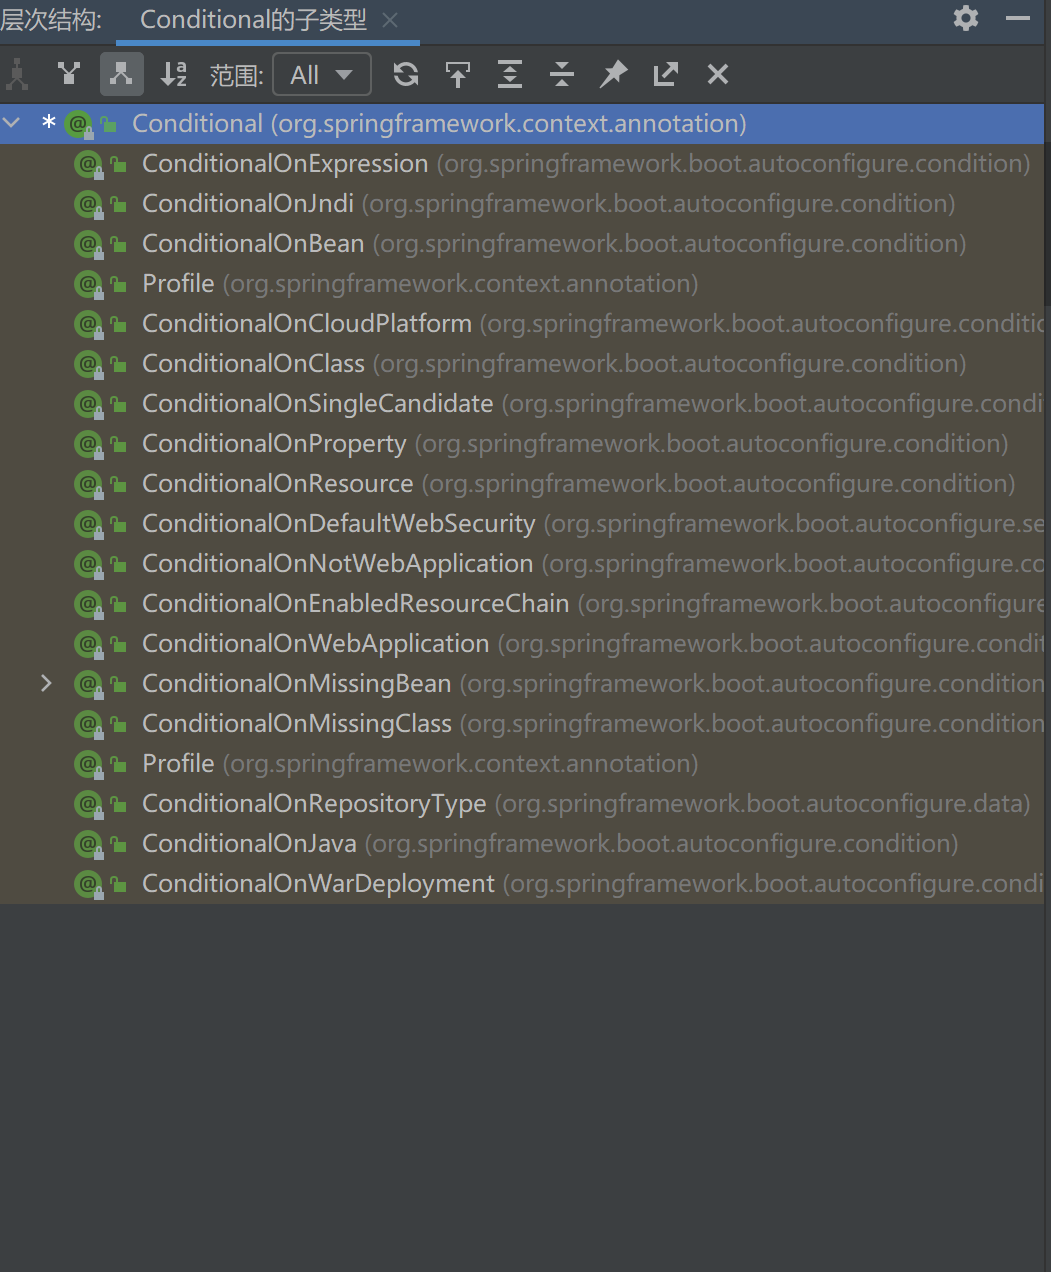
可以使用容器.containsBean("组件名")来判断容器中是否有一个组件
例如@ConditionalOnBean注解,该注解用作判断容器中是否由这个组件
@Configuration
@ConditionalOnBean(DataSource.class) // 代表容器中DataSource类型的组件时,这个配置类才会生效
class DataSourceConfig{
    @Bean
    public DataSource dataSource2(){
        return new DruidDataSource();
    }
}

@Configuration
class DataSourceConfig{
    @Bean
    @ConditionalOnBean(DataSource.class) // 代表容器中DataSource类型的组件时,这个工厂方法才会生效
    public DataSource dataSource2(){
        return new DruidDataSource();
    }
}


//其它类中
	@Bean
    public DataSource dataSource(){
        DruidDataSource dataSource = new DruidDataSource();
        dataSource.setUrl("jdbc:mysql://localhost:3306/test");
        dataSource.setPassword("20020327");
        dataSource.setUsername("root");
        return dataSource;
    }
@importResource
可以使用这个注解导入之前的xml配置文件使用xml配置文件的方式配置的bean不会自动的放到容器中,可以通过这个注解将其放到容器中
@importResource("classpath:xxx.xml")将类路径下的xxx.xml加载到容器中
@ConfigurationProperties
配置绑定的注解,需要加到容器中
例如有一个类,类结构如下
@Component
class User{
    private String username;
    private String password;
    getter、setter、toString方法
}
在resource目录下有一个application.xml文件,文件中有
user.username=admin
user.password=123456
可以给这个类添加@ConfigurationProperties(prefix = "user"),使这个类中的属性匹配配置文件中以user.开头的一系列的属性值,也就是说,可spring boot核心配置文件绑定在一块
prefix中文为前缀,读音为ˈpriːfɪks
在外部使用getBean方法获取这个实例时,会自动将属性值自动注入,也就是给user类添加这两个注解
@Component
@ConfigurationProperties(prefix = "user")
如果这个类没有在容器中,也可以在配置类上手动的开启配置绑定(但需要保证User类上有@ConfigurationProperties注解)
即@EnableConfigurationProperties({User.class})也是可以的,此时这个注解做了:
- 开启其后参数列表中
Class[]中的类的配置绑定功能 - 将其后参数列表中
Class[]中的类放到容器中
Lombok
简化JavaBean的开发
可以简化提供getter和setter以及构造器
spring boot中默认引入了,版本号为<lombok.version>1.18.22</lombok.version>
使用步骤:
-
引入依赖
-
<dependency>
    <groupId>org.projectlombok</groupId>
    <artifactId>lombok</artifactId>
</dependency>
-
-
idea中安装lombok插件
之后就不需要在每个JavaBean上写getter/setter了,只需要在JavaBean类上添加@Data注解即可
@ToString自动生成toString方法
@AllArgsConstructor:自动生成有参构造器
@NoArgsConstructor:自动生成无参构造器
@EqualsAndHashCode:自动生成equals()和hashCode()方法
Dev Tools
热部署
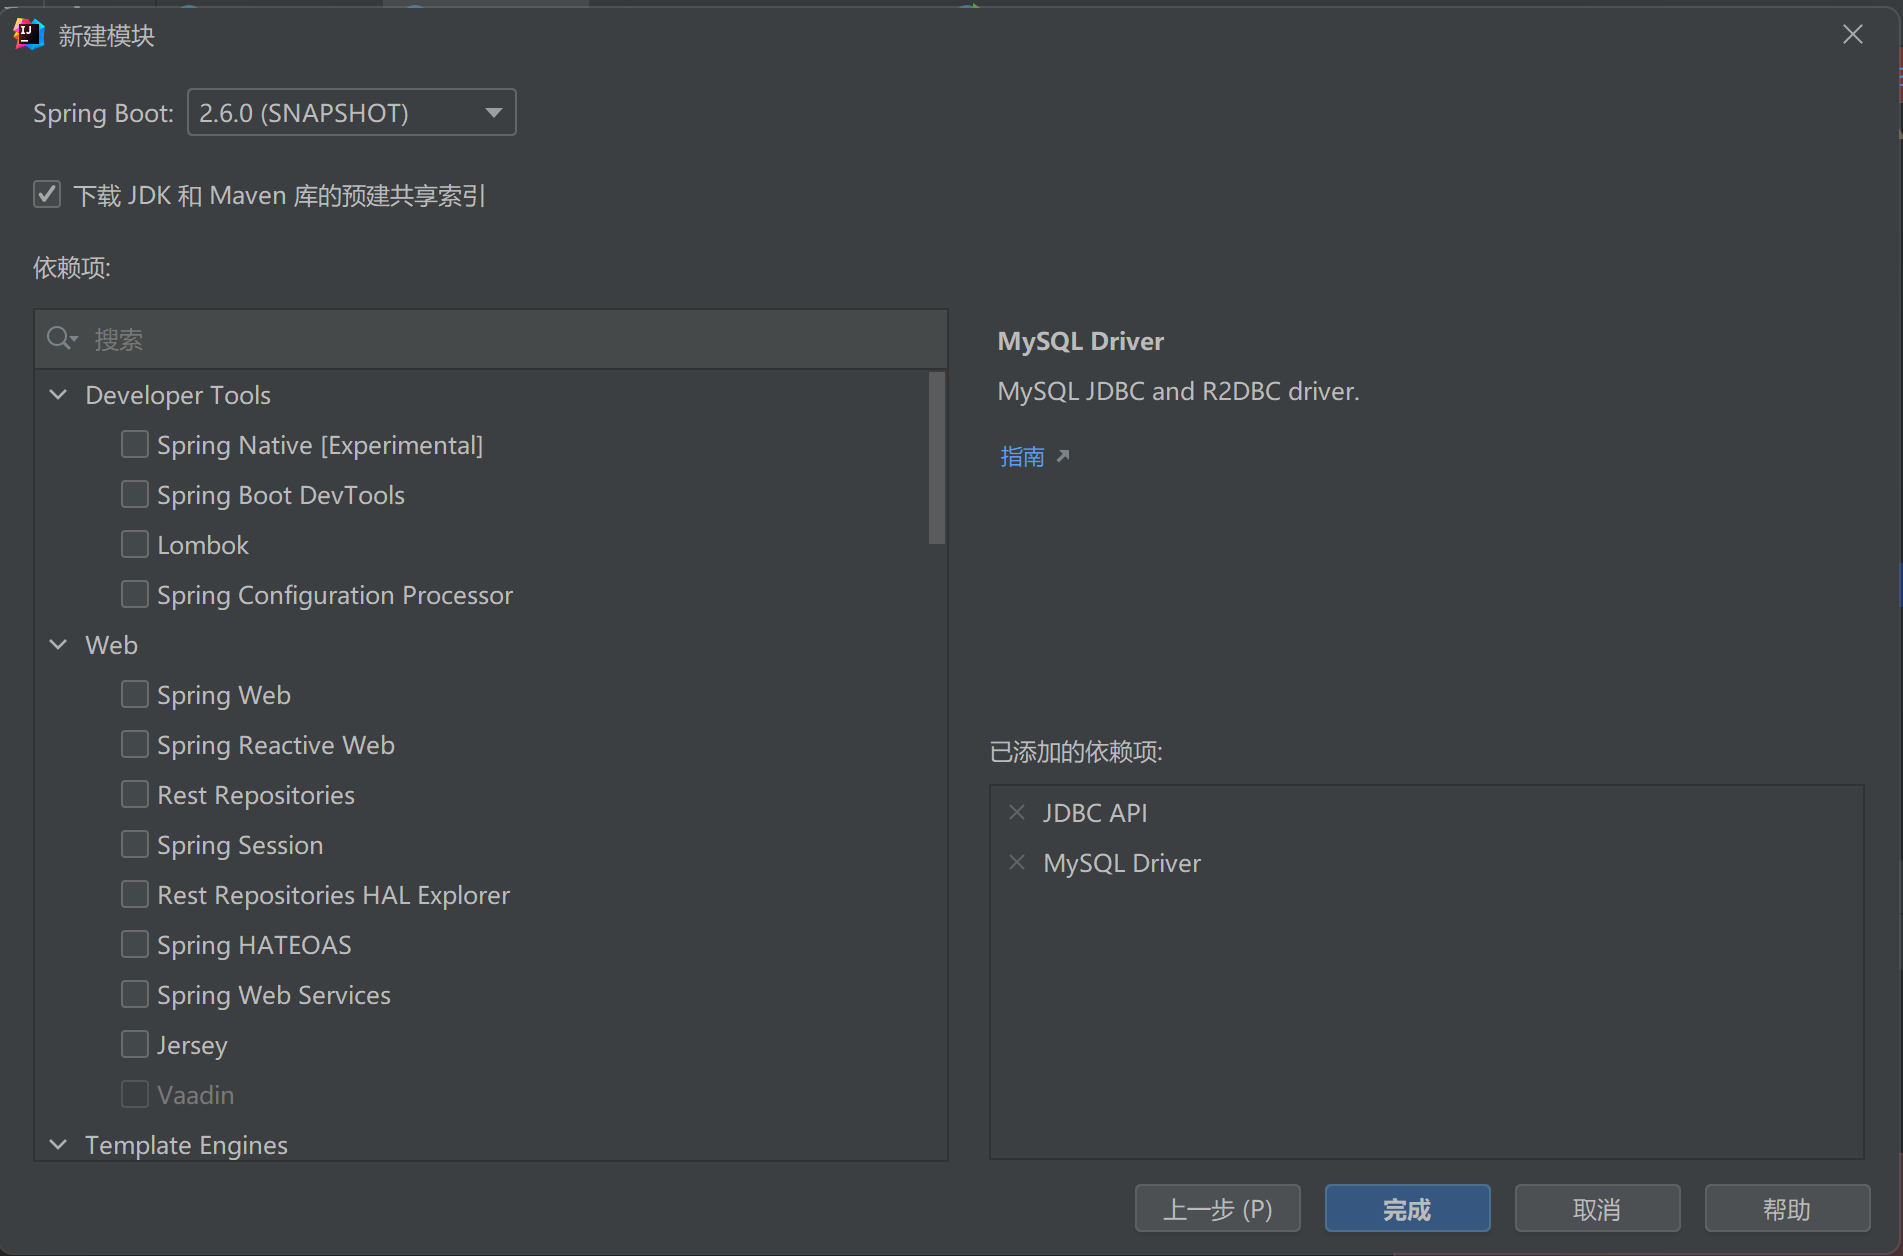
initializr
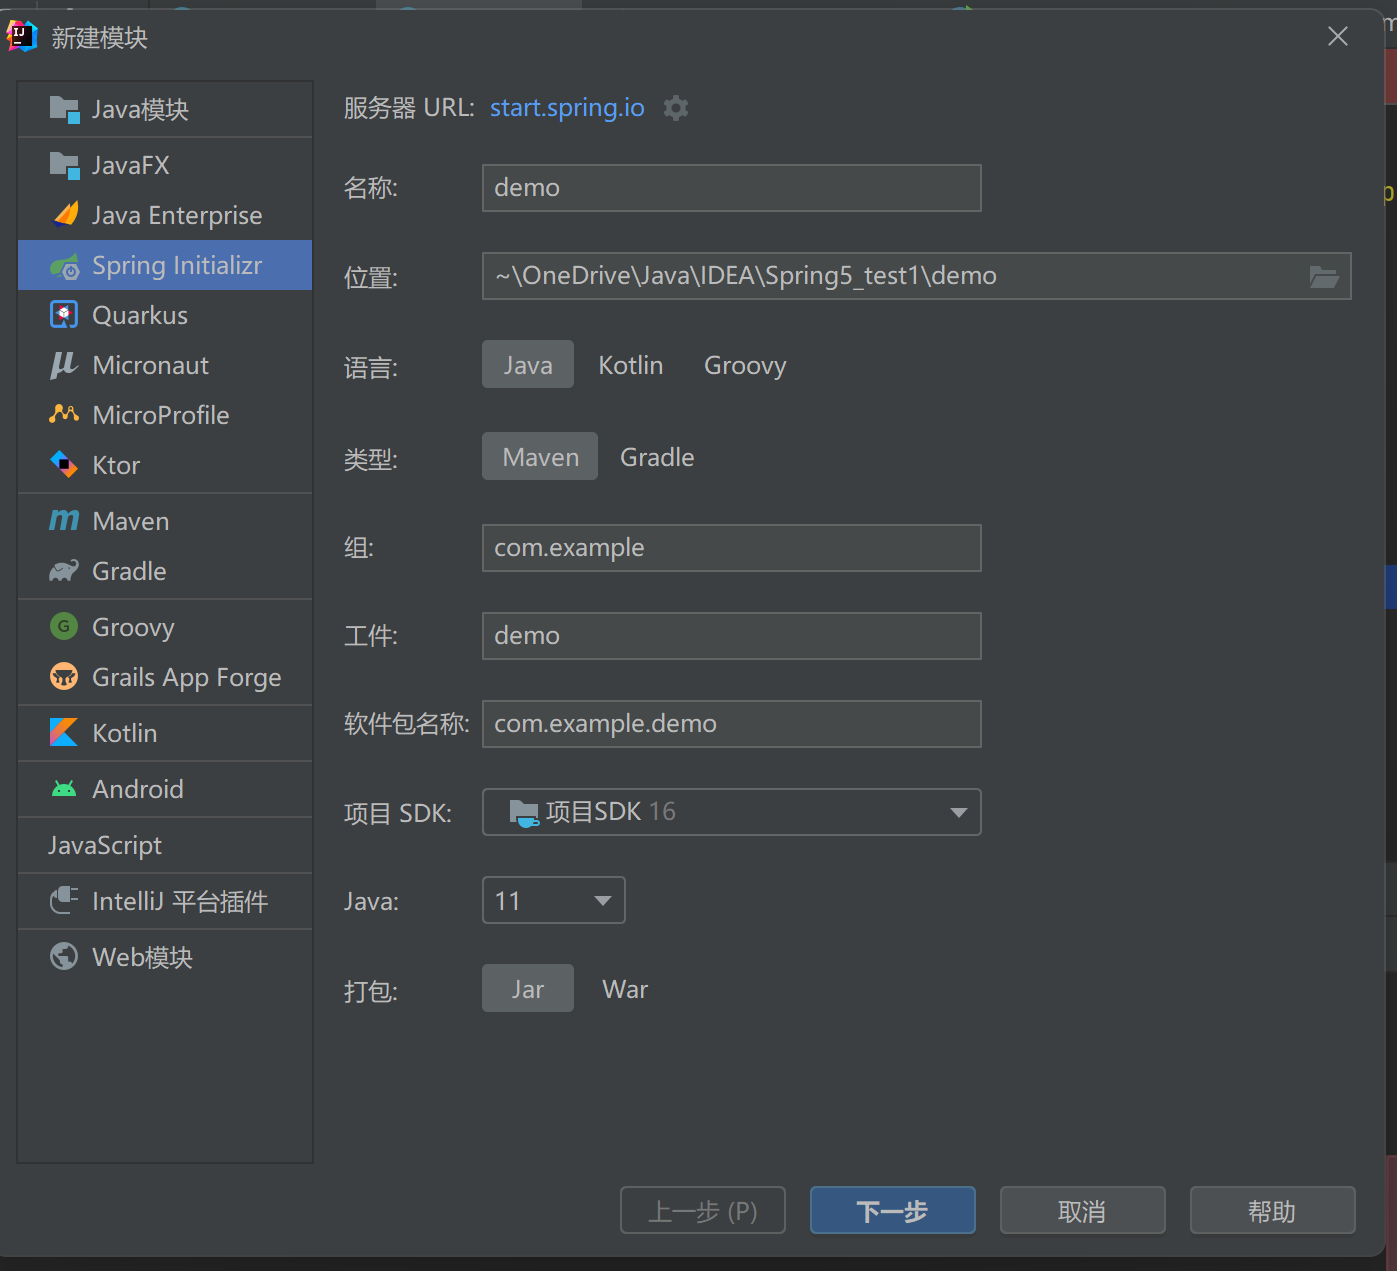
可以选择需要的部件
YAML
是一种标记语言,比如properties、json、xml
适合用来存储以数据为中心的配置文件
语法
-
也遵循key-value的形式,格式
key: value,key冒号:空格 value -
大小写敏感
-
使用缩进表示层级关系
-
缩进只允许使用空格,不允许使用tab
-
使用
#代表注释 -
字符串不需要加引号,引号也可以加的,如果是单引号会原样输出,双引号会进行转义后输出
-
对象、map写法:
-
obj: f1: 1 f2: 2 -
obj: {f1: 1,f2: 2}
-
-
数组/list/set写法:
-
array: {1,2,3} -
array:
  -1
  -2
  -3
-
Spring Boot配置文件也支持.yaml格式,并且也是依旧放在resource目录下,并且文件名为application.yaml,并且其中的配置和application.properties中的配置都可以同时的被读取并加载
和读取properties中的属性一样,也是通过@Configuration(prefix="前缀")注解的方式进行绑定
以下为读取配置文件值的例子
package Package1;

import lombok.Data;
import lombok.ToString;
import org.springframework.boot.context.properties.ConfigurationProperties;
import org.springframework.stereotype.Component;

import java.util.ArrayList;
import java.util.HashMap;
import java.util.HashSet;

@Component
@Data
@ToString
@ConfigurationProperties(prefix = "class1")
public class ClassOne {
    public ClassTwo classTwo;
    public String password;
    public ArrayList<Integer> list;
    public HashMap<String, String> map;
    public int[] arr;
    public HashSet<String> set;
    public int intValue;

}

@Component
@Data
@ToString
class ClassTwo{
    public String username;
    public int age;
}
application.yaml
class1:
  intValue: 20
  classTwo:
    username: admin1
    age: 12
  password: 122222
  list: [1,2,3,4,5,6,7777]
  map:
    key1: value1
    key2: value2
    key3: value3
#  这是注释
  arr:
    - 1
    - 2
    - 3
    - 9999
    - 898989
  set: [22,333,444,555]
在写yaml配置信息时,会发现没有任何的代码提示,并且在类文件中,idea也有错误提示,错误提示为 未配置spring boot 配置注解处理器

这是缺少某个依赖造成的,需要引入一个依赖
    <dependency>
        <groupId>org.springframework.boot</groupId>
        <artifactId>spring-boot-configuration-processor</artifactId>
        <optional>true</optional>
    </dependency>
此时再次写配置文件时会出现自动提示了,引入这个依赖仅仅提升了开发的体验,与最后的功能无关,可能在编译打包后导致冗余类的问题,但也无关紧要,可以继续优化
Web
根据官方文档,在resource目录下的以下文件夹内的静态的资源都可以访问到
使用Controller或者RestController进行标注类必须要和使用@SpringBootApplication标注的类放在一个包下,否则将会无法扫描到
/static、 /public 、/resources 、 /META-INF/resources
例如以下目录结构中位于main/resources目录下/static、 /public 、/resources 、 /META-INF/resources下图片都可以通过localhost:端口号/图片名.jpg进行访问到
├───main
│   ├───java
│   │   └───service
│   │           Application.java
│   │           HelloController.java
│   │+
│   └───resources
│       │   application.yaml
│       │
│       ├───META-INF
│       │   └───resources
│       │           p-12.jpg
│       │
│       ├───public
│       │       logo2.jpg
│       │
│       ├───resources
│       │       p-22.jpg
│       │
│       ├───static
│       │       p-19.jpg
│       │
│       └───templates
│               index.html
│
└───test
    └───java
静态映射的是/**,如果有有请求,先去找@Controller进行处理,如果处理不了,再去静态映射进行处理
设置静态资源前缀
默认是没有前缀
以上情况中,所有的静态资源都可以被访问到,有一些资源可以使用filter进行过滤,但全部都过滤会浪费时间,可以给某些静态资源设置一个前缀,使访问时无需进行过滤
添加前缀:
spring:
  mvc:
    static-path-pattern: /res/**
之后访问资源时,必须加前缀,例如localhost:8080/res/文件此时的文件目录也必须在上边规定的目录中
也可以设置只有某几个目录下的文件可以访问静态资源,可以填写数组,访问方式localhost:端口号/文件,无论如何设置,/resource/resource下的文件都可以访问
spring:
  web:
    resources:
      static-locations:
         - classpath:/目录名1
         - classpath:/目录名2
也可以和静态资源前缀配合使用,例如
spring:
  mvc:
    static-path-pattern: /res/**
  web:
    resources:
      static-locations:
         - classpath:/file
         - classpath:/image
此时访问方式依旧是localhost:8080/res/文件,但此时只有位于指定的目录下的文件才能够被访问到
Webjars将类似于jQuery Vue之类的封装到jar包中了,可以尝试着引入jQuery,引入后,查看jar的结构如下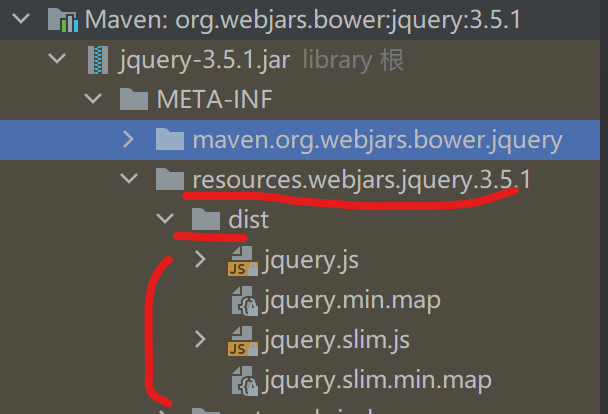
此时相当于放在了/resource/resource/webjars/jquery/3.5.1/dist/,浏览器打开http://localhost:8080/webjars/jquery/3.5.1/dist/jquery.js可以访问到,这也就印证了/resource/resource下的文件都可以访问
欢迎页
spring支持两种方式的欢迎页,分别是静态方式和模板方式,即通过localhost:8080就能访问到欢迎页
静态方式:将index.html文件放在静态资源路径下
模板方式:如果有能处理/index请求的,那么会自动调用这个请求
如果设置了静态资源前缀,那么,此时将无法直接通过localhost:8080访问到欢迎页
Favicon图标
每个网站都有Favicon图标,Favicon全称为Favorites Icon,直接将以.ioc
@RequestMapping
用来映射请求地址,通常写在类或者方法前
当该注解放到类前边时,并且方法前也有这个注解,那么此时如果匹配某个方法时,浏览器的地址栏可以进行localhost:port/类之前指定的映射地址/方法之前指定的映射地址/
-
默认写法
@RequestMapping(value = "路径"),等价于@RequestMapping("路径")-
value后的属性还可以是一个字符串类型的数组,例如
@RequestMapping({"路径1", ..., "路径n"}) -
也可以使用通配符
*,或者**-
例如
*end,匹配以end结尾的,start*匹配以start开头的,start/*/匹配start/任意地址/,但任意地址后不能匹配,例如start/任意地址/a/就无法匹配 -
start/**代表匹配start/任意地址/......./任意地址即start后的任意地址都可以匹配,包括子地址 -
//    以start开头的全部匹配
    @RequestMapping("/start*")
    public String start(){
        return "/spring/start开头的任意地址/";
    }
//    /start2/之后的任意地址全部匹配
    @RequestMapping("/start2/*")
    public String AfterStart2(){
        return "/spring/start2/之后的任意地址/";
    }
//    匹配/spring/以end结尾的地址/
    @RequestMapping("/*end")
    public String end(){
        return "end结尾";
    }
    @RequestMapping("/*center*")
    public String center(){
        return "含有center字符的地址";
    }
    @RequestMapping("/sub/**")
    public String AllSubAddress(){
        return "/spring/sub/.../.../.../...../的任意子地址";
    }
-
-
-
可以指定请求方式,
@RequestMapping(value = "路径", Method = RequestMethod.Get/Post)或者直接写Get/PostMapping -
params参数,这个参数可以指定这个方法匹配的键=值,例如@RequestMapping(value = "/parameter", params = {"id=1", "name=123"})代表该方法是匹配id=1并且name=123的请求,其中params = {"id=1", "name=123"}数组中的=两边不要有空格 -
也可以自定义其他请求:
-
自定义请求是基于POST请求的
-
原理是在表单中添加一个隐藏标签,隐藏标签名字为
_method -
Spring Boot默认是关闭这项功能的,需要手动在配置文件中开启,只需要在配置文件中的
spring:下添加-
mvc:
  hiddenmethod:
    filter:
      enabled: true
-
-
package service; import org.springframework.stereotype.Controller; import org.springframework.web.bind.annotation.*; @RestController @RequestMapping("/") public class HelloController { @RequestMapping("hello") public String index(){ System.out.println("hello"); return "index"; } @GetMapping("request") public String get(){ return "get请求"; } @PostMapping("request") public String post(){ return "post请求"; } @DeleteMapping("request") public String delete(){ return "自定义删除请求l"; } } @RestController @RequestMapping("/spring") public class HelloController { @RequestMapping("/hello") public String index(){ System.out.println("hello"); return "localhost:port/spring/hello"; } @RequestMapping("/") public String index2(){ return "localhost:port/spring/"; } @RequestMapping({"h1", "h2", "h3"}) public String addresses(){ return "localhost:port/spring/<br>后的h1 h2 h3都映射到这里<br>localhost:port/spring/h1<br>localhost:port/spring/h2<br>localhost:port/spring/h3"; } } -
<!DOCTYPE html> <html lang="en"> <head> <meta charset="UTF-8"> <title>Title</title> </head> <body> <form action="/request" method="get"> <button type="submit">get请求</button> </form> <br> <form action="/request" method="post"> <button type="submit">post请求</button> </form> <br> <form action="/request" method="post"> <input type="hidden" name="_method" value="DELETE" /> <button type="submit">自定义删除请求</button> </form> </body> </html> -
原理:请求表单时会带上
_method=自定义请求方式的参数,请求到服务器时,会被springgboot集成的HiddenHttpMethodFilter进行拦截(底层依旧是HttpServletRequest类),判断请求是否正常,如果正常,获取请求参数_method的值,将获取到的值转换为全部大写(也就是说在表单域中写小写或者大小写混合也是可以的)
-
@RestController注解 = @ReponseBody注解 + @Controller注解
@ReponseBody注解代表这个类中的方法在获取到某个请求后返回某些数据
如果仅用@Controller注解代表当这个类中的方法在获取到某个请求后,返回一个页面
@RequestParam注解:
-
该注解需要和
@RequestMapping()配合使用 -
用在方法的参数列表中,变量前
-
参数
value = 键或者name = 键(这两个参数的作用相同),用来指定匹配传递进来的哪个参数,如果不写,默认以右侧的变量名作为键进行匹配 -
参数
required = true/false,默认为true- 为
true表示在请求中必须有这个参数才能够被匹配这个方法,否则会404 - 为
false表示有没有都会匹配- 如果没有,此时的值为
null - 对于基本数据类型的数据,尽量使用包装类,如果使用基本数据类时这个值不存在会抛异常,并且浏览器报500错误,require中文为依赖、要求,读音为
rɪˈkwaɪər,required中文为必需、需要、必要
- 如果没有,此时的值为
- 为
-
@RequestMapping("/parameter") public String parameter(@RequestParam(name = "ID", required = false) Integer id){ return "请求的id = " + id; } -
参数
defaultValue = 值当某个请求参数不存在时,为其后的变量指定一个默认值,如果指定默认值,会导致required属性为false,即指定这个参数后,无论有没有这个属性,都会匹配这个方法
@PathVariable注解:
-
使用占位符来获取请求过来的路径,天生的适合RESTful风格
-
在请求的路径中使用
{占位符}作为占位符,在形式参数上加这个注解,如果注解后所跟着的变量名能够和占位符所匹配上(即同名,如以下例子),可以不用再标明value = "值" -
// 可以直接匹配上 @RequestMapping("/request2/{id}") public String requestPath(@PathVariable Integer id){ return "/request2/" + id; } -
如果不能匹配,则需要标明
-
// 不能直接匹配上
@RequestMapping("/request2/{id}")
public String requestPath(@PathVariable Integer id){
    return "/request2/" + id;
}
-
RESTful风格
REST,即Representational State Transfer的缩写。直接翻译的意思是"表现层状态转化"
在之前的请求是,通常使用IP:port/路径?参数1=值&参数2=值....的方式进行传递数据
RESTful风格是无需在后边加一堆参数,提倡URL使用统一的风格,即以/的方式将需要的操作拼接起来
4个动词:
- GET:获取
- POST:新建资源
- PUT:更新资源
- DELETE:删除资源
以对用户的增删改查操作为例,传统的查询、新建、修改、删除的url如下:
- 查询GET:
localhost:port/getUser?id=1 - 新建POST:
localhost:port/addUser - 修改POST:
localhost:port/updateUser - 删除GET:
localhost:port/deleteUser?id=1
而采用RESTful风格的方式大致如下:
@GetMapping("/user/{id}")
public String queryUser(@PathVariable Integer id){
    return "查询用户,id = " + id;
}

@PostMapping("/user")
public String addUser(@RequestParam String username, @RequestParam String password){
    return "新增用户" + "username = " + username + " " + "password = " + password;
}

@PutMapping("/user")
public String updateUser(@RequestParam String username, @RequestParam String password){
    return "修改用户"+ "username = " + username + " " + "password = " + password;
}

@DeleteMapping("/user")
public String deleteUser(@RequestParam Integer id){
    return "删除用户 id = " + id;
}
<!DOCTYPE html>
<html lang="en">
<head>
    <meta charset="UTF-8">
    <title>Title</title>
</head>
<body>
<h1>CRUD</h1>
<a href="/spring/user/1">查询用户</a>
<br>
<h3>新建</h3>
<form action="/spring/user" method="post">
    username:<input type="text" name="username"><br>
    password:<input type="text" name="password"><br>
    <button>新增用户</button>
</form>

<br>
<h3>修改</h3>
<form action="/spring/user" method="post">
    <input type="hidden" name="_method" value="PUT">
    username:<input type="text" name="username"><br>
    password:<input type="text" name="password"><br>
    <button>修改用户</button>
</form>
<br>
<h3>删除</h3>
<form action="/spring/user" method="post">
    <input type="hidden" name="_method" value="DELETE">
    id:<input type="text" name="id"><br>
    <button>修改用户</button>
</form>
</body>
</html>
参数的获取
可以使用以上的方式获取值,当提交的参数过多时,可以使用一个Map<String, String>进行接收,Map键和值必须都是String类型的,在这个方法的形式参数中添加@RequestParam Map<String, String> 变量名,此时的map中就是放的提交过来的键值对
@PostMapping("/user")
public Map<String, String> addUser(@RequestParam Map<String, String> map){
    return map;
}
除了可以用键值对存储,也可以返回键值对到网页上
可以在形式参数上添加@RequestHeader注解获取请求头,如果后边跟着Map<String, String>,则将获取到的内容放到了Map中,也可以单独获取某一个请求头,例如获取UA
@PostMapping("/user")
public Map<String, String> addUser(@RequestHeader("user-agent") String userAgent){
    System.out.println(userAgent);
    return map;
}
如果某个属性有多个值,可以在形式参数中将这个变量声明为List<String>类型,然后可以在这个List中取出值
可以通过在形式参数上加@CookieValue注解获取Cookie
使用@RequestAttribute("key")可以获取request域中的attribute
package service;

import org.springframework.stereotype.Controller;
import org.springframework.web.bind.annotation.RequestAttribute;
import org.springframework.web.bind.annotation.RequestMapping;
import org.springframework.web.bind.annotation.ResponseBody;

import javax.servlet.http.HttpServletRequest;
import javax.servlet.http.HttpServletResponse;

@Controller
public class RequestController {
    @RequestMapping("/hi")
    public String goToIndex(HttpServletRequest request){
        request.setAttribute("key", "value12345678");
//        转发请求到attr,对于有子目录的,一定要加上最后的/
        return "forward:/attr/";
    }

    @RequestMapping("/attr")
    @ResponseBody
    public String attr(@RequestAttribute("key") String key){
        return key;
    }
}
也可以用原生的request拿过来,通过request.getAttribute("key")获取请求
@MatrixVariable
matrix中文为矩阵、模型,读音为ˈmeɪtrɪks
视频在这里
在Map和Model中存放数据
如果在添加了@RequestMapping的方法的形式参数中写了Map或者Model类型的参数,在方法体内若给相关的参数存放数据,那么存放的数据也一并都放在了Request域中,也就是说相当于间接的调用了request.setAttribute(key, value)
package service;

import org.springframework.stereotype.Controller;
import org.springframework.ui.Model;
import org.springframework.web.bind.annotation.*;

import javax.servlet.http.Cookie;
import javax.servlet.http.HttpServletRequest;
import javax.servlet.http.HttpServletResponse;
import java.util.HashMap;
import java.util.List;
import java.util.Map;

@Controller
public class ParameterTest {
    @RequestMapping("test")
    public String requestTest(Map<String, Object> map, HttpServletRequest request, Model model){
        map.put("key1", "666666");
        map.put("key21", "6662666");
        map.put("key221", "66662266");
        request.setAttribute("hello", "hi");
        model.addAttribute("java", "python");
        return "forward:/param/";
    }

    @RequestMapping("/param")
    @ResponseBody
    public Map<String, Object> param(HttpServletRequest request){
        HashMap<String, Object> map = new HashMap<>();
        map.put("key1", request.getAttribute("key1"));
        map.put("key21", request.getAttribute("key21"));
        map.put("key221", request.getAttribute("key221"));
        map.put("hello", request.getAttribute("hello"));
        map.put("java", request.getAttribute("java"));
        return map;
    }

}
自定义绑定
可以直接在形式参数中放入一个bean类的参数,当有请求进行提交过来时,会自动将符合的表单项自动的进行注入
package bean;


import lombok.Data;
import lombok.ToString;

@Data
@ToString
public class User {
    public String username, password;
    public int age;
}
@GetMapping("/user")
@ResponseBody
public User saveUser(User user){
    return user;
}
此时请求地址为http://localhost:8080/user?username=admin&password=1234&age=10010,页面所返回的内容为{"username":"admin","password":"1234","age":10010}
视图解析
SpringBoot默认不支持JSP,所以需要第三方的模板引擎进行渲染
使用Thymeleaf
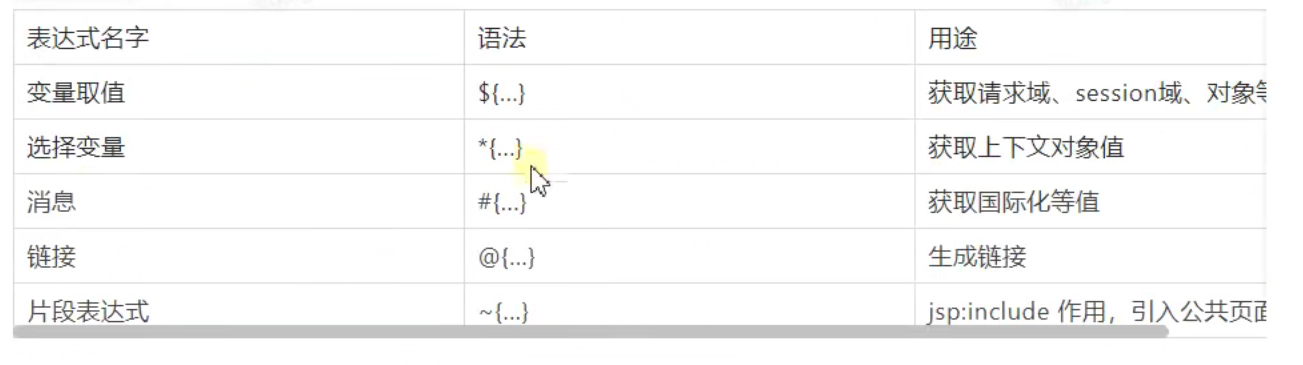
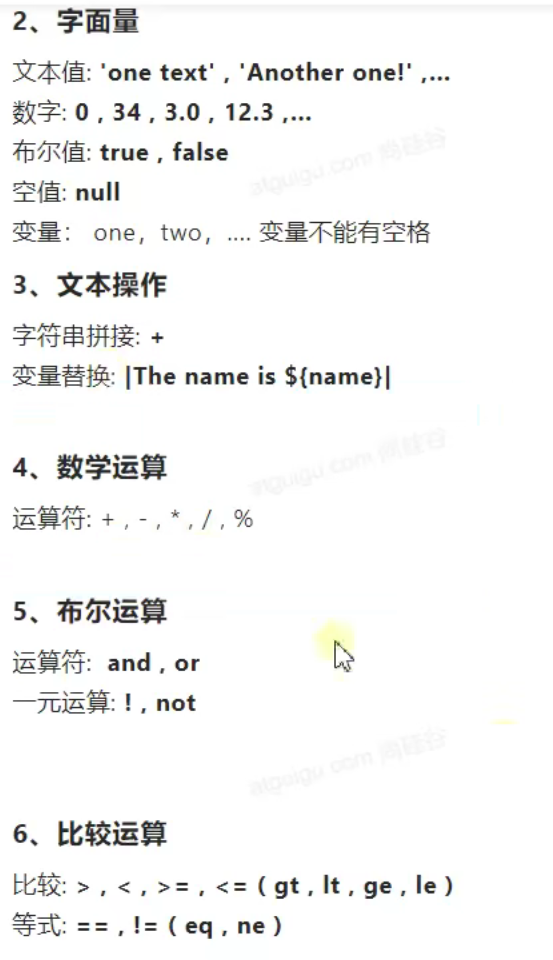
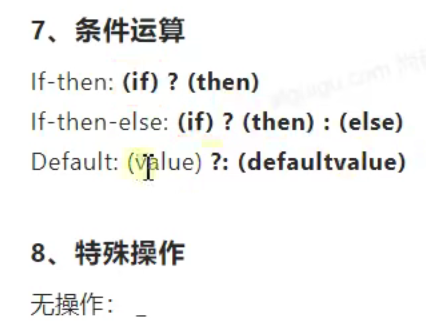
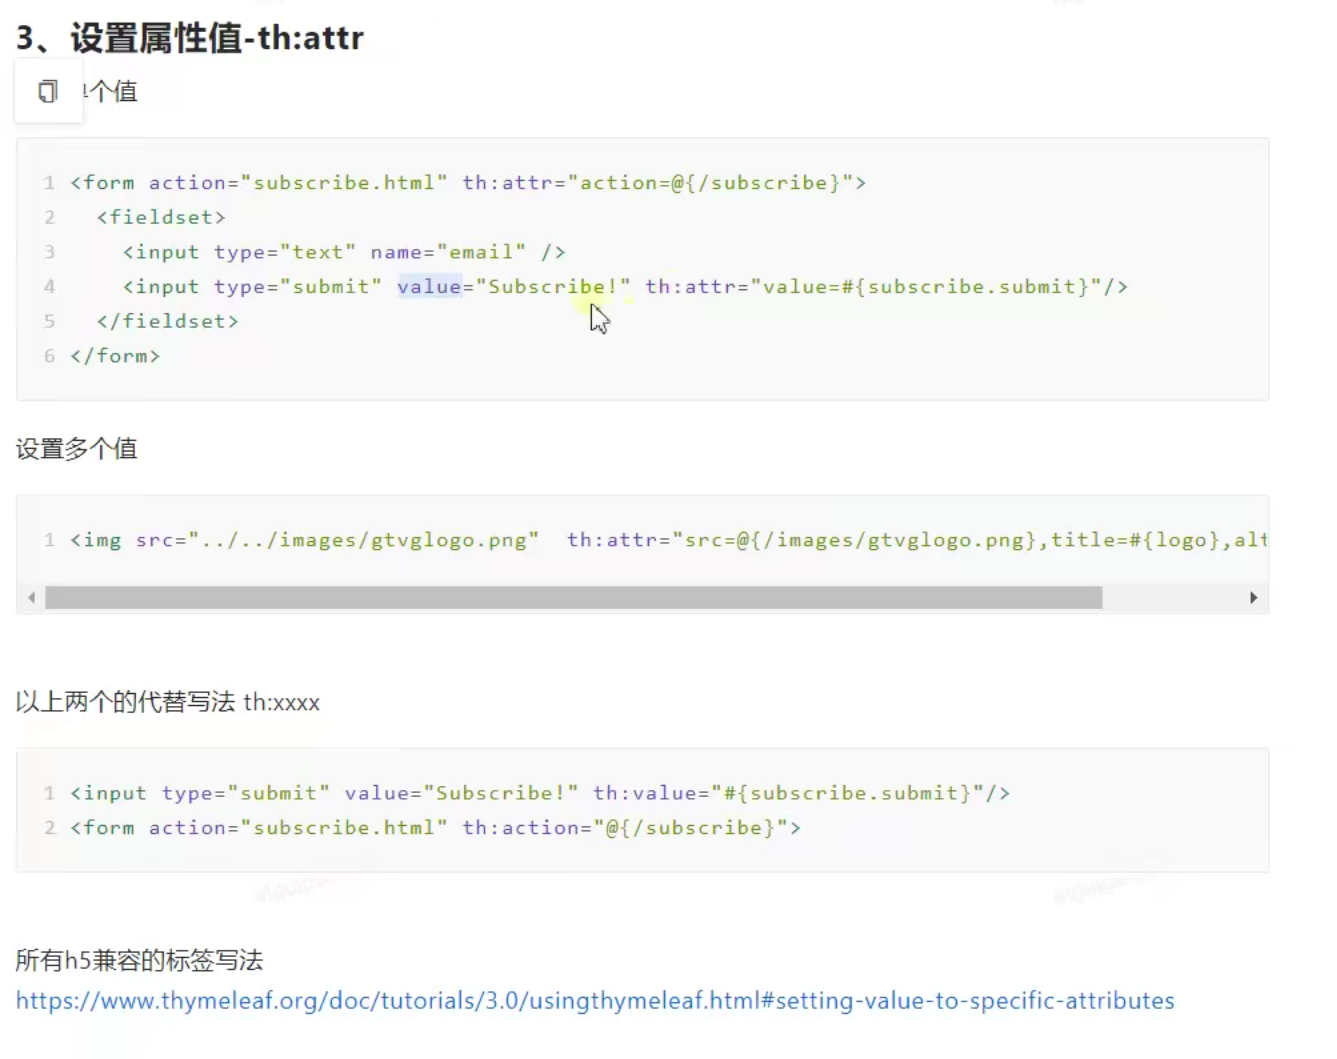
语法
引入thymeleaf
<dependency>
    <groupId>org.springframework.boot</groupId>
    <artifactId>spring-boot-starter-thymeleaf</artifactId>
</dependency>
默认是访问/resource/templates/下的页面,并且,访问的后缀默认是.html,因此,在返回相应的页面时,无需写全称,只需写html的文件名即可
package service;
import org.springframework.stereotype.Controller;
import org.springframework.ui.Model;
import org.springframework.web.bind.annotation.RequestMapping;
@Controller
public class ViewController {
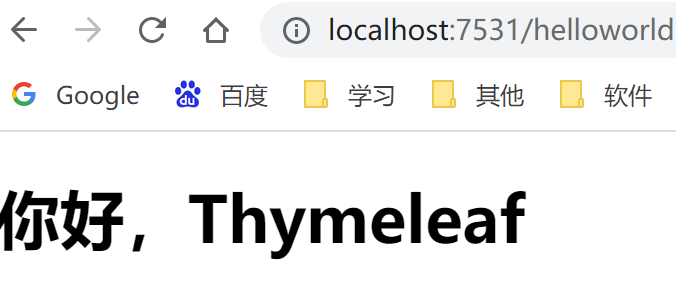
@RequestMapping("/helloworld")
public String fun1(Model model){
model.addAttribute("msg", "你好,Thymeleaf");
return "he";
}
}
<!DOCTYPE html>
<html lang="en"  xmlns:th="http://www.thymeleaf.org">
<head>
    <meta charset="UTF-8">
    <title>Title</title>
</head>
<body>
<h1 th:text = "${msg}">
    默认的
</h1>
</body>
</html>
防止表单重复提交:当提交表单后,按下刷新按钮会导致表单的重复提交,解决办法依旧是采用重定向的方式
// 返回登录页面
@GetMapping ({"/login", "/"})
public String login(){
    return "login";
}

// 登录页将使用post的方式将内容提交到/login下,此时处理提交的内容,处理结束后,重定向到某个页面
@PostMapping("/login")
public String login2(){
    return "redirect:/login3";
}

//重定向过l
@GetMapping("/login3")
@ResponseBody
public String login3(){
    return "登录";
}
拦截器
用来拦截没有权限的操作
Interceptor 中文为拦截器,读音为in(t)ərˈseptər
被拦截后的效果是页面显示空白
过程:
-
新创建一个类,使其实现
HandlerInterceptor接口,该接口位于org.springframework.web.servlet.HandlerInterceptor,这个接口中的所有的方法都是默认的方法,因此,需要重写/** * 目标方法执行之前 * @param request * @param response * @param handler * @return * @throws Exception */ @Override public boolean preHandle(HttpServletRequest request, HttpServletResponse response, Object handler) throws Exception { HttpSession session = request.getSession(); // 根据条件拦截 if (需要拦截的条件,可以在原生的request中取出响应的内容){ //可以在此处添加一个重定向的语句,让其跳转到相应的错误页 return false; } // 放行 return true; } /** * 目标方法执行完成 * @param request * @param response * @param handler * @param modelAndView * @throws Exception */ @Override public void postHandle(HttpServletRequest request, HttpServletResponse response, Object handler, ModelAndView modelAndView) throws Exception { HandlerInterceptor.super.postHandle(request, response, handler, modelAndView); } @Override public void afterCompletion(HttpServletRequest request, HttpServletResponse response, Object handler, Exception ex) throws Exception { HandlerInterceptor.super.afterCompletion(request, response, handler, ex); } -
新建一个配置类,为这个类添加
@Configuration,使其实现WebMvcConfigurer接口,该接口位于org.springframework.web.servlet.config.annotation.WebMvcConfigurer,重写addInterceptors方法@Configuration public class Config implements WebMvcConfigurer { @Override public void addInterceptors(InterceptorRegistry registry) { // 注册拦截器,并填写拦截的路径和放行的路径(如果有) registry.addInterceptor(new Filters()).addPathPatterns("需要拦截的路径1", "路径n").excludePathPatterns("不需要拦截的路径1", "路径n"); } } -
如果不在拦截器中设置拦截后进行跳转或者拦截后进行操作的语句,那么此时页面将会是一个空白页面,拦截器也会将css和图片之类的拦截
文件的上传
和之前一样,整个表单都有固定的一个格式,格式如下
<!DOCTYPE html>
<html lang="en" xmlns:th="http://www.thymeleaf.org">
<head>
    <meta charset="UTF-8">
    <title>Title</title>
</head>
<body>
<form action="/upload" method="post" enctype="multipart/form-data">
    单文件:<input type="file" name="file"> <br>
    多文件:<input type="file" name="file2" multiple> <br>
    <button type="submit">提交</button>
</form>
</body>
</html>
对于普通的表单项,依旧可以在处理的方法上添加@RequestParam注解来获取相应的参数值
对于文件的表单项,需要在形式参数添加@RequestPart("表单项name") MultipartFile 变量名来接收
对于多文件的表单项,依旧采用@RequestPart("表单项name")注解,但参数为MultipartFile[] 变量名
SpringBoot对文件上传的大小有限制,默认单个文件最大为1MB,所有上传的文件总大小最大为10MB
设置文件上传的大小限制:
spring:
	servlet:
        multipart:
          max-file-size: 100MB # 为单个文件的大小
          max-request-size: 1024MB # 为所有文件的总大小
transfer中文为转移,读音为trænsfɜːr
original,中文为最初的、起源,读音为əˈrijənl
multipart,中文为多部分,part中文为部分
getOriginalFileName()获取文件的原始名称,即获取文件名,文件名为文件名.后缀
transferTo(new File("路径") + 文件名)将获取到的文件写入到指定的路径中
@PostMapping("/upload")
@ResponseBody
public String upload(@RequestParam Map<String, Object> map, @RequestPart("file") MultipartFile file, @RequestPart("file2") MultipartFile[] files) throws Exception {
    // 当文件不为空时,将这个文件赋值到指定的路径
    if (!file.isEmpty()){
        file.transferTo(new File("C:\\Users\\singx\\Desktop\\file\\pdf\\" + file.getOriginalFilename()));
    }
    // 当上传过来的多文件的总数大于0时,将每个文件复制到指定的路径
    if (files.length > 0){
        for (MultipartFile f : files){
            f.transferTo(new File("C:\\Users\\singx\\Desktop\\file\\pdf\\files\\" + f.getOriginalFilename()));
        }
    }
    return "上传成功";
}
错误处理
可以在templates文件夹下新建一个error目录,这个目录下放一些错误页面,文件命名状态码.html
例如404.html也就是当出现这些错误时,自动跳转到相应的页面
Web原生组件注入
原生组件一般是指servlet、filter、listener
使用原生的组件注入的Servlet不会被Spring的拦截器拦截
使用注解
- 新建一个
HttpServlet的子类,并实现相应的方法 - 在这个子类上,添加一个
@WebServlet("/路径")的注解 - 在被
@SpringBootApplication注解标注的类上,添加@ServletComponentScan注解,可以在后边填写要扫描的包的参数,默认缺省值代表在这个类的包下进行扫描
package service;

import org.springframework.boot.SpringApplication;
import org.springframework.boot.autoconfigure.SpringBootApplication;
import org.springframework.boot.web.servlet.ServletComponentScan;

@SpringBootApplication
@ServletComponentScan
public class Application {
    public static void main(String[] args) {
        SpringApplication.run(Application.class, args);
    }
}
package service;

import javax.servlet.ServletException;
import javax.servlet.annotation.WebServlet;
import javax.servlet.http.HttpServlet;
import javax.servlet.http.HttpServletRequest;
import javax.servlet.http.HttpServletResponse;
import java.io.IOException;

@WebServlet("/my")
public class MyServlet extends HttpServlet {
    @Override
    protected void doGet(HttpServletRequest req, HttpServletResponse resp) throws ServletException, IOException {
        resp.getWriter().write("hhhh");
    }
}
对于Filter拦截器,需要使用@WebFilter("/路径"),依旧需要在被@SpringBootApplication注解标注的类上,添加@ServletComponentScan注解
package service;

import javax.servlet.*;
import javax.servlet.annotation.WebFilter;
import javax.servlet.http.HttpServletResponse;
import java.io.IOException;

@WebFilter("/my")
public class MyFilter implements Filter {
    @Override
    public void init(FilterConfig filterConfig) throws ServletException {
        Filter.super.init(filterConfig);
    }

    @Override
    public void doFilter(ServletRequest servletRequest, ServletResponse servletResponse, FilterChain filterChain) throws IOException, ServletException {
        HttpServletResponse response = (HttpServletResponse) servletResponse;
        response.setHeader("Content-Type", "text/html;charset=UTF-8");
        String result = servletRequest.getParameter("flag");
        if (result == null) {
            response.getWriter().write("拦截");
        } else {
            filterChain.doFilter(servletRequest, servletResponse);
        }
    }

    @Override
    public void destroy() {
        Filter.super.destroy();
    }
}
使用配置类
也可以去掉@WebXxx注解,使用一个配置类进行配置,这个配置类通常为单实例的
package service;

import org.springframework.boot.web.servlet.FilterRegistrationBean;
import org.springframework.boot.web.servlet.ServletRegistrationBean;
import org.springframework.context.annotation.Bean;
import org.springframework.context.annotation.Configuration;

@Configuration
public class Config{
//    注册servlet
    @Bean
    public ServletRegistrationBean myServlet(){
        System.out.println("使用了myServlet方法");
//        参数1是一个servlet,可以是自己实现的一个类,参数2是可变参数,可以写多个路径
        return new ServletRegistrationBean(new MyServlet(), "/my");
    }
    @Bean
    public FilterRegistrationBean myFilter(){
        System.out.println("使用了myFilter方法");
//        参数1是一个Filter,参数2是传入的一个servlet,将这个ServletRegisterationBean中设置的路径作为拦截路径
        return new FilterRegistrationBean(new MyFilter(), myServlet());
    }
}
以上的写法针对Filter只能使用servlet中的ServletRegistrationBean设置的路径进行拦截,也可以使用自定义路劲进行拦截,写法如下:
 @Bean
    public FilterRegistrationBean myFilter(){
        System.out.println("使用了myFilter方法");
        FilterRegistrationBean filterRegistrationBean = new FilterRegistrationBean(new MyFilter());
        // 需要传入一个Collection<String>类型的参数(可以传入一个List)
        filterRegistrationBean.setUrlPatterns(Arrays.asList("/my", "/hello"));
        return filterRegistrationBean;
    }
数据访问
引入依赖
<dependency>
    <groupId>org.springframework.boot</groupId>
    <artifactId>spring-boot-starter-data-jdbc</artifactId>
</dependency>
默认不会导入数据库的驱动,需要手动的引入驱动
<!-- https://mvnrepository.com/artifact/mysql/mysql-connector-java -->
<dependency>
    <groupId>mysql</groupId>
    <artifactId>mysql-connector-java</artifactId>
    <version>8.0.26</version>
</dependency>
也可以不用指定数据库驱动的版本,在spring boot 自动引入的文件中,会自动对版本进行仲裁
导入相关的数据库依赖后,必须要配置这个数据库,可以去application.yaml中进行配置
spring:
  datasource:
    url: jdbc:mysql://数据库地址:端口号/数据库名称
    username: 数据库用户名
    password: 数据库密码
可以设置超时时间
spring:
    jdbc:
      template:
        query-timeout: 9
测试类的基本结构:
需要以下两个注解
@SpringBootTest
@RunWith(SpringRunner.class)
被测试的类所在src/test/java目录下,必须要和带有@SpringBootApplication注解的类有相同的目录结构
└─src
   ├─main
   │  └─java
   │     └─service
   │             Application.java --这个类带有@SpringBootApplication注解
   └─test
       └─java
           └─service
                   Test.java ---- 这个类为测试类
以上目录结构所示,此时测试类的目录结构和带有@SpringBootApplication注解的类的目录结构一致
测试数据库连接
package service;

import org.junit.runner.RunWith;
import org.springframework.beans.factory.annotation.Autowired;
import org.springframework.boot.test.context.SpringBootTest;
import org.springframework.jdbc.core.JdbcTemplate;
import org.springframework.test.context.junit4.SpringRunner;

import javax.sql.DataSource;
import java.sql.SQLException;
import java.util.List;
import java.util.Map;

@SpringBootTest
@RunWith(SpringRunner.class)
public class Test {
    @Autowired
    JdbcTemplate jdbcTemplate;
    @Autowired
    DataSource dataSource;
    @org.junit.Test
    public void testJdbcTemplate(){
        List<Map<String, Object>> maps = jdbcTemplate.queryForList("select * from user");
        System.out.println(maps);
        try {
            System.out.println(dataSource.getConnection());
        } catch (SQLException e) {
            e.printStackTrace();
        }
    }
}
使用Druid
有两种方式,一种是自定义方式(配置类),另外一种是使用start
使用自定义方式
在之前使用默认的数据库连接池时,在application.yaml中写过了相关的配置文件了,可以在配置类的工厂方法上使用@ConfigurationProperties("前缀")进行获取连接地址或者密码
package service;

import com.alibaba.druid.pool.DruidDataSource;
import org.springframework.boot.context.properties.ConfigurationProperties;
import org.springframework.context.annotation.Bean;

import javax.sql.DataSource;

public class DruidConfiguration {
    @Bean
    @ConfigurationProperties("spring.datasource")// 此时自动注入账号密码以及连接地址
    public DataSource dataSource(){// 工厂方法
        return new DruidDataSource();
    }
}
若想要直接使用druid,还需要在application.yaml配置文件中的datasource添加type: com.alibaba.druid.pool.DruidDataSource
使用starter简化流程
删除掉配置类和在pom.xml中引入的Druid
添加以下依赖
<!-- https://mvnrepository.com/artifact/com.alibaba/druid-spring-boot-starter -->
<dependency>
    <groupId>com.alibaba</groupId>
    <artifactId>druid-spring-boot-starter</artifactId>
    <version>1.2.8</version>
</dependency>
Q.E.D.