Android开发基础
文件结构如下
│   .gitignore
│   build.gradle
│   gradle.properties
│   gradlew
│   gradlew.bat
│   local.properties
│   settings.gradle
│
├───.gradle
│   ├───7.0.2
│   │   │   gc.properties
│   │   │
│   │   ├───dependencies-accessors
│   │   │       dependencies-accessors.lock
│   │   │       gc.properties
│   │   │
│   │   ├───fileChanges
│   │   │       last-build.bin
│   │   │
│   │   ├───fileHashes
│   │   │       fileHashes.bin
│   │   │       fileHashes.lock
│   │   │
│   │   └───vcsMetadata-1
│   ├───buildOutputCleanup
│   │       buildOutputCleanup.lock
│   │       cache.properties
│   │       outputFiles.bin
│   │
│   ├───checksums
│   │       checksums.lock
│   │       md5-checksums.bin
│   │       sha1-checksums.bin
│   │
│   └───vcs-1
│           gc.properties
│
├───.idea
│   │   .gitignore
│   │   compiler.xml
│   │   gradle.xml
│   │   misc.xml
│   │   modules.xml
│   │   workspace.xml
│   │
│   └───modules
│           HelloWorld.iml
│
├───app
│   │   .gitignore
│   │   build.gradle
│   │   proguard-rules.pro
│   │
│   ├───libs
│   └───src
│       ├───androidTest
│       │   └───java
│       │       └───com
│       │           └───example
│       │               └───helloworld
│       │                       ExampleInstrumentedTest.java
│       │
│       ├───main
│       │   │   AndroidManifest.xml
│       │   │
│       │   ├───java
│       │   │   └───com
│       │   │       └───example
│       │   │           └───helloworld
│       │   │                   MainActivity.java
│       │   │
│       │   └───res
│       │       ├───drawable
│       │       │       ic_launcher_background.xml
│       │       │
│       │       ├───drawable-v24
│       │       │       ic_launcher_foreground.xml
│       │       │
│       │       ├───layout
│       │       │       activity_main.xml
│       │       │
│       │       ├───mipmap-anydpi-v26
│       │       │       ic_launcher.xml
│       │       │       ic_launcher_round.xml
│       │       │
│       │       ├───mipmap-hdpi
│       │       │       ic_launcher.webp
│       │       │       ic_launcher_round.webp
│       │       │
│       │       ├───mipmap-mdpi
│       │       │       ic_launcher.webp
│       │       │       ic_launcher_round.webp
│       │       │
│       │       ├───mipmap-xhdpi
│       │       │       ic_launcher.webp
│       │       │       ic_launcher_round.webp
│       │       │
│       │       ├───mipmap-xxhdpi
│       │       │       ic_launcher.webp
│       │       │       ic_launcher_round.webp
│       │       │
│       │       ├───mipmap-xxxhdpi
│       │       │       ic_launcher.webp
│       │       │       ic_launcher_round.webp
│       │       │
│       │       ├───values
│       │       │       colors.xml
│       │       │       strings.xml
│       │       │       themes.xml
│       │       │
│       │       └───values-night
│       │               themes.xml
│       │
│       └───test
│           └───java
│               └───com
│                   └───example
│                       └───helloworld
│                               ExampleUnitTest.java
│
└───gradle
    └───wrapper
            gradle-wrapper.jar
            gradle-wrapper.properties
在清单文件中的activity标签中添加android:label="名称"会修改标题栏中的名称
res下放一些资源文件
draw able中文为绘制,这个文件夹下经常放一些图片或者自定义的xml文件
layout下经常放一些布局文件
mipmap中文为小地图,例如图标就是放在这里的
values 里边有一个string.xml经常放一些文件,app中的文字可以在这里引用
AndroidManifest.xml,manifest中文为显现,读音为ˈmanəˌfest,程序中用到的一些activity都需要在这里声明
build.gradle,版本号在里边进行定义的、依赖再次引入
MainActivity.java为入口文件
package com.example.helloworld;

import androidx.appcompat.app.AppCompatActivity;

import android.os.Bundle;

public class MainActivity extends AppCompatActivity {

    @Override
    protected void onCreate(Bundle savedInstanceState) {
        super.onCreate(savedInstanceState);
        // 设置的视图
        setContentView(R.layout.activity_main);
    }
}
R.layout.activity_main就是指的是layout文件夹下的activity_main.xml
每个activity都需要在AndroidManifest.xml注册,打开这个文件,可以发现activity_main.xml中的.MainActivity在这个文件中注册了
R.id中的R代表Resource
Toast弹出消息

使用Toast类,toast中文为吐司,读音为tōst,这个类有一个公共的构造器,含有一个参数,可以被new出来,但构造器中的内容为throw new RuntimeException("Stub!");
在Toast类中,有一个静态方法(可以被看成工厂方法)makeText(this, 消息内容, 时间)
时间是一个整型的参数,在Toast类中,定义了两个常量
    public static final int LENGTH_LONG = 1;
    public static final int LENGTH_SHORT = 0;
这两个常量对应着时间,LENGTH_LONG代表弹出时间在3.5秒左右,LENGTH_SHORT代表弹出时间在2秒左右
这个方法可以控制弹出消息,该方法返回Toast类的一个实例,还需要调用这个实例的show()方法才能弹出消息
public void Head(View view) {
    Toast.makeText(this, "你好,世界", Toast.LENGTH_LONG).show();
}
在Android 11及更高版本不能设置Toast弹出消息居中
Toast也可以自定义弹出的内容,弹出的内容可以是一个layout
-
新建一个布局,布局中的组件为要弹出的内容
-
使用
LayoutInflater.from(context).inflate(R.layout.xxxx, null)加载布局并获取一个view,针对第二个参数为null而导致布局不正常的做法:- 在最外层的
layout中嵌套一个layout,为第二个layout设置长宽
- 在最外层的
-
创建一个
Toast实例,调用setView方法,将弹出的内容设置为view效果:此时青色背景框中的内容为弹出的内容
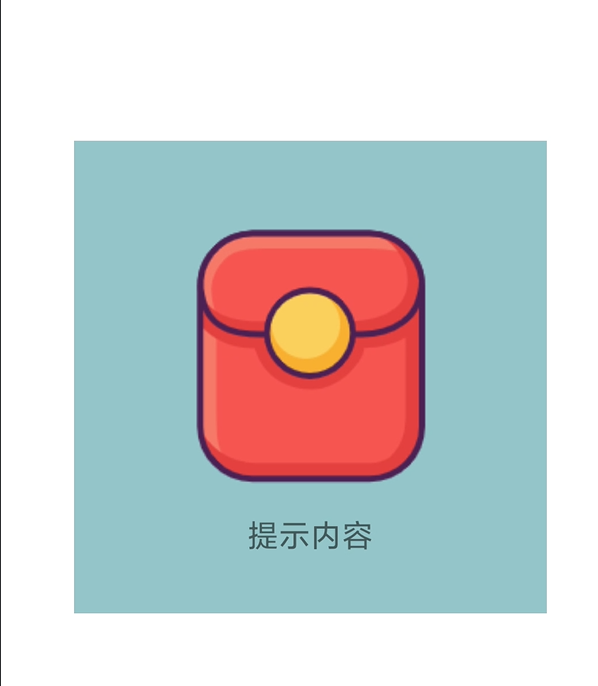
layout文件:
<?xml version="1.0" encoding="utf-8"?>
<LinearLayout xmlns:android="http://schemas.android.com/apk/res/android"
    xmlns:app="http://schemas.android.com/apk/res-auto"
    xmlns:tools="http://schemas.android.com/tools"
    android:layout_width="300dp"
    android:layout_height="300dp"
    android:background="#93C5C8"
    android:gravity="center"
    android:orientation="vertical"
    tools:context=".ToastLayout">

    <LinearLayout
        android:layout_width="300dp"
        android:layout_height="300dp"
        android:gravity="center"
        android:orientation="vertical">

        <ImageView
            android:layout_width="wrap_content"
            android:layout_height="wrap_content"
            android:src="@drawable/red_bag" />

        <TextView
            android:layout_width="wrap_content"
            android:layout_height="wrap_content"
            android:text="提示内容"
            android:textSize="20sp" />
    </LinearLayout>
</LinearLayout>
代码
//使弹出的内容为自定义的布局
View view = LayoutInflater.from(ToastActivity.this).
inflate(R.layout.activity_toast_layout, null);
Toast toast2 = new Toast(v.getContext());
toast2.setView(view);
toast2.setDuration(Toast.LENGTH_SHORT);
toast2.show();
线性布局 Linear Layout
常用属性
| 属性 | 含义 |
|---|---|
android:id | 布局本身是一个控件,通过这个找到这个布局 |
android:layout_margin | ˈmɑːrdʒɪn,边缘,外边距,可设置多个方向 |
android:layout_width | wɪdθ |
android:layout_padding | 填充,内边距,可设置多个方向 |
android:layout_height | |
android:background | |
android:orientation | ˌɔːriənˈteɪʃ,方向,有两个值,vertical垂直的,ˌhɔːrɪˈzɑːntl水平的,默认是水平的 |
android:gravity | ˈɡrævəti,中文为重力,作用是设置其内部元素的排列方式 |
android:weight | 设置权重,按照比例平分的占用当前布局 |
控件的属性值:
| 值 | 含义 |
|---|---|
wrap_content | ræp,中文为包,包含内容,内容宽度时多少,这个控件的宽度就是多少 |
match_parent | 匹配父控件,取决于父控件的宽度 |
通常设置空间的长宽时,一般使用dp作为单位(dpi),这样会根据设备屏幕的dpi自动适配 当然也可以使用px,字体一般使用sp作为大小
布局可以嵌套布局
权重
    <LinearLayout
        android:layout_width="match_parent"
        android:layout_height="300dp"
        android:layout_marginTop="20dp"
        android:background="#847843">

        <LinearLayout
            android:layout_width="0dp"
            android:layout_height="match_parent"
            android:layout_weight="1"
            android:background="@color/purple_200" />

        <LinearLayout
            android:layout_width="0dp"
            android:layout_height="match_parent"
            android:layout_weight="1"
            android:background="#FF9987"
            android:orientation="horizontal" />
    </LinearLayout>
此时效果为
相对布局 Relative Layout
常用属性,也具有id、高度、宽度、外边距、内边距
| 属性 | 含义 |
|---|---|
android:layout_toLeftOf | 在谁的左边 |
android:layout_toRightOf | 在谁的右边 |
android:layout_alignBotton | 跟谁底部对齐 |
android:layout_alignParentBotton | 跟父控件底部对齐 |
android:layout_below | 中文为以下,在谁的下边 |
android:layout_ | |
android:layout_ | |
android:layout_ | |
android:layout_ |
相对布局的值一般为其他控件的id,也就是以id控件作为参考
Constraint Layout 约束布局
相当于相对布局的改进版本的布局方式
新添加的组件如果不添加约束,无法将其放在想要在的位置
添加新组件后,点击infer constrains后,会自动的为其添加约束,此时所在的位置就是想要的位置
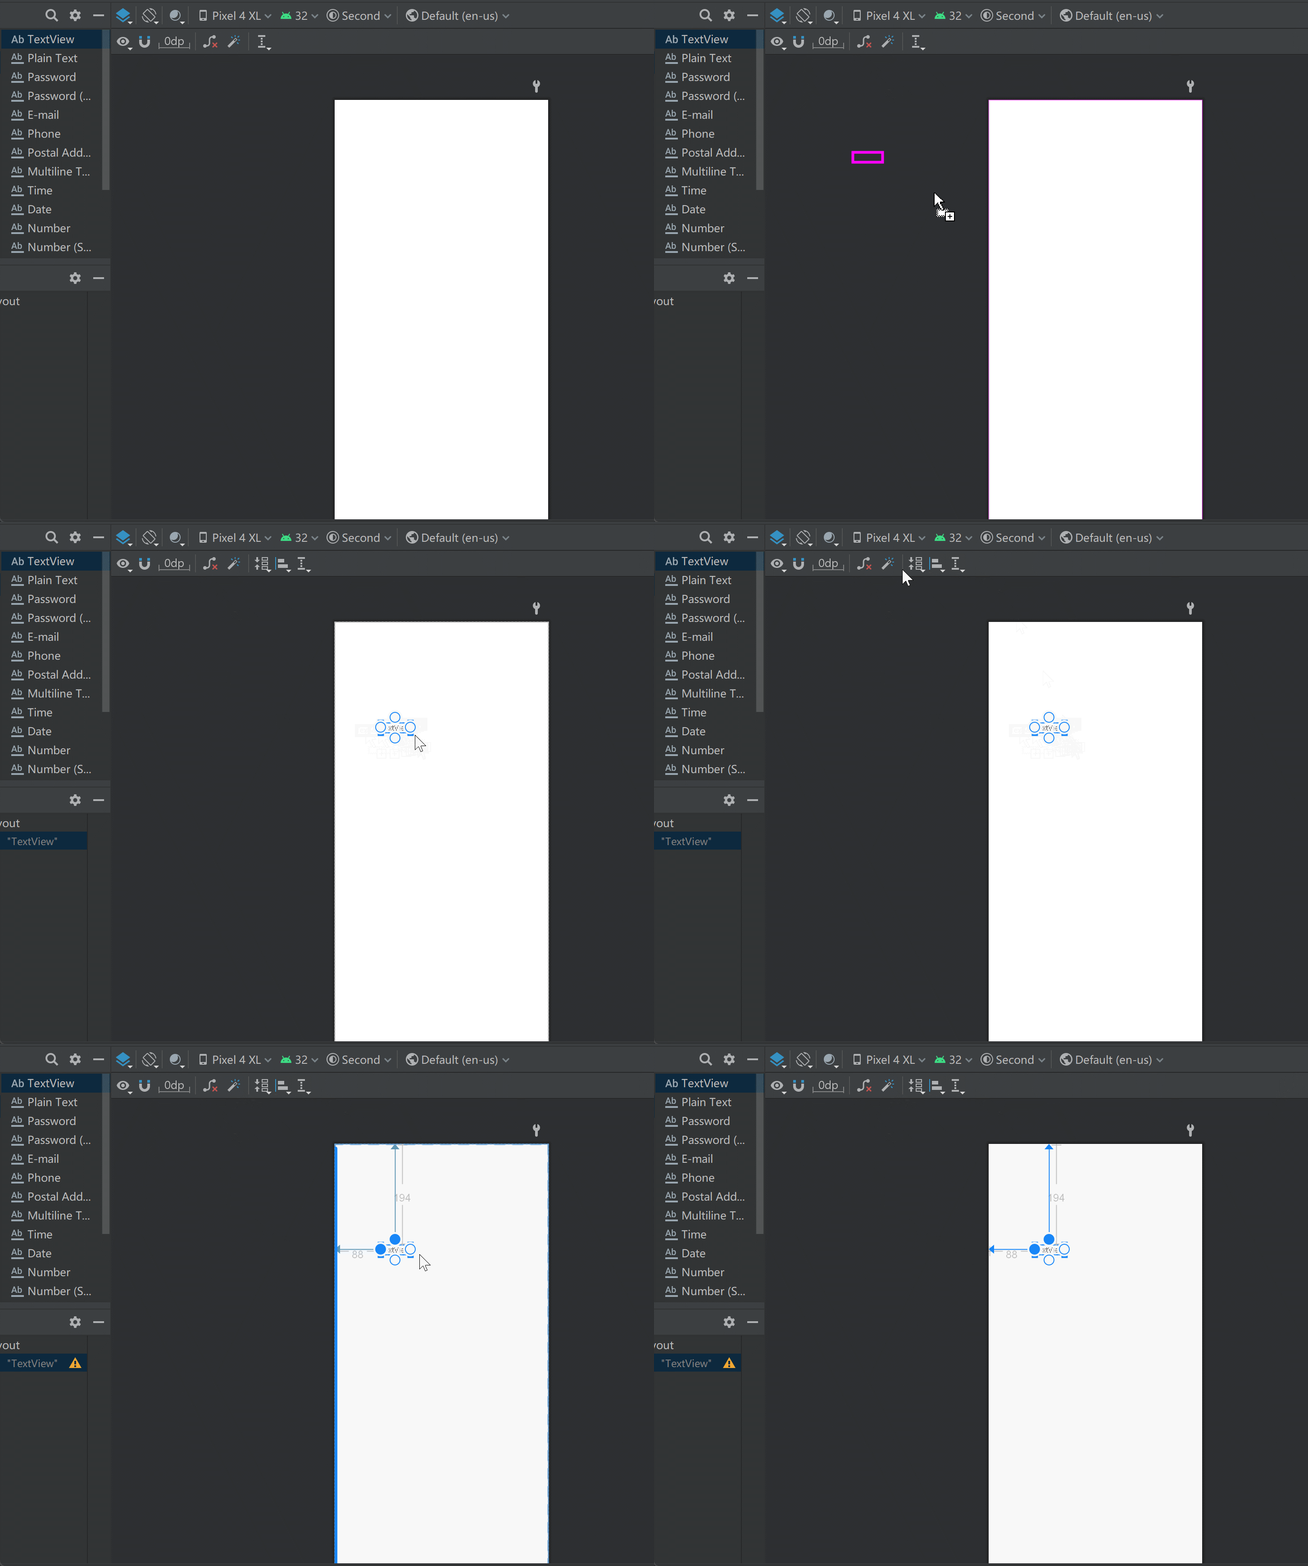
如果继续拖动,那么此时也会按照现在的位置
hint属性代表隐藏的提示内容
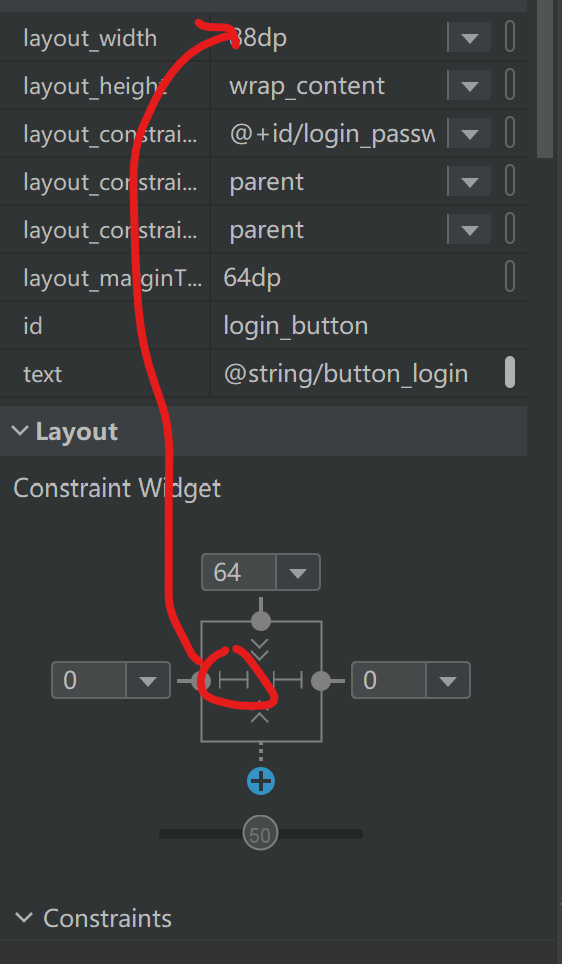
点击这个位置会变成实线,此时代表变成绝对的宽度
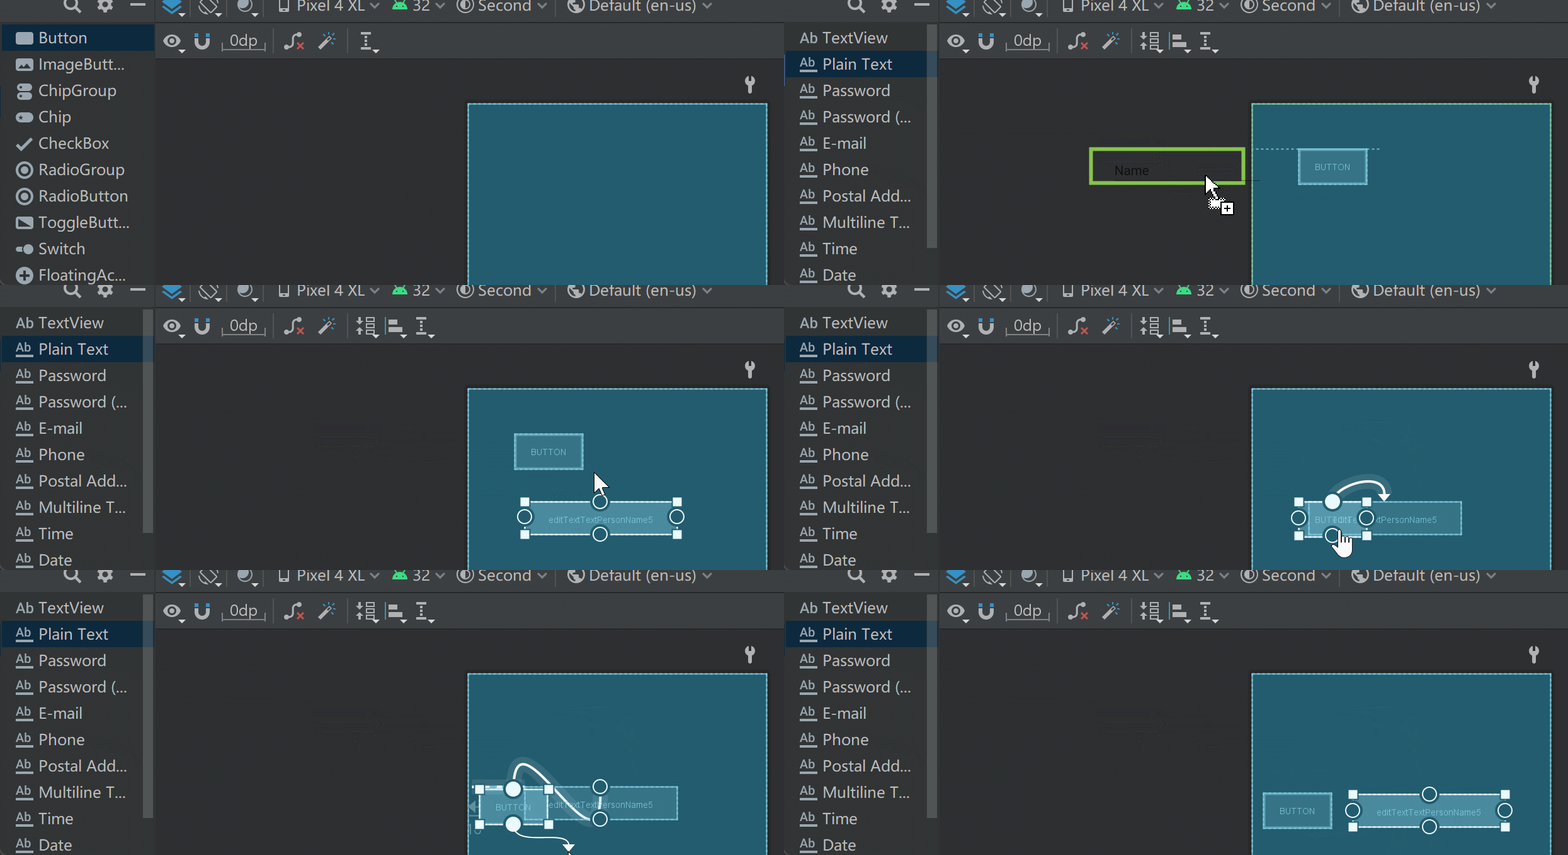
对齐
将一个组件的上顶点对齐另一个组件的上顶点,下顶点对齐下顶点
基线对齐
右键显示基线,在基线上拖出一条线放到另一个组件的中心
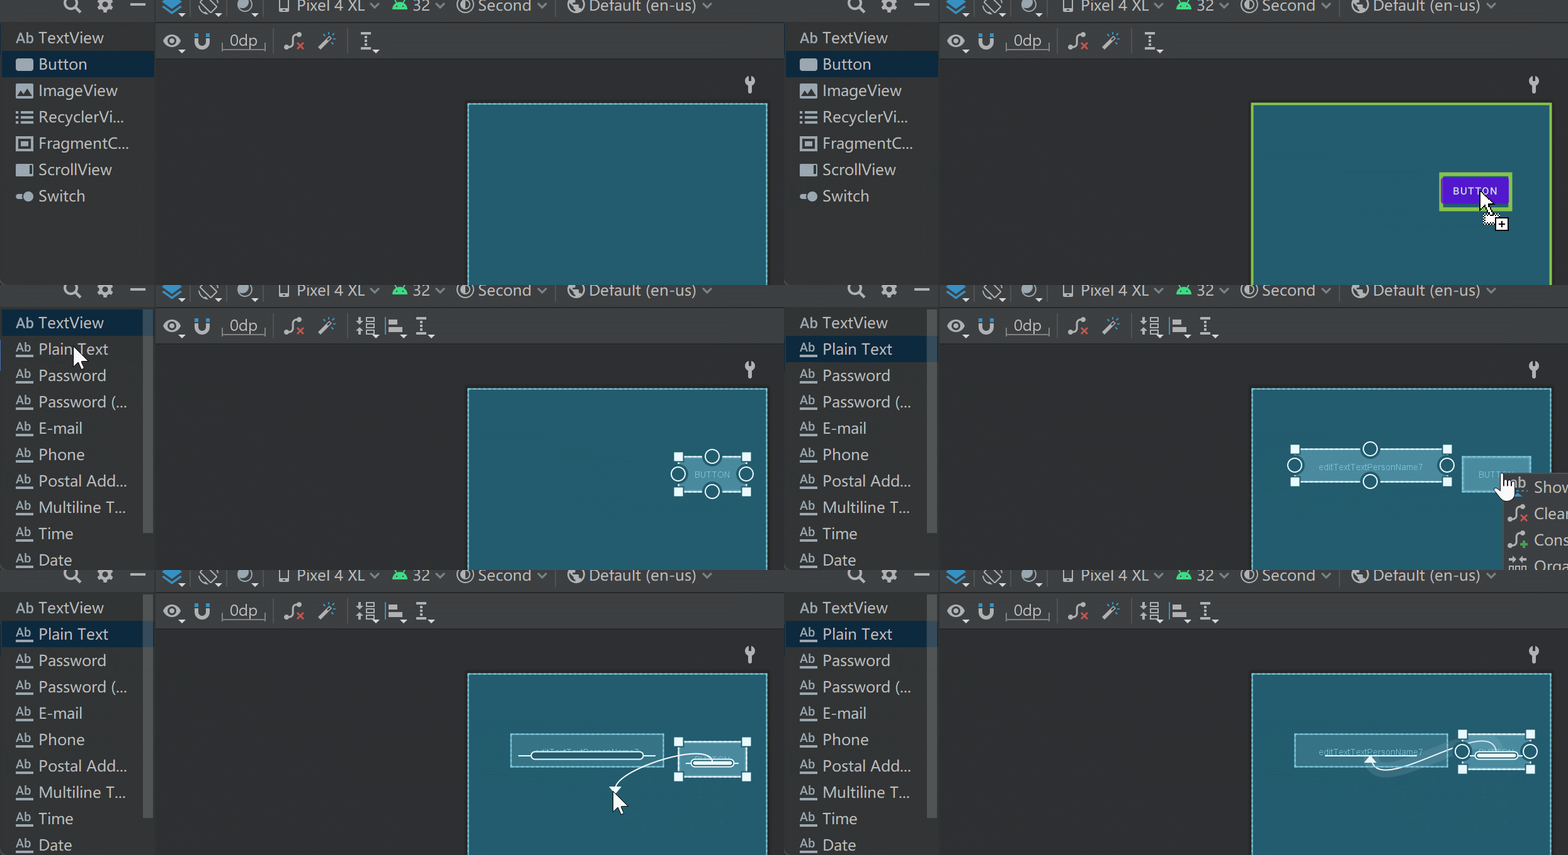
此时会以文字的底端对齐
可见
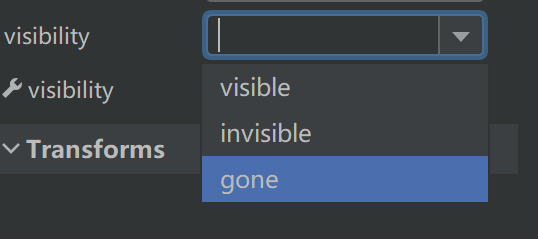
visibility:
- visible 可见
- invisible 不可见
- gone 不可见,此时不占据位置
辅助线
可以添加辅助线
添加辅助线之后,在设备上是不可见的,但新添加的组件四个点可以和辅助线对齐
当移动辅助线时,所有和辅助线关联的组件都会移动
也可以切换显示模式
Barrier 屏障
可以跟着组件走,需要把组件放到barrier中,读音为berēər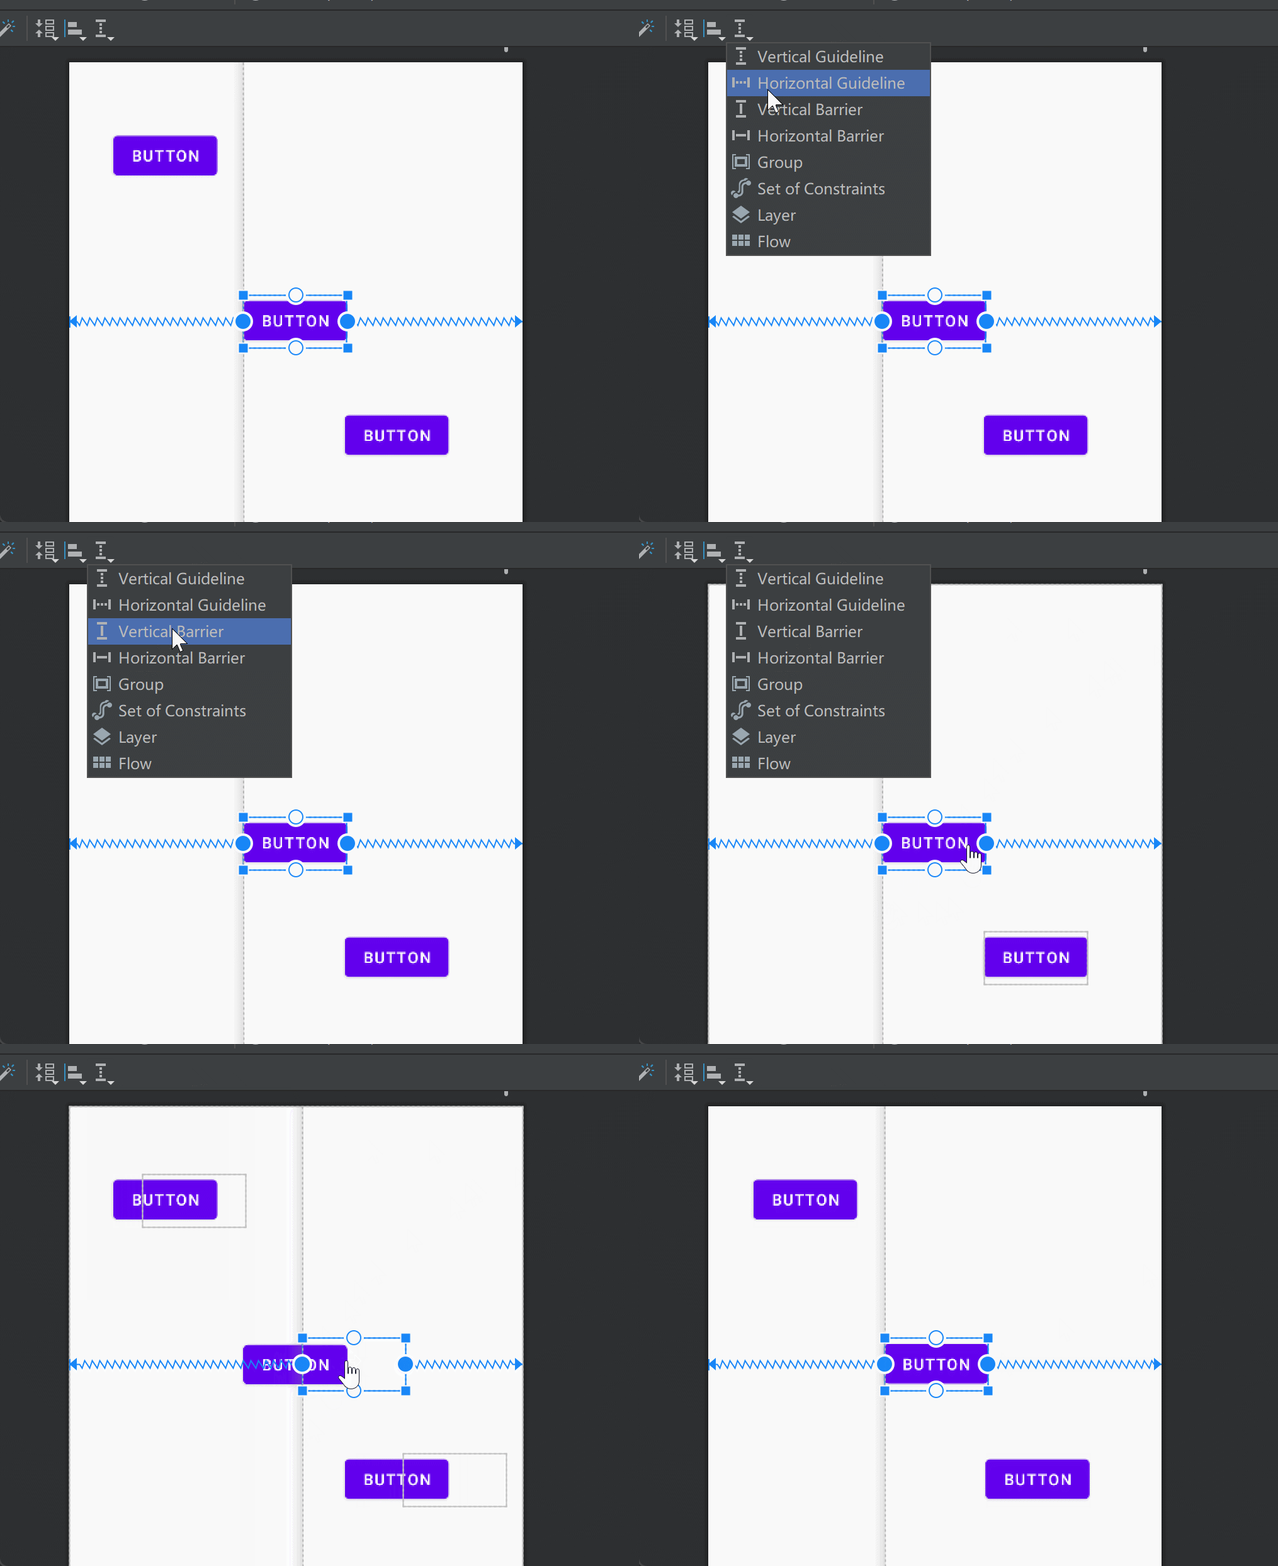
Group
可以将组件放到里边,对group应用的属性也会对其中的组件生效
组件
综合
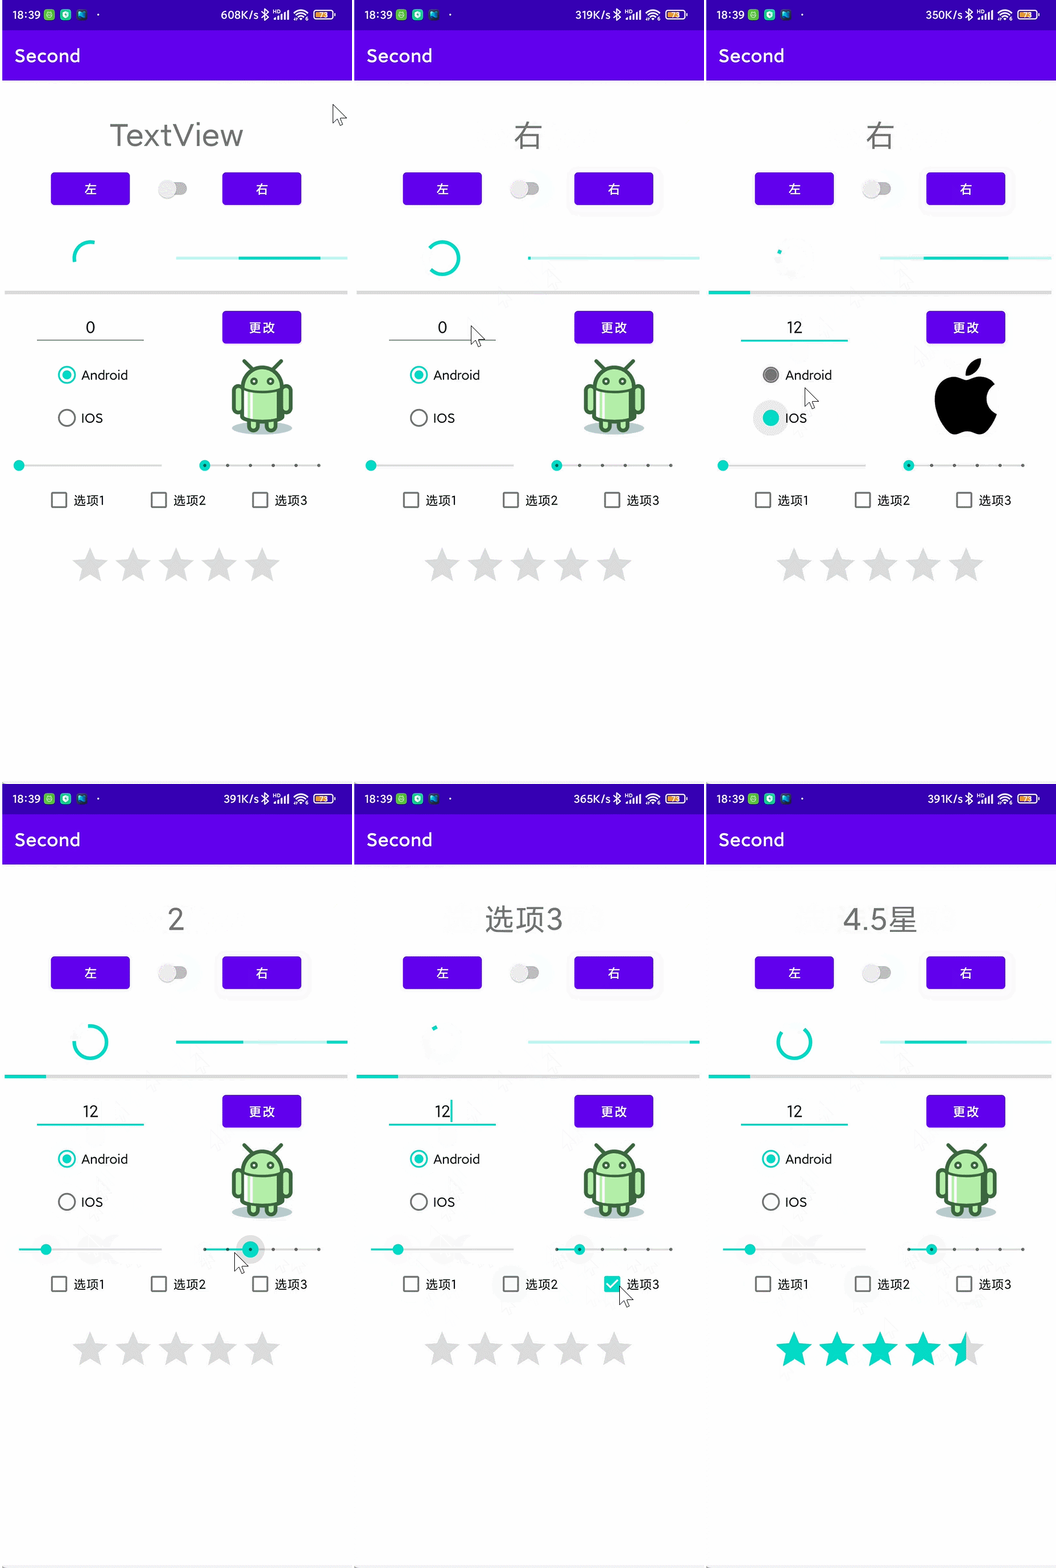
package com.xiaoxu.second;

import androidx.appcompat.app.AppCompatActivity;
import android.os.Bundle;
import android.text.TextUtils;
import android.view.View;
import android.widget.Button;
import android.widget.CheckBox;
import android.widget.CompoundButton;
import android.widget.EditText;
import android.widget.ImageView;
import android.widget.ProgressBar;
import android.widget.RadioGroup;
import android.widget.RatingBar;
import android.widget.SeekBar;
import android.widget.Switch;
import android.widget.TextView;
import android.widget.Toast;

import java.util.Map;
import java.util.TreeMap;

public class MainActivity extends AppCompatActivity {

    private Button left, right, change;
    private TextView text;
    private EditText textNum;
    private RadioGroup radioGroup;
    private ImageView system;
    private SeekBar seekBar1, seekBar2;
    private CheckBox box1, box2, box3;
    private RatingBar ratingBar;
    private Switch aSwitch;
    Map<String, Boolean> map = new TreeMap<String, Boolean>(){
        {
            put("选项1", false);
            put("选项2", false);
            put("选项3", false);
        }
    };
    // 水平滚动条
    ProgressBar progressBar1;

    public void bind(){
        left = findViewById(R.id.left);
        right = findViewById(R.id.right);
        change = findViewById(R.id.change);
        text = findViewById(R.id.info);
        radioGroup = findViewById(R.id.radio_group_select);
        system = findViewById(R.id.imageView);
        seekBar1 = findViewById(R.id.bar1);
        seekBar2 = findViewById(R.id.bar2);
        box1 = findViewById(R.id.check1);
        box2 = findViewById(R.id.check2);
        box3 = findViewById(R.id.check3);
        //打星
        ratingBar = findViewById(R.id.ratingBar);
        aSwitch = findViewById(R.id.switch1);
        textNum = findViewById(R.id.numEdit);
        textNum.setText("0");
        progressBar1 = findViewById(R.id.progressBar3);
    }
    @Override
    protected void onCreate(Bundle savedInstanceState) {
        super.onCreate(savedInstanceState);
        setContentView(R.layout.activity_main);
        bind();
        left.setOnClickListener(new View.OnClickListener() {
            @Override
            public void onClick(View view) {
                text.setText("左");
            }
        });
        right.setOnClickListener(new View.OnClickListener() {
            @Override
            public void onClick(View view) {
                text.setText("右");
            }
        });
        change.setOnClickListener(new View.OnClickListener() {
            @Override
            public void onClick(View view) {
                String s = textNum.getText().toString();
                // 判断s是否为空
                if (TextUtils.isEmpty(s)){
                    s = "0";
                }
                progressBar1.setProgress(Integer.parseInt(s), true);

            }
        });
//        给开关添加事件
        aSwitch.setOnCheckedChangeListener(new CompoundButton.OnCheckedChangeListener() {
            @Override
            public void onCheckedChanged(CompoundButton compoundButton, boolean b) {
                text.setText(b ? "开" : "关");
            }
        });
        radioGroup.setOnCheckedChangeListener(new RadioGroup.OnCheckedChangeListener() {
            @Override
            public void onCheckedChanged(RadioGroup group, int checkedId) {
                if (checkedId == R.id.android){
                    system.setImageResource(R.drawable.android);
                }else{
                    system.setImageResource(R.drawable.iphone_os);
                }
            }
        });
        seekBar1.setOnSeekBarChangeListener(new SeekBar.OnSeekBarChangeListener() {
            @Override
//            当滑动的值改变时,改变后的值是i
            public void onProgressChanged(SeekBar seekBar, int progress, boolean fromUser) {
                text.setText(String.valueOf(progress));
            }

            @Override
            public void onStartTrackingTouch(SeekBar seekBar) {

            }

            @Override
            public void onStopTrackingTouch(SeekBar seekBar) {

            }
        });
        seekBar2.setOnSeekBarChangeListener(new SeekBar.OnSeekBarChangeListener() {
            @Override
            public void onProgressChanged(SeekBar seekBar, int progress, boolean fromUser) {
                text.setText(String.valueOf(progress));
            }

            @Override
            public void onStartTrackingTouch(SeekBar seekBar) {

            }

            @Override
            public void onStopTrackingTouch(SeekBar seekBar) {

            }
        });
        CompoundButton.OnCheckedChangeListener onCheckedChangeListener = new CompoundButton.OnCheckedChangeListener() {
            @Override
            public void onCheckedChanged(CompoundButton buttonView, boolean isChecked) {
                map.put(buttonView.getText().toString(), isChecked);
                String s = "";
                for (Map.Entry<String, Boolean> m : map.entrySet()) {
                    if (m.getValue()){
                        s += m.getKey() + " ";
                    }
                }
                text.setText(s);
            }
        };
        box1.setOnCheckedChangeListener(onCheckedChangeListener);
        box2.setOnCheckedChangeListener(onCheckedChangeListener);
        box3.setOnCheckedChangeListener(onCheckedChangeListener);
        // 获取是几颗星
        ratingBar.setOnRatingBarChangeListener(new RatingBar.OnRatingBarChangeListener() {
            @Override
            public void onRatingChanged(RatingBar ratingBar, float rating, boolean fromUser) {
                text.setText(rating + "星");
            }
        });
    }
}
<?xml version="1.0" encoding="utf-8"?>
<androidx.constraintlayout.widget.ConstraintLayout xmlns:android="http://schemas.android.com/apk/res/android"
    xmlns:app="http://schemas.android.com/apk/res-auto"
    xmlns:tools="http://schemas.android.com/tools"
    android:layout_width="match_parent"
    android:layout_height="match_parent"
    android:layout_margin="5dp"
    tools:context=".MainActivity">

    <androidx.constraintlayout.widget.Guideline
        android:id="@+id/guideline5"
        android:layout_width="wrap_content"
        android:layout_height="wrap_content"
        android:orientation="vertical"
        app:layout_constraintGuide_percent="0.5" />

    <TextView
        android:id="@+id/info"
        android:layout_width="wrap_content"
        android:layout_height="wrap_content"
        android:layout_marginTop="32dp"
        android:text="TextView"
        android:textAlignment="center"
        android:textSize="34sp"
        app:layout_constraintEnd_toEndOf="parent"
        app:layout_constraintStart_toStartOf="parent"
        app:layout_constraintTop_toTopOf="parent" />

    <Button
        android:id="@+id/left"
        android:layout_width="wrap_content"
        android:layout_height="wrap_content"
        android:text="左"
        app:layout_constraintBottom_toTopOf="@+id/guideline7"
        app:layout_constraintEnd_toStartOf="@+id/guideline5"
        app:layout_constraintStart_toStartOf="parent"
        app:layout_constraintTop_toTopOf="@+id/guideline7" />

    <Button
        android:id="@+id/right"
        android:layout_width="wrap_content"
        android:layout_height="wrap_content"
        android:text="右"
        app:layout_constraintBaseline_toBaselineOf="@+id/left"
        app:layout_constraintEnd_toEndOf="parent"
        app:layout_constraintStart_toStartOf="@+id/guideline5" />

    <androidx.constraintlayout.widget.Guideline
        android:id="@+id/guideline7"
        android:layout_width="wrap_content"
        android:layout_height="wrap_content"
        android:orientation="horizontal"
        app:layout_constraintGuide_percent="0.15" />

    <Switch
        android:id="@+id/switch1"
        android:layout_width="wrap_content"
        android:layout_height="wrap_content"
        app:layout_constraintBottom_toTopOf="@+id/guideline7"
        app:layout_constraintEnd_toStartOf="@+id/right"
        app:layout_constraintStart_toEndOf="@+id/left"
        app:layout_constraintTop_toTopOf="@+id/guideline7" />

    <androidx.constraintlayout.widget.Guideline
        android:id="@+id/guideline9"
        android:layout_width="wrap_content"
        android:layout_height="wrap_content"
        android:orientation="horizontal"
        app:layout_constraintGuide_percent="0.25" />

    <ProgressBar
        android:id="@+id/progressBar1"
        style="?android:attr/progressBarStyle"
        android:layout_width="wrap_content"
        android:layout_height="wrap_content"
        android:max="100"
        app:layout_constraintBottom_toTopOf="@+id/guideline9"
        app:layout_constraintEnd_toStartOf="@+id/guideline5"
        app:layout_constraintStart_toStartOf="parent"
        app:layout_constraintTop_toTopOf="@+id/guideline9" />

    <ProgressBar
        android:id="@+id/progressBar2"
        style="?android:attr/progressBarStyleHorizontal"
        android:layout_width="0dp"
        android:layout_height="wrap_content"
        android:indeterminate="true"
        app:layout_constraintBottom_toTopOf="@+id/guideline9"
        app:layout_constraintEnd_toEndOf="parent"
        app:layout_constraintStart_toStartOf="@+id/guideline5"
        app:layout_constraintTop_toTopOf="@+id/guideline9" />

    <androidx.constraintlayout.widget.Guideline
        android:id="@+id/guideline10"
        android:layout_width="wrap_content"
        android:layout_height="wrap_content"
        android:orientation="horizontal"
        app:layout_constraintGuide_percent="0.3" />

    <ProgressBar
        android:id="@+id/progressBar3"
        style="?android:attr/progressBarStyleHorizontal"
        android:layout_width="0dp"
        android:layout_height="wrap_content"
        android:max="100"
        app:layout_constraintBottom_toTopOf="@+id/guideline10"
        app:layout_constraintEnd_toEndOf="parent"
        app:layout_constraintStart_toStartOf="parent"
        app:layout_constraintTop_toTopOf="@+id/guideline10" />

    <androidx.constraintlayout.widget.Guideline
        android:id="@+id/更改"
        android:layout_width="wrap_content"
        android:layout_height="wrap_content"
        android:orientation="horizontal"
        app:layout_constraintGuide_percent="0.35" />

    <EditText
        android:id="@+id/numEdit"
        android:layout_width="0dp"
        android:layout_height="wrap_content"
        android:layout_marginStart="32dp"
        android:layout_marginEnd="32dp"
        android:ems="10"
        android:hint="输入进度"
        android:inputType="number"
        android:textAlignment="center"
        app:layout_constraintBottom_toTopOf="@+id/更改"
        app:layout_constraintEnd_toStartOf="@+id/guideline5"
        app:layout_constraintStart_toStartOf="parent"
        app:layout_constraintTop_toTopOf="@+id/更改" />

    <Button
        android:id="@+id/change"
        android:layout_width="wrap_content"
        android:layout_height="wrap_content"
        android:layout_marginTop="8dp"
        android:text="更改"
        app:layout_constraintBottom_toTopOf="@+id/更改"
        app:layout_constraintEnd_toEndOf="parent"
        app:layout_constraintStart_toStartOf="@+id/guideline5"
        app:layout_constraintTop_toTopOf="@+id/更改" />

    <androidx.constraintlayout.widget.Guideline
        android:id="@+id/guideline12"
        android:layout_width="wrap_content"
        android:layout_height="wrap_content"
        android:orientation="horizontal"
        app:layout_constraintGuide_percent="0.45" />

    <RadioGroup
        android:id="@+id/radio_group_select"
        android:layout_width="wrap_content"
        android:layout_height="wrap_content"
        app:layout_constraintBottom_toTopOf="@+id/guideline12"
        app:layout_constraintEnd_toStartOf="@+id/guideline5"
        app:layout_constraintStart_toStartOf="parent"
        app:layout_constraintTop_toTopOf="@+id/guideline12">

        <RadioButton
            android:id="@+id/android"
            android:layout_width="match_parent"
            android:layout_height="wrap_content"
            android:checked="true"
            android:text="Android" />

        <RadioButton
            android:id="@+id/ios"
            android:layout_width="match_parent"
            android:layout_height="wrap_content"
            android:text="IOS" />
    </RadioGroup>

    <ImageView
        android:id="@+id/imageView"
        android:layout_width="0dp"
        android:layout_height="90dp"
        app:layout_constraintBottom_toTopOf="@+id/guideline12"
        app:layout_constraintDimensionRatio="w,1:1"
        app:layout_constraintEnd_toEndOf="parent"
        app:layout_constraintStart_toStartOf="@+id/guideline5"
        app:layout_constraintTop_toTopOf="@+id/guideline12"
        app:srcCompat="@drawable/android" />

    <androidx.constraintlayout.widget.Guideline
        android:id="@+id/guideline13"
        android:layout_width="0dp"
        android:layout_height="wrap_content"
        android:layout_marginStart="16dp"
        android:layout_marginEnd="16dp"
        android:orientation="horizontal"
        app:layout_constraintEnd_toEndOf="parent"
        app:layout_constraintGuide_percent="0.55"
        app:layout_constraintStart_toStartOf="parent" />

    <SeekBar
        android:id="@+id/bar1"
        android:layout_width="0dp"
        android:layout_height="wrap_content"
        app:layout_constraintBottom_toTopOf="@+id/guideline13"
        app:layout_constraintEnd_toStartOf="@+id/guideline5"
        app:layout_constraintStart_toStartOf="parent"
        app:layout_constraintTop_toTopOf="@+id/guideline13" />

    <SeekBar
        android:id="@+id/bar2"
        style="@style/Widget.AppCompat.SeekBar.Discrete"
        android:layout_width="0dp"
        android:layout_height="wrap_content"
        android:layout_marginStart="16dp"
        android:layout_marginEnd="16dp"
        android:max="5"
        android:progress="0"
        app:layout_constraintBottom_toTopOf="@+id/guideline13"
        app:layout_constraintEnd_toEndOf="parent"
        app:layout_constraintStart_toStartOf="@+id/guideline5"
        app:layout_constraintTop_toTopOf="@+id/guideline13" />

    <androidx.constraintlayout.widget.Guideline
        android:id="@+id/guideline14"
        android:layout_width="wrap_content"
        android:layout_height="wrap_content"
        android:orientation="horizontal"
        app:layout_constraintGuide_percent="0.6" />

    <CheckBox
        android:id="@+id/check1"
        android:layout_width="wrap_content"
        android:layout_height="wrap_content"
        android:text="选项1"
        app:layout_constraintBottom_toTopOf="@+id/guideline14"
        app:layout_constraintEnd_toStartOf="@+id/check2"
        app:layout_constraintHorizontal_bias="0.5"
        app:layout_constraintStart_toStartOf="parent"
        app:layout_constraintTop_toTopOf="@+id/guideline14" />

    <CheckBox
        android:id="@+id/check2"
        android:layout_width="wrap_content"
        android:layout_height="wrap_content"
        android:text="选项2"
        app:layout_constraintBottom_toBottomOf="@+id/check1"
        app:layout_constraintEnd_toStartOf="@+id/check3"
        app:layout_constraintHorizontal_bias="0.5"
        app:layout_constraintStart_toEndOf="@+id/check1"
        app:layout_constraintTop_toTopOf="@+id/check1" />

    <CheckBox
        android:id="@+id/check3"
        android:layout_width="wrap_content"
        android:layout_height="wrap_content"
        android:text="选项3"
        app:layout_constraintBottom_toBottomOf="@+id/check2"
        app:layout_constraintEnd_toEndOf="parent"
        app:layout_constraintHorizontal_bias="0.5"
        app:layout_constraintStart_toEndOf="@+id/check2"
        app:layout_constraintTop_toTopOf="@+id/check2" />

    <androidx.constraintlayout.widget.Guideline
        android:id="@+id/guideline15"
        android:layout_width="wrap_content"
        android:layout_height="wrap_content"
        android:orientation="horizontal"
        app:layout_constraintGuide_percent="0.7" />

    <RatingBar
        android:id="@+id/ratingBar"
        android:layout_width="wrap_content"
        android:layout_height="wrap_content"
        app:layout_constraintBottom_toTopOf="@+id/guideline15"
        app:layout_constraintEnd_toEndOf="parent"
        app:layout_constraintStart_toStartOf="parent"
        app:layout_constraintTop_toTopOf="@+id/guideline15" />


</androidx.constraintlayout.widget.ConstraintLayout>
TextView
设置行数android:maxLines="1"
设置显示不开时使用...代替android:ellipsize="end"
文字+图片,将图片放入到draw able文件夹内,使用android:drawableEnd="@drawable/图片名"为文字在末尾添加图片
设置文字下划线、删除线
package com.example.layout;

import androidx.appcompat.app.AppCompatActivity;

import android.graphics.Paint;
import android.graphics.drawable.Drawable;
import android.os.Bundle;
import android.widget.TextView;

public class second extends AppCompatActivity {

    TextView deleteLine, underLine;
    @Override
    protected void onCreate(Bundle savedInstanceState) {
        super.onCreate(savedInstanceState);
        setContentView(R.layout.second);
        deleteLine = findViewById(R.id.deleteLine);
        underLine = findViewById(R.id.underLine);
        deleteLine.setPaintFlags(Paint.STRIKE_THRU_TEXT_FLAG);
        underLine.setPaintFlags(Paint.UNDERLINE_TEXT_FLAG);
    }
}
Button
是TextView的子类
将外观改为圆角:
-
在drawable文件夹下新建一个
draw able 资源文件 -
Root element填
shape -
在新建的文件中,填入
-
<?xml version="1.0" encoding="utf-8"?>
<shape xmlns:android="http://schemas.android.com/apk/res/android"
    android:shape="rectangle">
    <solid android:color="#88EACF21">
    </solid>
    <corners android:radius="大小"></corners>

</shape>
-
-
在布局文件中,将
android::background的值修改为当前文件 -
最终效果

描边空心带圆角的按钮:
-
步骤和上一个样式一致,但
XML不同 -
<?xml version="1.0" encoding="utf-8"?> <shape xmlns:android="http://schemas.android.com/apk/res/android" android:shape="rectangle"> <stroke android:color="#834455" android:width="3dp"> </stroke> <corners android:radius="50dp"></corners> </shape> -
效果为

按压效果
可以通过XML进行控制
-
还是在
draw able文件夹下新建一个资源文件 -
Root element填写为selector -
XML内容为-
<?xml version="1.0" encoding="utf-8"?>
<selector xmlns:android="http://schemas.android.com/apk/res/android">
<!--    被按下-->
    <item android:state_pressed="true">
        <shape>
            <solid android:color="#A4FF7B" />
            <corners android:radius="100dp"/>
        </shape>
    </item>
<!--    没有被按下-->
    <item android:state_pressed="false">
        <shape>
            <solid android:color="#338A0B" />
            <corners android:radius="100dp"/>
        </shape>
    </item>
</selector>
-
-
按压前深绿色,按压时绿色
-
依旧将按钮的背景颜色属性更改为
xml当前的配置文件
Edit Text
同样是TextView的一个子类
在按钮上添加android:textAllCaps="false"属性后,英文才能够显示出自定义的大小写的形式
编辑框的灰色提示
android:hint="账号"
效果
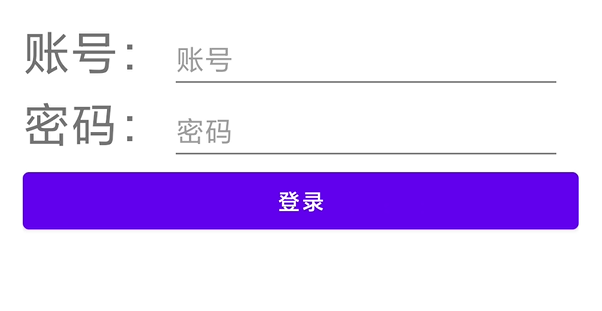
hint中文为暗示
输入内容为密码:
android:inputType="textPassword"
圆角的样式设置和前边按钮的设置方式一致
也可以插入图片,关于图片可以设置drawable-padding等属性调整间距
可以为文本框添加内容改变的监听事件
添加内容改变监听:可以实现自动保存、检查内容是否正确
phoneNumber.addTextChangedListener(new TextWatcher() {
    @Override
    public void beforeTextChanged(CharSequence charSequence, int i, int i1, int i2) {
        tip.setText("输入用户名");
    }

    @Override
    public void onTextChanged(CharSequence charSequence, int i, int i1, int i2) {
        if (charSequence.toString().length() < 6){
            tip.setText("长度小于6位");
        }
    }

    @Override
    public void afterTextChanged(Editable editable) {
        if (editable.toString().length() >= 6) {
            tip.setText("合格");
        }
    }
});
Radio Button
单选按钮
如果有多个单选按钮,需要将其放到一个组中,即一个<RadioGroup></RadioGroup>中,组中的组件排列是有方向的,可以设置垂直或者水平排列
可以设置某个按钮是默认选中的,只需要在需要默认选中的按钮上添加:
android:checked="true"
可以去掉默认的样式,去掉后的效果:
android:button="@null"
去掉默认样式后,可以自行写一个样式
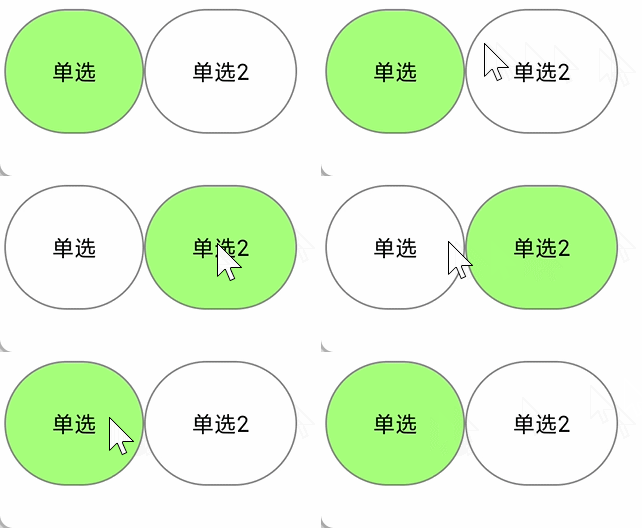
上图样式:
-
在
drawable下新建一个资源文件,root element为selector -
填写以下内容:
-
<?xml version="1.0" encoding="utf-8"?>
<selector xmlns:android="http://schemas.android.com/apk/res/android">
    <item android:state_checked="true">
        <shape>
            <solid android:color="#A4FF7B" />
            <corners android:radius="100dp" />
            <stroke android:width="1dp" android:color="#888888" />
        </shape>
    </item>
    <item android:state_checked="false">
        <shape>
            <solid android:color="#FFFFFF" />
            <corners android:radius="100dp" />
            <stroke android:width="1dp" android:color="#888888" />
        </shape>
    </item>
</selector>
-
获取选中的单选按钮
radioGroup.setOnCheckedChangeListener(new RadioGroup.OnCheckedChangeListener() {
    @Override
    public void onCheckedChanged(RadioGroup radioGroup, int i) {
        RadioButton radioButton = findViewById(i);
        Toast.makeText(RadioButtonActivity.this, "你选中了" + radioButton.getText(), Toast.LENGTH_SHORT).show();
    }
});
如果编程语言使用的时kotlin,那么无需调用findViewById(id)来查找某个组件,因为kotlin会自动的将组件作为一个属性写到一个类中
Check Box
多选框,检查选中状态:
    checkBox1.setOnCheckedChangeListener(new CompoundButton.OnCheckedChangeListener() {
        @Override
        public void onCheckedChanged(CompoundButton compoundButton, boolean b) {
            Toast.makeText(CheckBoxActivity.this, "ch1被改变,是否已选中:" + b, Toast.LENGTH_SHORT).show();
        }
    });
}
Image View
android:src=""属性可以指定图片的路径
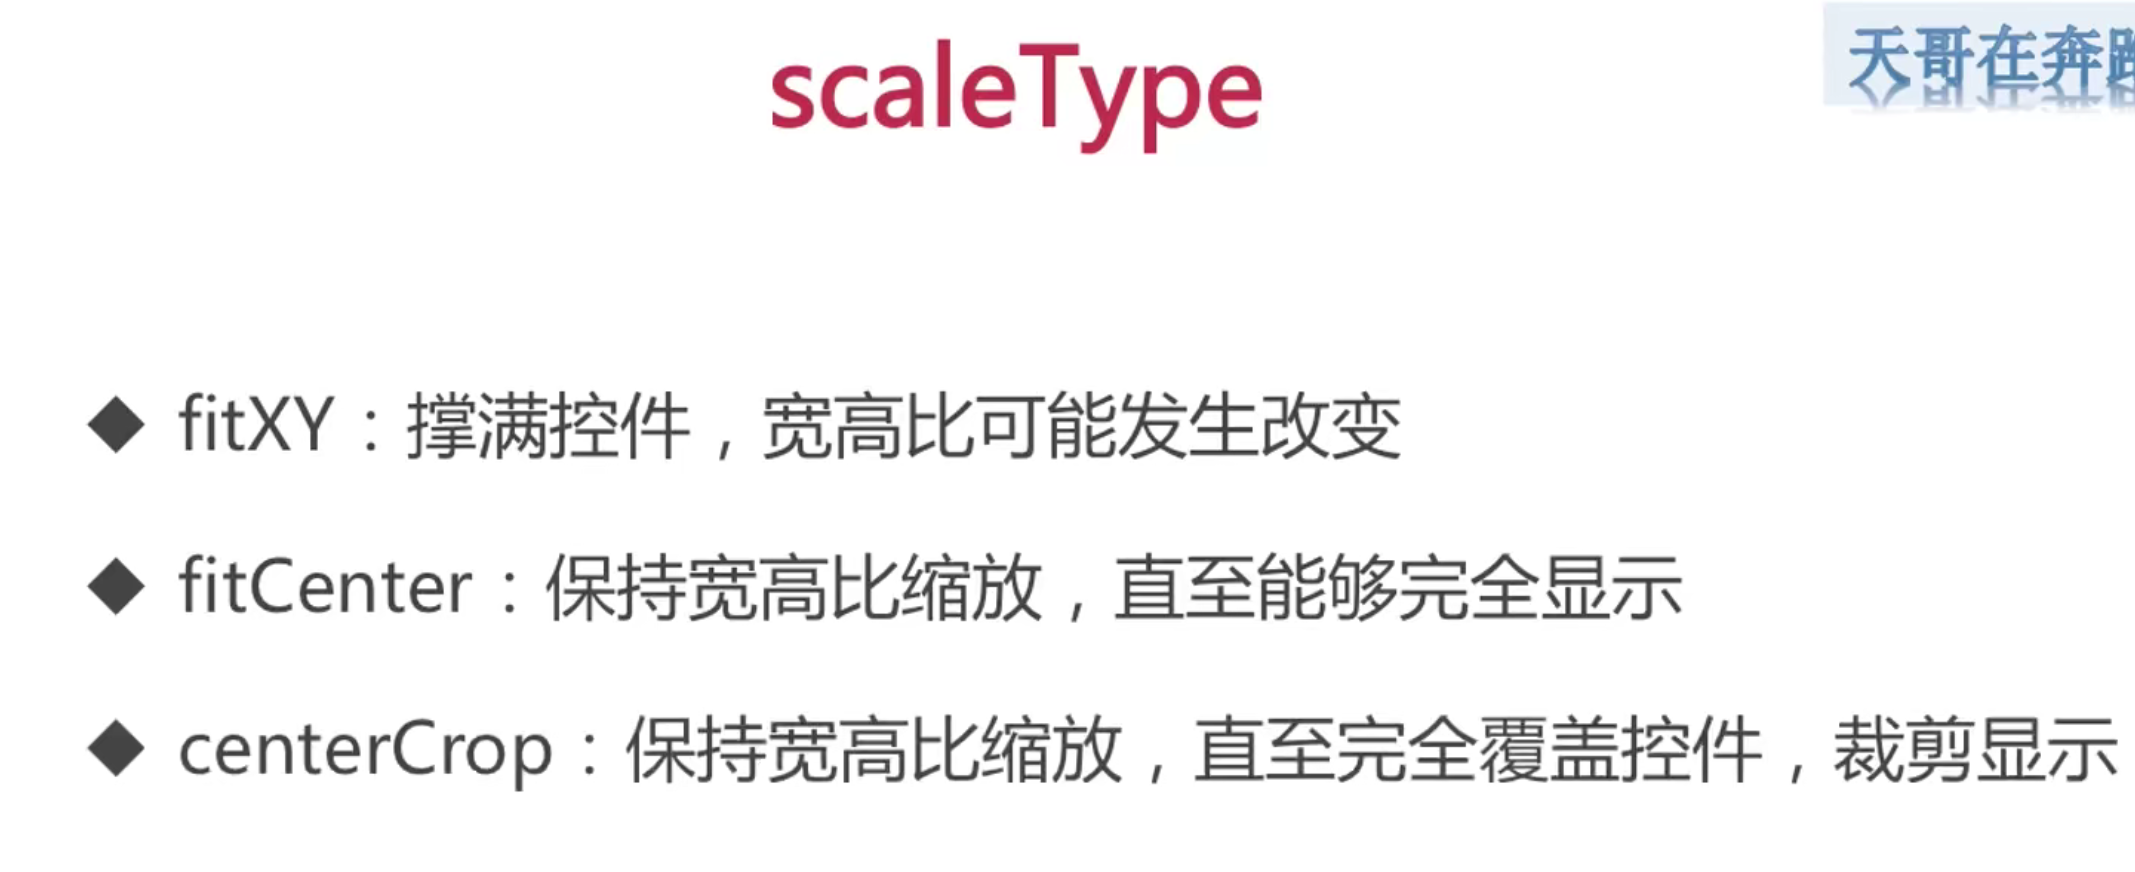
可以使用glide库进行处理图片,如果图片不是https协议的,可能会加载失败
-
引入
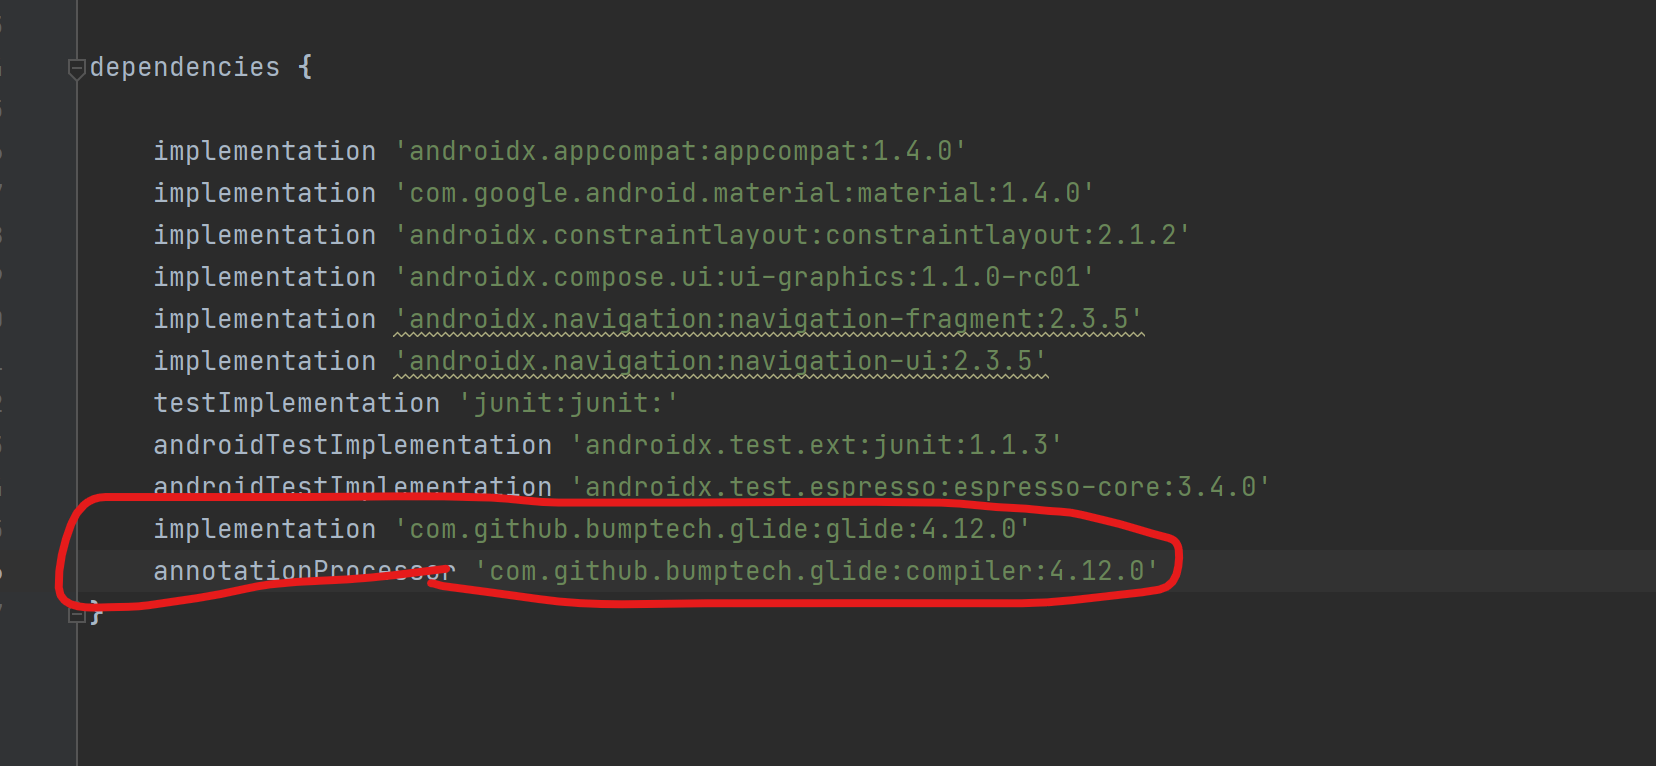
-
在
AndroidManifest.xml中申请联网权限,即在<manifes></manifes>根标签中添加以下内容:-
<uses-permission android:name="android.permission.INTERNET"/>
-
-
Glide.with(this).load("https://www.baidu.com/img/PCtm_d9c8750bed0b3c7d089fa7d55720d6cf.png").into(image);
ListView
在xml中:
- 使用
<ListView></ListView>标签
在Java代码中:
- 用是一个实例变量作为
<ListView></ListView>标签的一个实例 - 找一个适配器
- 为这个实例变量设置一个适配器
使用ArrayAdapter作为适配器:
-
public class ListViewActivity extends AppCompatActivity { ListView listView; @Override protected void onCreate(Bundle savedInstanceState) { super.onCreate(savedInstanceState); setContentView(R.layout.activity_list_view); listView = findViewById(R.id.lists); listView.setAdapter(new ArrayAdapter<String>(this, android.R.layout.simple_list_item_1, Arrays.asList("狗", "猫", "驴", "人"))); } } -
此时的
ArrayAdapter的构造器有3个参数:- 参数1:需要传入一个
context,通常为this - 参数2:传入一个组件,这个组件
xml文件要求只能含有一个<TextView>标签,所以可以使用Android Studio提供的内置布局文件android.R.layout.simple_list_item_1 - 参数3:为一个
List集合
- 参数1:需要传入一个
-
设置适配器
-
效果

LayoutInflater类
这个类可以将某个组件添加到某个布局中
新家两个Activity,一个为父布局,一个为子布局,此时的两个布局为
父
<?xml version="1.0" encoding="utf-8"?>
<LinearLayout xmlns:android="http://schemas.android.com/apk/res/android"
    xmlns:tools="http://schemas.android.com/tools"
    android:layout_width="match_parent"
    android:layout_height="match_parent"
    tools:context=".TestParent"
    android:gravity="center">
    <LinearLayout
        android:gravity="center"
        android:id="@+id/patent"
        android:layout_width="200dp"
        android:layout_height="200dp"
        android:background="#A3A3A3"
        android:orientation="horizontal" />
</LinearLayout>
子
<?xml version="1.0" encoding="utf-8"?>
<LinearLayout xmlns:android="http://schemas.android.com/apk/res/android"
    xmlns:app="http://schemas.android.com/apk/res-auto"
    xmlns:tools="http://schemas.android.com/tools"
    android:layout_width="150dp"
    android:layout_height="150dp"
    tools:context=".TestChild"
    android:id="@+id/child"
    android:background="#994924"
    android:gravity="center">
    <Button
        android:id="@+id/button"
        android:layout_width="match_parent"
        android:layout_height="wrap_content"
        android:layout_margin="10dp"
        android:text="按钮"/>
</LinearLayout>
可以通过工厂方法LayoutInflater.from(context)获得一个LayoutInflater实例
在这个类中有一个inflate方法,返回View,这个方法有多个重载,通常用其中的两个重载
-
inflate(int resource, ViewGroup root)-
参数1:需要被放入的
View的id -
参数2:需要放入的
View -
如果参数2为空,那么此时不会自动放入到
root中,而是直接返回一个view,可以通过获取到父的一个Layout并调用.add(View view)将其加入到父中,此时会把参数1的大小设置为默认的大小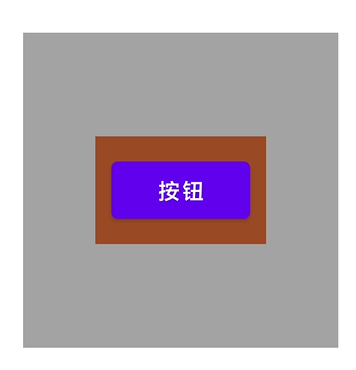
-
LinearLayout layout = findViewById(R.id.patent);
View inflate = LayoutInflater.from(this).inflate(R.layout.activity_test_child, null);
layout.addView(inflate);
-
-
如果参数2不为空,此时会直接将
参数1(子)在不改变子的任何参数的情况下将其放入到父中-
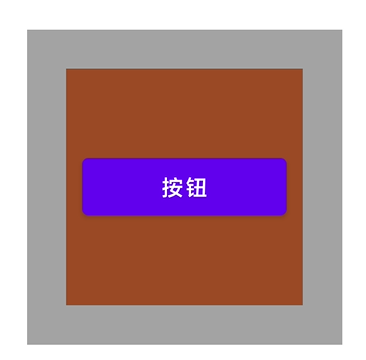
-
LinearLayout layout = findViewById(R.id.patent);
View inflate = LayoutInflater.from(this).inflate(R.layout.activity_test_child, layout);
-
-
-
inflate(int resource, ViewGroup root, boolean attachToRoot)-
当参数1、参数2不为空时
-
参数3为
false-
此时也不会将
子放入到父中,此时返回的View是子原本的样子 -
需要手动的获取到
父的一个Layout并调用.add(View view)将其加入到父中 -

-
View inflate = LayoutInflater.from(this).inflate(R.layout.activity_test_child, layout, false);
layout.addView(inflate);
-
-
当参数3为
true时,此时的效果和inflate(int resource, ViewGroup root)的参数2不为空的效果一致
-
-
当参数2为空时,参数3就没有存在的意义了(无论是
true还是false,此时和inflate(int resource, ViewGroup root)的参数2为空的效果一致
-
package com.example.layout;

import androidx.appcompat.app.AppCompatActivity;

import android.os.Bundle;
import android.util.Log;
import android.view.LayoutInflater;
import android.view.View;
import android.widget.FrameLayout;
import android.widget.LinearLayout;

import org.jetbrains.annotations.NotNull;

public class TestParent extends AppCompatActivity {

    @Override
    protected void onCreate(Bundle savedInstanceState) {
        super.onCreate(savedInstanceState);
        setContentView(R.layout.activity_test_parent);
        LinearLayout layout = findViewById(R.id.patent);
        View inflate = LayoutInflater.from(this).inflate(R.layout.activity_test_child, null, false);
        layout.addView(inflate);
    }
}
通过以上方式将子放入到父中,子.xml对应的类不会被运行,也就是对子添加的事件不会被触发
自定义ArrayAdapter
过程如下
-
声明一个类,继承这个类,重写这个类的
public View getView(int position, @Nullable View convertView, @NonNull ViewGroup parent)方法,构造器声明为 -
添加一个参数
int resourceId,使用以下构造器
public FruitAdapter(@NonNull Context context, int resource, @NonNull List<Fruit> objects) {
    super(context, resource, objects);
    this.resourceId = resource;
}
-
创建一个布局,可以看作是每一项,在这个控件中写一下自己需要的部件
-
<?xml version="1.0" encoding="utf-8"?>
<LinearLayout xmlns:android="http://schemas.android.com/apk/res/android"
    xmlns:app="http://schemas.android.com/apk/res-auto"
    xmlns:tools="http://schemas.android.com/tools"
    android:layout_width="match_parent"
    android:layout_height="match_parent"
    tools:context=".FruitActivity"
    android:padding="10dp">
    <ImageView
        android:layout_width="200dp"
        android:layout_height="150dp"
        android:background="#C757EF"
        android:id="@+id/fruit_image"/>
    <TextView
        android:layout_width="150dp"
        android:layout_height="150dp"
        android:id="@+id/fruit_name"
        android:text="123"
        android:textSize="30sp"
        android:gravity="center"
        android:layout_marginLeft="20dp"/>

</LinearLayout>
-
-
创建一个带有
<ListView>的布局-
<?xml version="1.0" encoding="utf-8"?>
<LinearLayout xmlns:android="http://schemas.android.com/apk/res/android"
    xmlns:app="http://schemas.android.com/apk/res-auto"
    xmlns:tools="http://schemas.android.com/tools"
    android:layout_width="match_parent"
    android:layout_height="match_parent"
    tools:context=".FruitListActivity">
    <ListView
        android:layout_width="match_parent"
        android:layout_height="match_parent"
        android:id="@+id/fruit_list"/>
</LinearLayout>
-
-
使用
LayoutInflater获取一个View,将最后一个参数设置为false,即不自动添加到父中 -
获取返回的
view中的各个组件,为其设置相应的值,也可以为其设置点击事件等 -
package com.example.layout.adapter; import android.app.Application; import android.content.Context; import android.media.Image; import android.view.LayoutInflater; import android.view.View; import android.view.ViewGroup; import android.widget.ArrayAdapter; import android.widget.ImageView; import android.widget.TextView; import android.widget.Toast; import androidx.annotation.NonNull; import androidx.annotation.Nullable; import com.example.layout.FruitActivity; import com.example.layout.FruitListActivity; import com.example.layout.R; import com.example.layout.bean.Fruit; import java.util.List; public class FruitAdapter extends ArrayAdapter<Fruit> { public int resourceId; public FruitAdapter(@NonNull Context context, int resource, @NonNull List<Fruit> objects) { super(context, resource, objects); this.resourceId = resource; } @NonNull @Override public View getView(int position, @Nullable View convertView, @NonNull ViewGroup parent) { View view = LayoutInflater.from(getContext()).inflate(resourceId, parent, false); TextView textView = view.findViewById(R.id.fruit_name); ImageView imageView = view.findViewById(R.id.fruit_image); Fruit fruit = getItem(position); textView.setText(fruit.getName()); imageView.setImageResource(fruit.getId()); imageView.setOnLongClickListener(new View.OnLongClickListener() { @Override public boolean onLongClick(View v) { textView.setText(textView.getText() + "被长按击"); return false; } }); return view; } } -
返回
view -
在针对
<ListView>的类中,为<ListView>设置适配器Adapter-
package com.example.layout;

import androidx.appcompat.app.AppCompatActivity;

import android.os.Bundle;
import android.view.View;
import android.widget.AdapterView;
import android.widget.ListView;
import android.widget.Toast;

import com.example.layout.adapter.FruitAdapter;
import com.example.layout.bean.Fruit;

import java.util.ArrayList;
import java.util.List;

public class FruitListActivity extends AppCompatActivity {

    @Override
    protected void onCreate(Bundle savedInstanceState) {
        super.onCreate(savedInstanceState);
        setContentView(R.layout.activity_fruit_list);
        ListView listView = findViewById(R.id.fruit_list);
        List<Fruit> fruitList = new ArrayList<Fruit>() {
            {
                add(new Fruit("图1-水果", R.drawable.fruit_1));
                add(new Fruit("图2-水果", R.drawable.fruit_2));
                add(new Fruit("图3-水果", R.drawable.fruit_3));
                add(new Fruit("图4-水果", R.drawable.fruit_4));
                add(new Fruit("图5-水果", R.drawable.fruit_5));
            }
        };
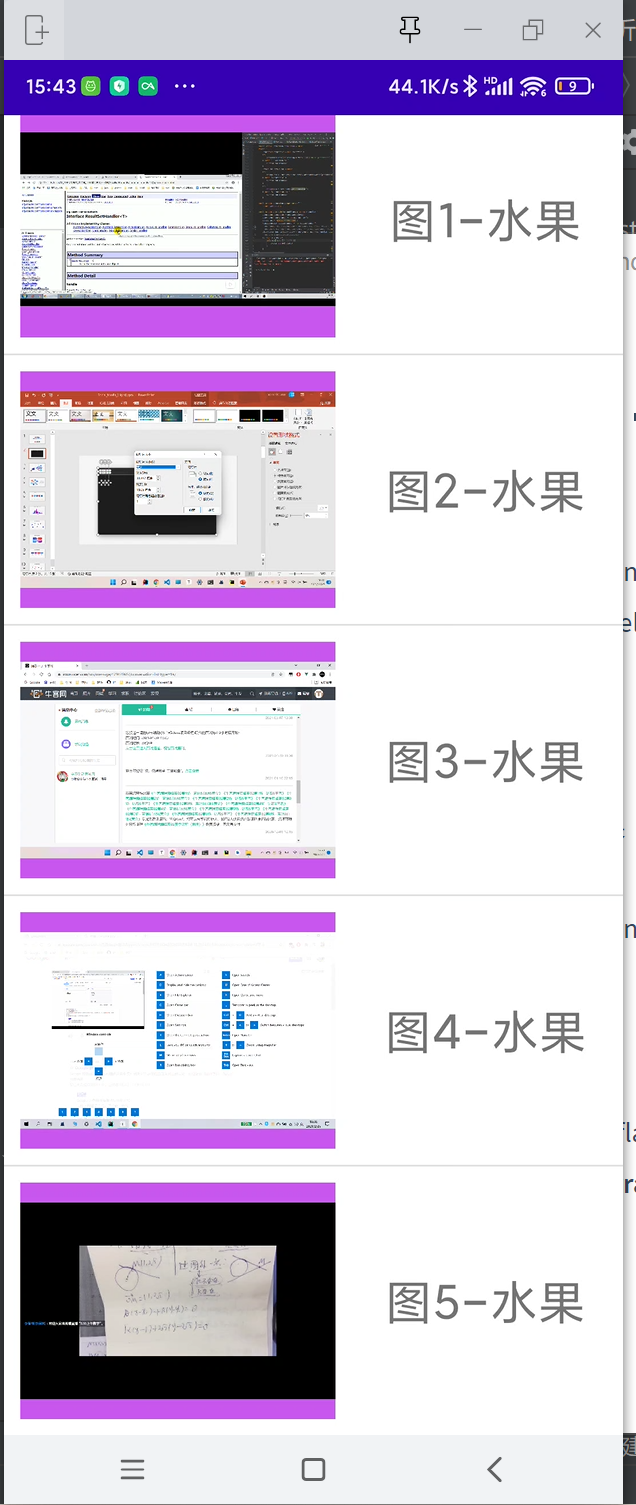
        listView.setAdapter(new FruitAdapter(this, R.layout.activity_fruit, fruitList));
        listView.setOnItemClickListener(new AdapterView.OnItemClickListener() {
            @Override
            public void onItemClick(AdapterView<?> parent, View view, int position, long id) {
                Toast.makeText(FruitListActivity.this, "第" + id + "个被点击了", Toast.LENGTH_SHORT).show();
            }
        });
    }
}
-
此时的运行效率还是比较低,还有进一步优化的空间
在getView()方法中,第二个参数convertView没有使用,这个参数可以提高程序的效率
使用一个内部类继续优化,因为此时要多次在本地查找TextView和ImageView,所以可以把这个优化一下
    static class ViewHolder{
        public TextView textView;
        public ImageView imageView;

        public ViewHolder(TextView textView, ImageView imageView) {
            this.textView = textView;
            this.imageView = imageView;
        }
    }

    @NonNull
    @Override
    public View getView(int position, @Nullable View convertView, @NonNull ViewGroup parent) {
        View view;
        ViewHolder holder;
        if (convertView != null) {
            view = convertView;
//            把暂存的holder取出
            holder = (ViewHolder) view.getTag();
        } else {
            view = LayoutInflater.from(getContext()).inflate(resourceId, parent, false);
            TextView textView = view.findViewById(R.id.fruit_name);
            ImageView imageView = view.findViewById(R.id.fruit_image);
            holder = new ViewHolder(textView, imageView);
            // 把holder暂存一下
            view.setTag(holder);
        }

        Fruit fruit = getItem(position);
        holder.textView.setText(fruit.getName());
        holder.imageView.setImageResource(fruit.getId());
        holder.imageView.setOnLongClickListener(new View.OnLongClickListener() {
            @Override
            public boolean onLongClick(View v) {
                holder.textView.setText(holder.textView.getText() + "被长按击");
                return false;
            }
        });
        return view;
    }
添加菜单Menu
要选一个有标题栏ActionBar的主题,否则将看不到菜单
-
在
res下新建一个目录,目录名为menu -
在
menu目录上右击->新建->Menu Resource File -
在里边添加
<item>标签-
<?xml version="1.0" encoding="utf-8"?>
<menu xmlns:app="http://schemas.android.com/apk/res-auto"
    xmlns:android="http://schemas.android.com/apk/res/android">
    <item
        android:id="@+id/test_item"
        android:title="测试"/>
    <item
        android:id="@+id/test_about"
        android:title="关于"/>
    <item
        android:id="@+id/app_bar_search"
        android:icon="@drawable/ic_search_black_24dp"
        android:title="Search" />
</menu>
-
-
在需要添加菜单的
Activity所对应的类中,重写onCreateOptionsMenu方法-
@Override
public boolean onCreateOptionsMenu(Menu menu) {
    MenuInflater menuInflater = getMenuInflater();
    menuInflater.inflate(R.menu.文件名, menu);
    return true;
}
-
-
重写
onOptionsItemSelected方法来捕获按下的菜单项-
@Override public boolean onOptionsItemSelected(MenuItem item) { switch (item.getItemId()) { case R.id.test_about: Toast.makeText(FruitListActivity.this, "关于", Toast.LENGTH_SHORT).show(); return true; case R.id.test_item: Toast.makeText(FruitListActivity.this, "测试", Toast.LENGTH_SHORT).show(); return true; default: return super.onOptionsItemSelected(item); } } -
如果处理了菜单项,应返回
true -
如果未处理菜单项,应调用
super.onOptionsItemSelected(item)的父类实现(默认实现会返回false)
-
Recycler View
使用方法:
-
在
xml中放入一个RecyclerView -
创建包含在
RecyclerView中的xml -
写一个适配器类,使其继承自
RecyclerView.Adapter<占位>,添加一个List<>成员变量- 在构造方法中为其赋值
- 在适配器类中,实现3个没有实现的方法
- 在适配器类中,写一个静态的内部类,这个类名通常为
Holder,使其继承自RecyclerView.ViewHolder- 在这个类中添加在第二步创建的
xml中所对应的组件的实例 - 为这个内部类匹配默认的构造方法(
public Holder(View itemView),在匹配的构造方法中填写super(itemView)并为这个静态类中的成员变量使用itemView.findViewById(id)绑定第二步中的每个组件
- 在这个类中添加在第二步创建的
- 将
占位修改为适配器类名.Holder - 此时适配器类中的状态为
RecyclerView.Adapter<适配器类名.Holder>
-
设置项数,将适配器类中的
public int getItemCount()的返回值写为return List<>成员变量.size() -
编写创建视图持有方法,将实现的
onCreateViewHolder(@NonNull ViewGroup parent, int viewType)方法的返回值修改为Holder-
使用
LayoutInflater.from(context).inflate(R.layout.第二步创建的布局, parent, false)获取一个View -
返回一个
Holder(view)的一个实例 -
public Holder onCreateViewHolder(@NonNull ViewGroup parent, int viewType) {
    View view = LayoutInflater.from(parent.getContext()).
        inflate(R.layout.activity_fruit, parent, false);
    return new Holder(view);
}
-
-
为
holder实例绑定资源,将实现的onBindViewHolder()方法的参数1的类型修改为Holder- 此时的状态为
public void onBindViewHolder(@NonNull Holder holder, int position) - 方法体中,通过
position在list中获取的数据为holder对象中的组件进行绑定赋值
- 此时的状态为
-
在
RecyclerView所在的实例工具类中获取到RecyclerView所对应的实例,并为其设置适配器和布局管理器
综上,还是以之前的水果为例
activity_recycler.xml
<?xml version="1.0" encoding="utf-8"?>
<LinearLayout xmlns:android="http://schemas.android.com/apk/res/android"
    xmlns:app="http://schemas.android.com/apk/res-auto"
    xmlns:tools="http://schemas.android.com/tools"
    android:layout_width="match_parent"
    android:layout_height="match_parent"
    tools:context=".recycler.RecyclerActivity">
    <androidx.recyclerview.widget.RecyclerView
        android:layout_width="match_parent"
        android:layout_height="match_parent"
        android:id="@+id/recycler_view"/>
</LinearLayout>
适配器类
package com.example.layout.adapter;

import android.view.LayoutInflater;
import android.view.View;
import android.view.ViewGroup;
import android.widget.ImageView;
import android.widget.TextView;

import androidx.annotation.NonNull;
import androidx.recyclerview.widget.RecyclerView;

import com.example.layout.R;
import com.example.layout.bean.Fruit;

import java.util.List;

public class RecyclerViewAdapter extends RecyclerView.Adapter<RecyclerViewAdapter.Holder> {

    public List<Fruit> fruitList;

    public RecyclerViewAdapter(List<Fruit> fruitList) {
        this.fruitList = fruitList;
    }

    // 设置一个内部类,用来缓存每个组件
    public static class Holder extends RecyclerView.ViewHolder {
        public ImageView imageView;
        public TextView textView;

        public Holder(@NonNull View itemView) {
            super(itemView);
            imageView = itemView.findViewById(R.id.fruit_image);
            textView = itemView.findViewById(R.id.fruit_name);
        }
    }

    @NonNull
    @Override
    // 返回一个Holder
    public Holder onCreateViewHolder(@NonNull ViewGroup parent, int viewType) {
        View view = LayoutInflater.from(parent.getContext()).inflate(R.layout.activity_fruit, parent, false);
        return new Holder(view);
    }

    @Override
    // 绑定Hoder
    public void onBindViewHolder(@NonNull Holder holder, int position) {
        Fruit fruit = fruitList.get(position);
        holder.textView.setText(fruit.getName());
        holder.imageView.setImageResource(fruit.getId());
    }

    @Override
    // 获取个数
    public int getItemCount() {
        return fruitList.size();
    }
}
RecyclerView所对应的类
package com.example.layout.recycler;

import androidx.appcompat.app.AppCompatActivity;
import androidx.recyclerview.widget.LinearLayoutManager;
import androidx.recyclerview.widget.RecyclerView;

import android.os.Bundle;

import com.example.layout.R;
import com.example.layout.adapter.RecyclerViewAdapter;
import com.example.layout.bean.Fruit;

import java.util.ArrayList;
import java.util.List;

public class RecyclerActivity extends AppCompatActivity {

    @Override
    protected void onCreate(Bundle savedInstanceState) {
        super.onCreate(savedInstanceState);
        setContentView(R.layout.activity_recycler);
        List<Fruit> fruitList = new ArrayList<Fruit>() {
            {
                add(new Fruit("图1-水果", R.drawable.fruit_1));
                add(new Fruit("图2-水果", R.drawable.fruit_2));
                add(new Fruit("图3-水果", R.drawable.fruit_3));
                add(new Fruit("图4-水果", R.drawable.fruit_4));
                add(new Fruit("图5-水果", R.drawable.fruit_5));
                add(new Fruit("图5-水果", R.drawable.fruit_5));
                add(new Fruit("图5-水果", R.drawable.fruit_5));
                add(new Fruit("图5-水果", R.drawable.fruit_5));
                add(new Fruit("图5-水果", R.drawable.fruit_5));
                add(new Fruit("图5-水果", R.drawable.fruit_5));
                add(new Fruit("图5-水果", R.drawable.fruit_5));
                add(new Fruit("图5-水果", R.drawable.fruit_5));
                add(new Fruit("图5-水果", R.drawable.fruit_5));
                add(new Fruit("图5-水果", R.drawable.fruit_5));
                add(new Fruit("图5-水果", R.drawable.fruit_5));
                add(new Fruit("图5-水果", R.drawable.fruit_5));
                add(new Fruit("图5-水果", R.drawable.fruit_5));
                add(new Fruit("图5-水果", R.drawable.fruit_5));
                add(new Fruit("图5-水果", R.drawable.fruit_5));
                add(new Fruit("图5-水果", R.drawable.fruit_5));
                add(new Fruit("图5-水果", R.drawable.fruit_5));
                add(new Fruit("图5-水果", R.drawable.fruit_5));
                add(new Fruit("图5-水果", R.drawable.fruit_5));
                add(new Fruit("图5-水果", R.drawable.fruit_5));
                add(new Fruit("图5-水果", R.drawable.fruit_5));
                add(new Fruit("图5-水果", R.drawable.fruit_5));
                add(new Fruit("图5-水果", R.drawable.fruit_5));
                add(new Fruit("图5-水果", R.drawable.fruit_5));
                add(new Fruit("图5-水果", R.drawable.fruit_5));
                add(new Fruit("图5-水果", R.drawable.fruit_5));
                add(new Fruit("图5-水果", R.drawable.fruit_5));
                add(new Fruit("图5-水果", R.drawable.fruit_5));
                add(new Fruit("图5-水果", R.drawable.fruit_5));
                add(new Fruit("图5-水果", R.drawable.fruit_5));
                add(new Fruit("图5-水果", R.drawable.fruit_5));
                add(new Fruit("图5-水果", R.drawable.fruit_5));
                add(new Fruit("图5-水果", R.drawable.fruit_5));
                add(new Fruit("图5-水果", R.drawable.fruit_5));
                add(new Fruit("图5-水果", R.drawable.fruit_5));
                add(new Fruit("图5-水果", R.drawable.fruit_5));
            }
        };
        RecyclerView recyclerView = findViewById(R.id.recycler_view);
        // 设置布局管理器
        recyclerView.setLayoutManager(new LinearLayoutManager(this));
        // 设置适配器
        recyclerView.setAdapter(new RecyclerViewAdapter(fruitList));
    }
}
默认是垂直排列的,可以实现横向排列
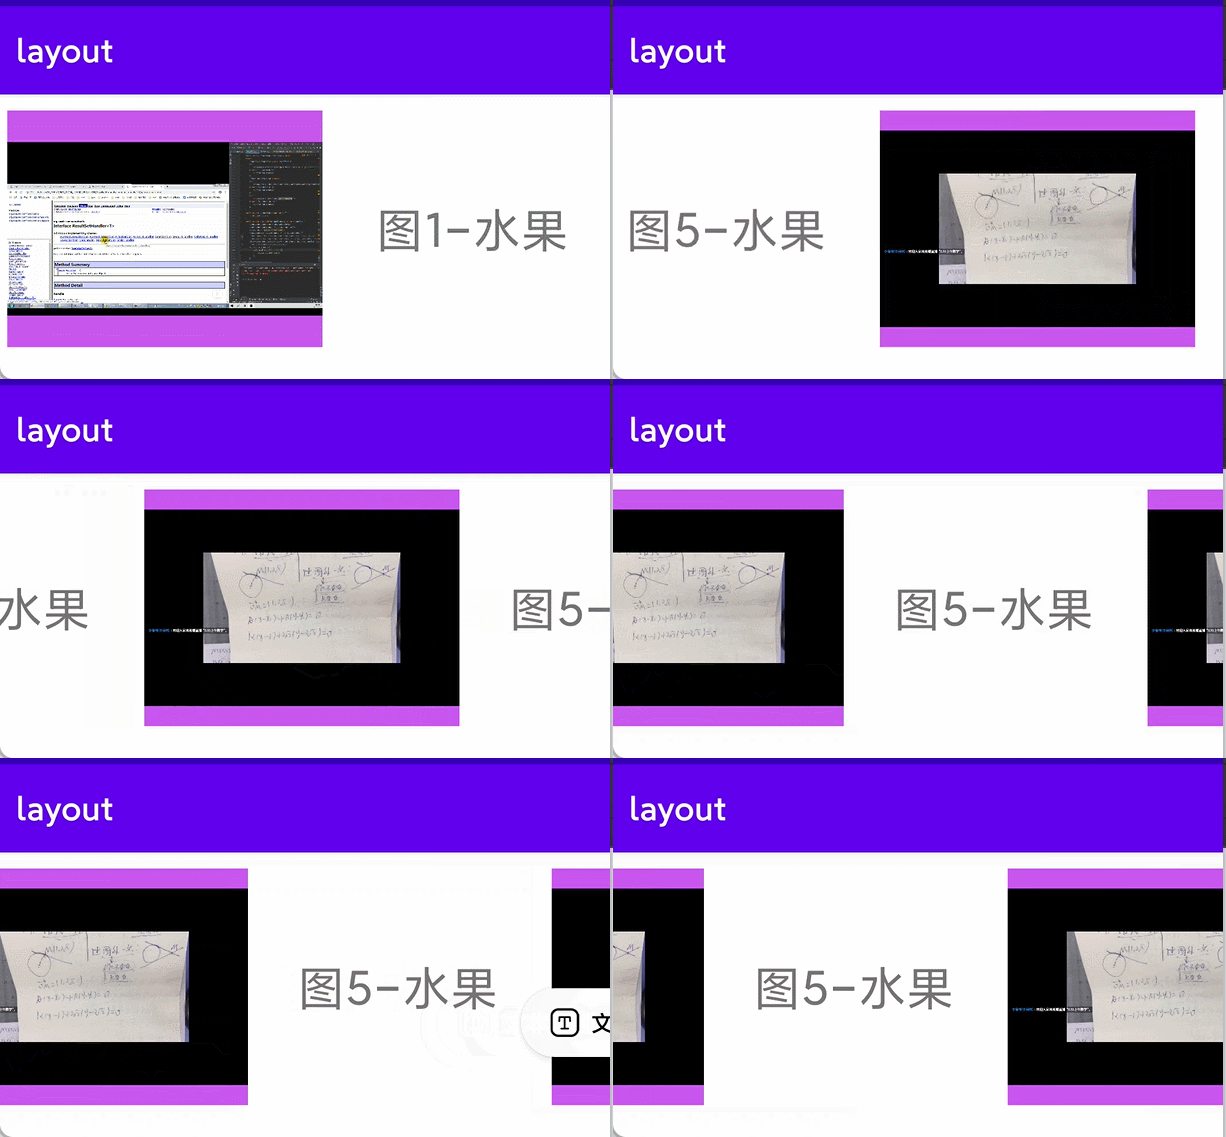
此时修改RecyclerView所在的类中随对应的代码,此时修改后的内容为
RecyclerView recyclerView = findViewById(R.id.recycler_view);
// new 一个线性布局管理器
LinearLayoutManager linearLayoutManager = new LinearLayoutManager(this);
// 设置排列方式为水平
linearLayoutManager.setOrientation(LinearLayoutManager.HORIZONTAL);
// 设置布局管理器
recyclerView.setLayoutManager(linearLayoutManager);
// 设置适配器
recyclerView.setAdapter(new RecyclerViewAdapter(fruitList));
修改为网格布局
也可以修改为网格布局
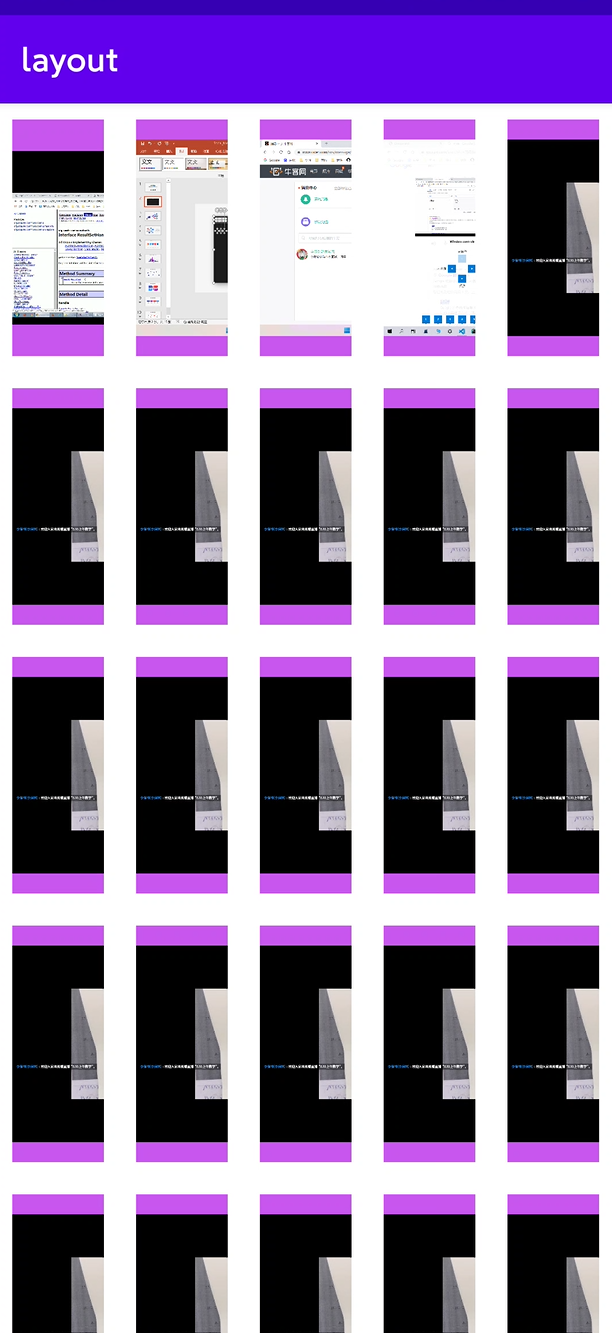
只需要将布局管理器设置为GridLayoutManager
// 参数2为行/列数
GridLayoutManager gridLayoutManager = new GridLayoutManager(this, 5);
// 设置布局管理器
recyclerView.setLayoutManager(gridLayoutManager);
修改为瀑布布局
// 参数1为行数/列数,参数2为方向
StaggeredGridLayoutManager staggeredGridLayoutManager = new StaggeredGridLayoutManager(3, StaggeredGridLayoutManager.VERTICAL);
recyclerView.setLayoutManager(staggeredGridLayoutManager);
点击事件
RecyclerView并没有直接的提供类似于ListView中setOnItemClickListener()的方法,所以只能适配器中添加点击事件
package com.example.layout.adapter;

import android.view.LayoutInflater;
import android.view.View;
import android.view.ViewGroup;
import android.widget.ImageView;
import android.widget.TextView;
import android.widget.Toast;

import androidx.annotation.NonNull;
import androidx.recyclerview.widget.RecyclerView;

import com.example.layout.R;
import com.example.layout.bean.Fruit;

import java.util.List;

public class RecyclerViewAdapter extends RecyclerView.Adapter<RecyclerViewAdapter.Holder> {

    public List<Fruit> fruitList;

    public RecyclerViewAdapter(List<Fruit> fruitList) {
        this.fruitList = fruitList;
    }

    // 设置一个内部类,用来缓存每个组件
    public static class Holder extends RecyclerView.ViewHolder {
        public ImageView imageView;
        public TextView textView;

        public Holder(@NonNull View itemView) {
            super(itemView);
            imageView = itemView.findViewById(R.id.fruit_image);
            textView = itemView.findViewById(R.id.fruit_name);
            itemView.setOnClickListener(new View.OnClickListener() {
                @Override
                public void onClick(View v) {
//                    Toast.makeText(itemView.getContext(), "你点击了整个View", Toast.LENGTH_SHORT).show();
                }
            });
        }
    }

    @NonNull
    @Override
    // 返回一个Holder
    public Holder onCreateViewHolder(@NonNull ViewGroup parent, int viewType) {
        View view = LayoutInflater.from(parent.getContext()).inflate(R.layout.activity_fruit, parent, false);
        return new Holder(view);
    }

    @Override
    // 绑定Hoder
    public void onBindViewHolder(@NonNull Holder holder, int position) {
        Fruit fruit = fruitList.get(position);
        holder.textView.setText(fruit.getName());
        holder.imageView.setImageResource(fruit.getId());
        holder.textView.setOnClickListener(new View.OnClickListener() {
            @Override
            public void onClick(View v) {
                Toast.makeText(holder.textView.getContext(), "你点击了文字", Toast.LENGTH_SHORT).show();
            }
        });
        holder.imageView.setOnClickListener(new View.OnClickListener() {
            @Override
            public void onClick(View v) {
                Toast.makeText(holder.imageView.getContext(), "你点击了图片", Toast.LENGTH_SHORT).show();
            }
        });
    }

    @Override
    // 获取个数
    public int getItemCount() {
        return fruitList.size();
    }
}
WebView
可以用来加载网页,或者本地的assets文件夹下的HTML文件
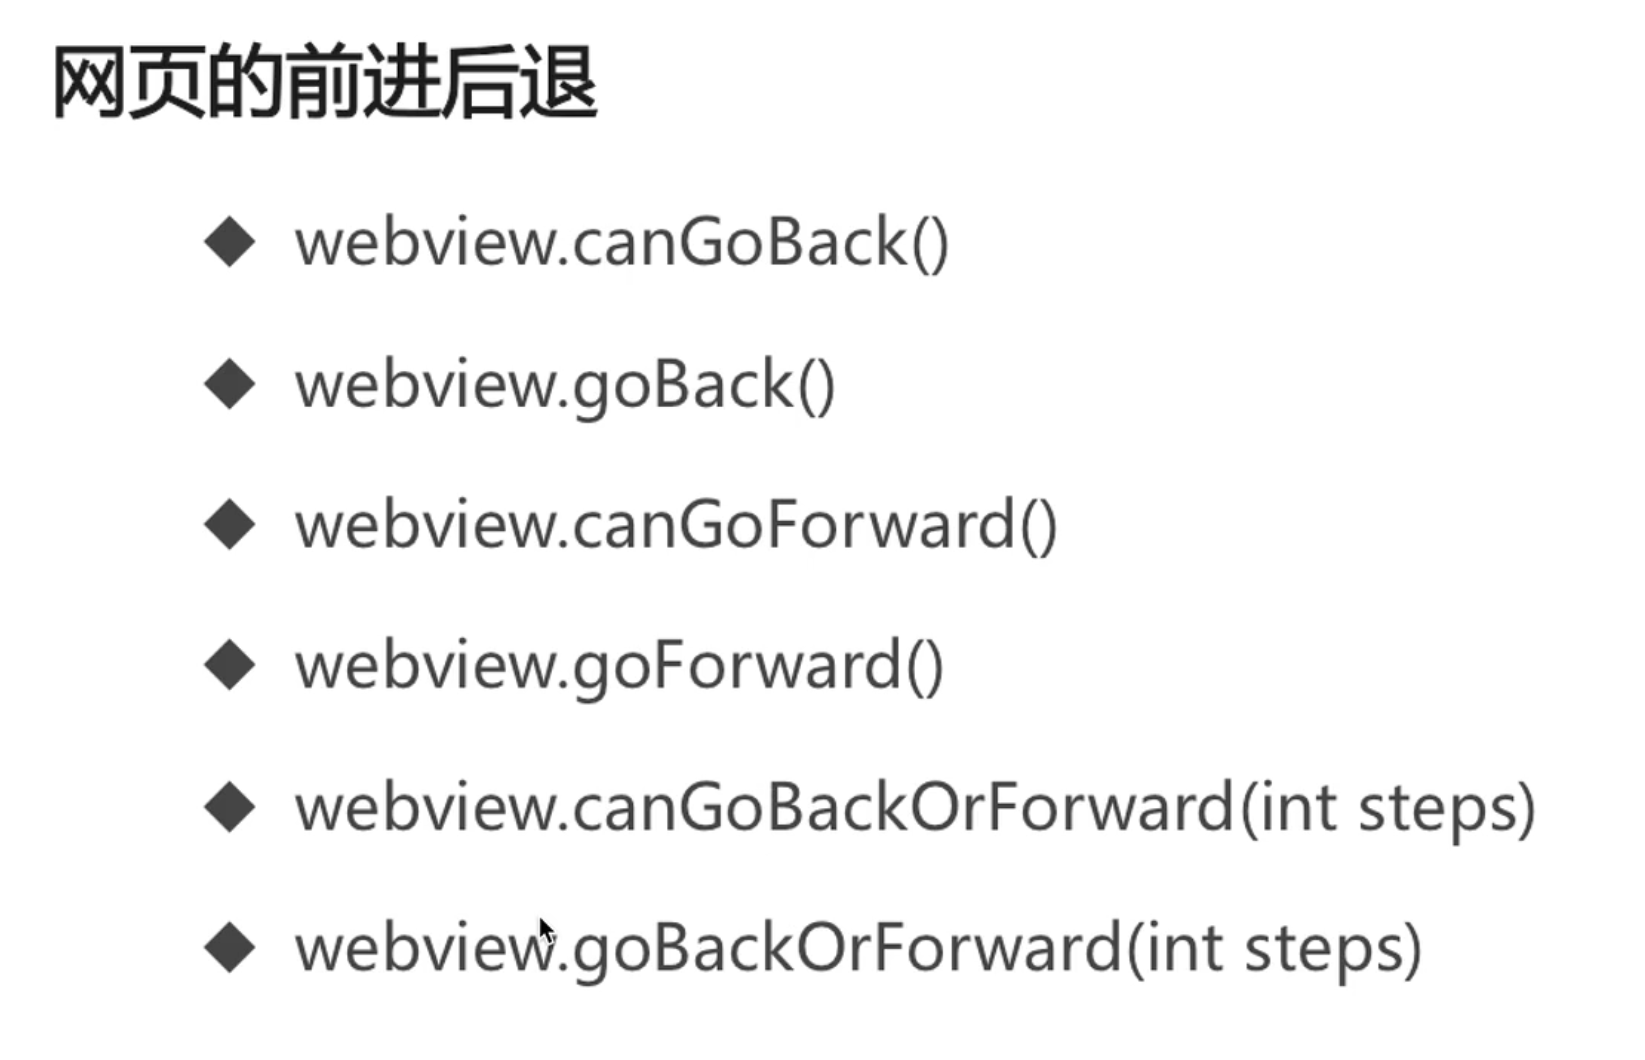
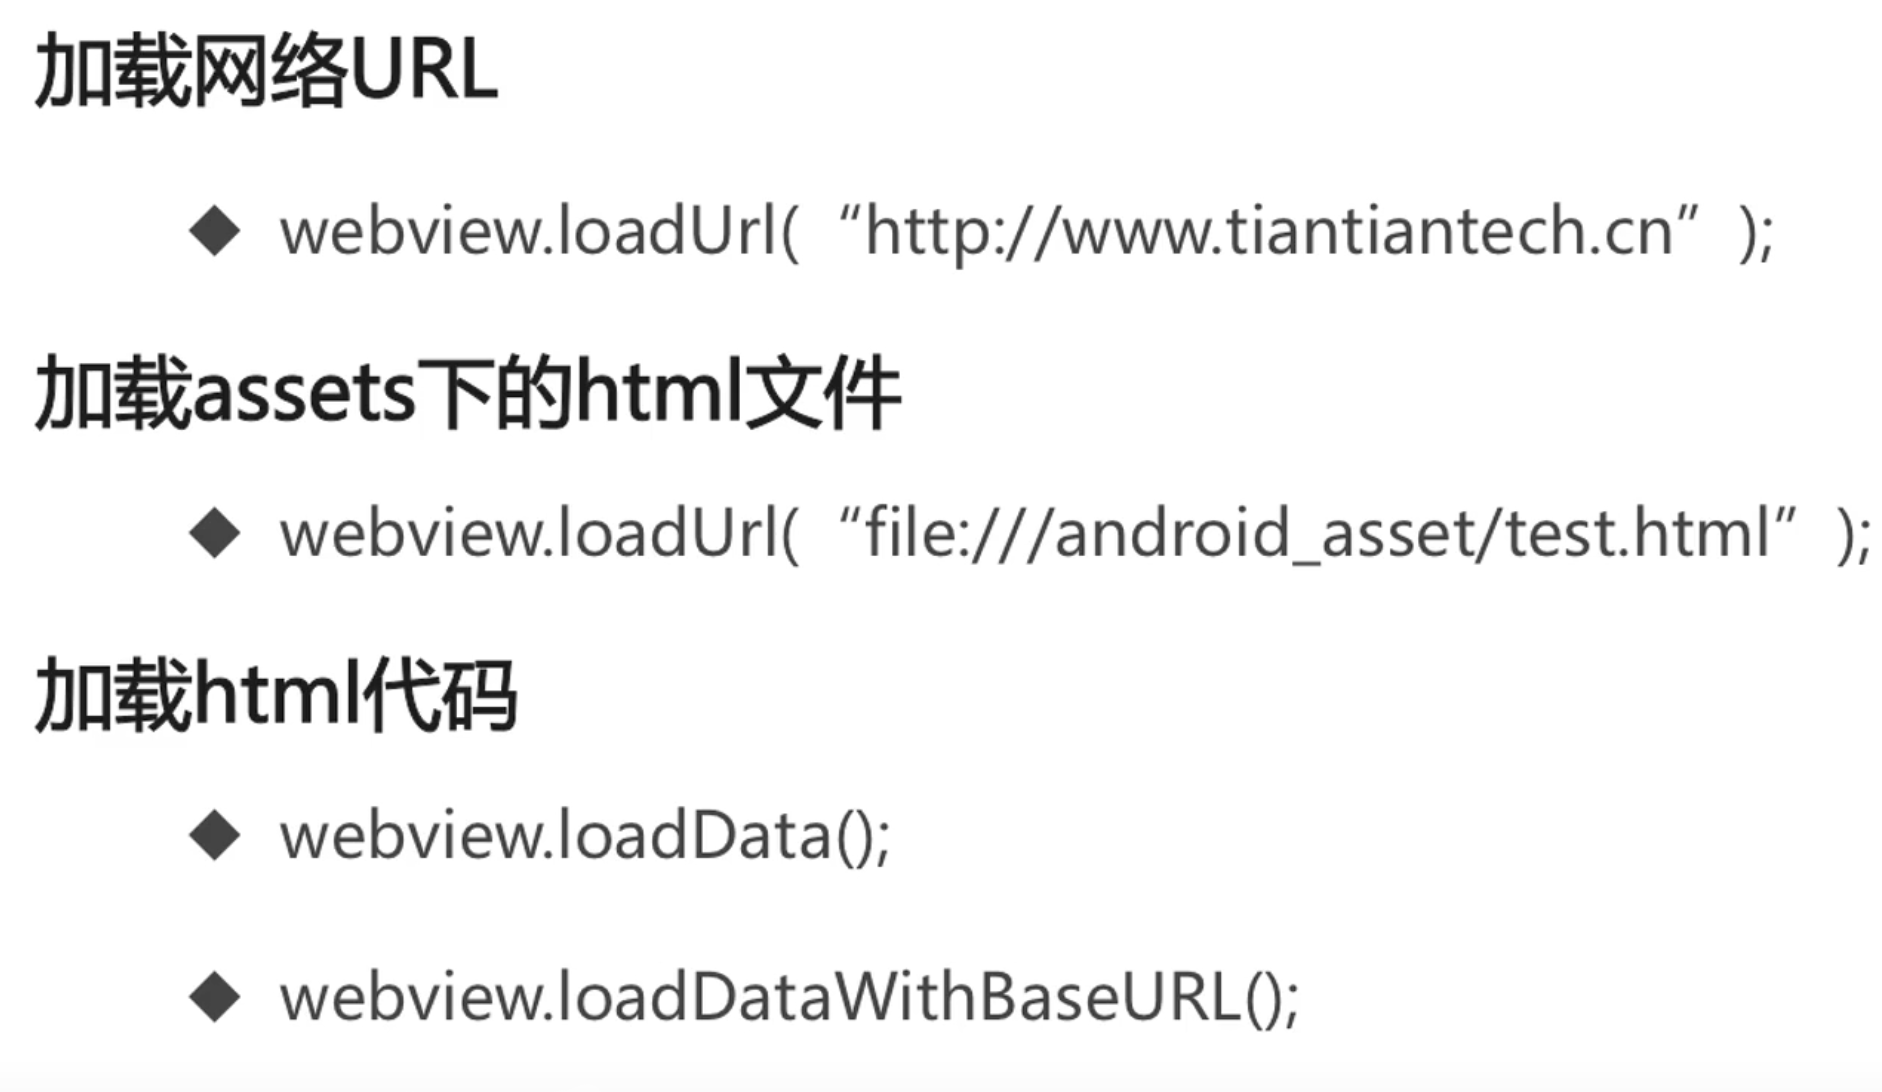
默认情况下,如果有需要打开新的窗口的页面,会自动跳转到默认的浏览器打开,解决方案:
-
写一个内部类,使其继承自
WebViewClient类 -
重写
shouldOverrideUrlLoading方法,使其内容为:-
    @Override
    public boolean shouldOverrideUrlLoading(WebView view, WebResourceRequest request) {
        view.loadUrl(request.getUrl().toString());
        return true;
    }
-
-
调用
WebView的webView.setWebViewClient(new 自己写的内部类()); -
整体代码为
-
package com.example.layout;

import androidx.annotation.NonNull;
import androidx.appcompat.app.AppCompatActivity;

import android.os.Bundle;
import android.view.Menu;
import android.view.MenuInflater;
import android.view.MenuItem;
import android.webkit.WebResourceRequest;
import android.webkit.WebView;
import android.webkit.WebViewClient;

public class WebViewActivity extends AppCompatActivity {

    private WebView webView;

    @Override
    public boolean onCreateOptionsMenu(Menu menu) {
        MenuInflater inflater = getMenuInflater();
        inflater.inflate(R.menu.webview_menu, menu);
        return true;
    }

    @Override
    public boolean onOptionsItemSelected(@NonNull MenuItem item) {
        switch (item.getItemId()){
            case R.id.forward:
                if (webView.canGoForward()){
                    webView.goForward();
                }
                return true;
            case R.id.back:
                if (webView.canGoBack()){
                    webView.goBack();
                }
                return true;
            case R.id.refresh:
                webView.reload();
                return true;
            default:
                return super.onOptionsItemSelected(item);
        }
    }


    @Override
    protected void onCreate(Bundle savedInstanceState) {
        super.onCreate(savedInstanceState);
        setContentView(R.layout.activity_web_view);
        webView = findViewById(R.id.web_view);
//        开启js
        webView.getSettings().setJavaScriptEnabled(true);
        webView.loadUrl("https://blog.integer.top");
//        设置当有需要打开新窗口的连接不会打开系统自带的浏览器
        webView.setWebViewClient(new MyWebViewClient());
    }
    class MyWebViewClient extends WebViewClient{
        @Override
        public boolean shouldOverrideUrlLoading(WebView view, WebResourceRequest request) {
            view.loadUrl(request.getUrl().toString());
            return true;
        }
    }
}
-
webView.setWebChromeClient(WebChromeClient client);方法:
- 这个方法中需要
WebChromeClient类型的参数,可以用一个类继承之后重写WebChromeClient类的一些方法 - 例如获取进度之类的、设置标题
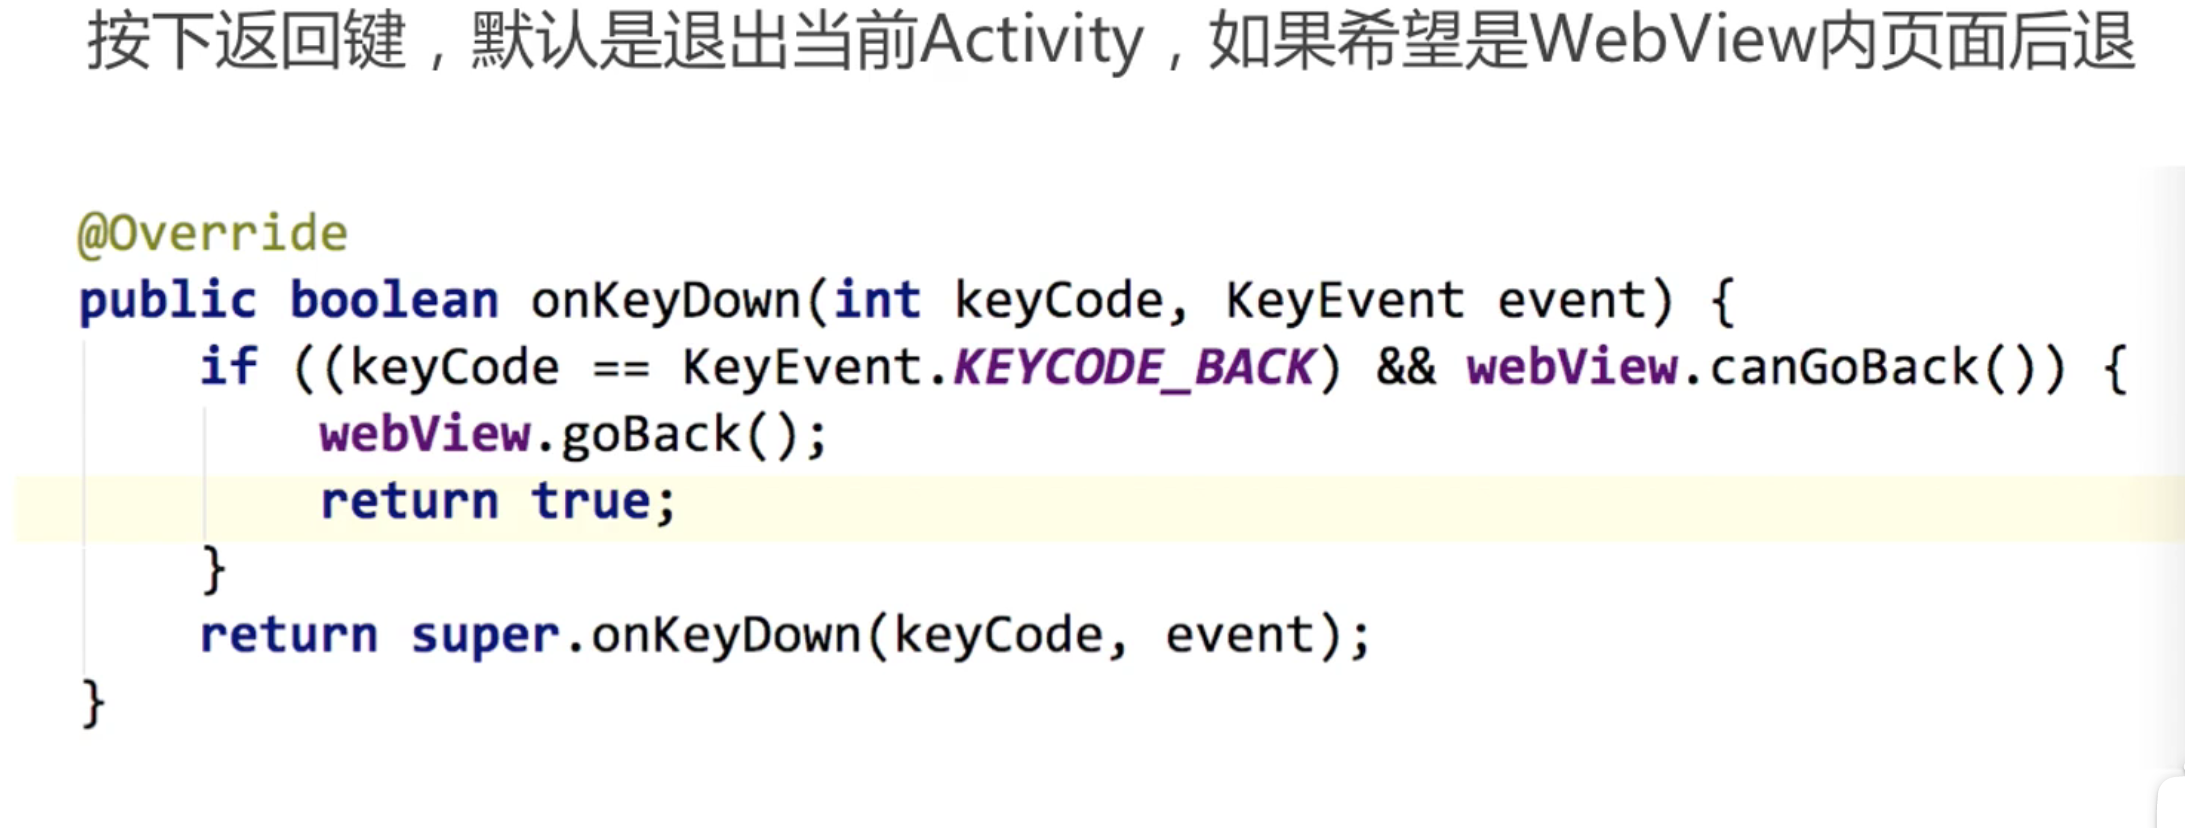
在按下返回键的时候默认是结束掉当前的activity,为了使按下返回键的时候使网页后退,需要重写onKeyDown方法
    @Override
    public boolean onKeyDown(int keyCode, KeyEvent event) {
//        如果按下的是返回键,并且web view能够回退
        if (keyCode == KeyEvent.KEYCODE_BACK && webView.canGoBack()){
//            后退
            webView.goBack();
            return true;
        }
//        否则就执行默认操作
        return super.onKeyDown(keyCode, event);
    }
AlertDialog 警示对话框
一个类型的按钮只能有一个
-
AlertDialog类中有一个内部类AlertDialog.Builder类,遵循的建造者模式,可以new一个AlertDialog.Builder类,假设此时new的实例名是builder -
设置标题可以使用
setTitle -
设置中间的内容可以使用
setMessage -
最多添加3个按钮,从左到右分别是:
- 中性的按钮
neutral,读音为'nuːtrəl - 消极的按钮
negative,读音为'neɡətɪv - 积极的按钮
positive,读音为'pɑːzətɪv
- 中性的按钮
-
可以给按钮添加点击的监听事件,此时的监听事件需要实现
DialogInterface.OnClickListener接口 -
AlertDialog.Builder builder = new AlertDialog.Builder(ToastActivity.this);
builder.setTitle("这是标题").setMessage("这是Message").setPositiveButton("积极1", new DialogInterface.OnClickListener() {
    @Override
    public void onClick(DialogInterface dialog, int which) {
        Toast.makeText(ToastActivity.this, "你点击了积极的按钮1", Toast.LENGTH_SHORT).show();
    }
}).setNeutralButton("中性按钮", new DialogInterface.OnClickListener() {
    @Override
    public void onClick(DialogInterface dialog, int which) {
        Toast.makeText(ToastActivity.this, "你点击了中性的按钮", Toast.LENGTH_SHORT).show();
    }
}).setNegativeButton("消极1", new DialogInterface.OnClickListener() {
    @Override
    public void onClick(DialogInterface dialog, int which) {
        Toast.makeText(ToastActivity.this, "你点击了消极的按钮1", Toast.LENGTH_SHORT).show();

    }
}).show();
效果为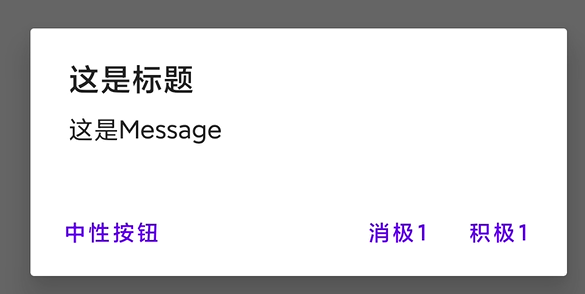
也可以设置图标,setIcon(R.drawable.xxx)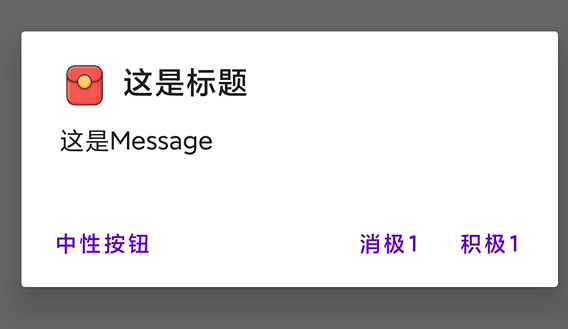
也可以设置为选择类型的提示框:
设置选择提示框
-
new一个String数组,数组中的内容可以被看作是提示框中的每一项 -
new一个AlertDialog.Builder,为其设置标题,调用setItems(String 数组, 监听事件)- 在监听事件中有两个参数,
public void onClick(DialogInterface dialog, int which),参数2为选择的第几项
- 在监听事件中有两个参数,
-
AlertDialog.Builder builder1 = new AlertDialog.Builder(ToastActivity.this);
String[] items = new String[]{"选项1", "选项2", "选项3", "选项4", "选项5"};
builder1.setTitle("选择").setItems(items, new DialogInterface.OnClickListener() {
    @Override
    public void onClick(DialogInterface dialog, int which) {
        Toast.makeText(builder1.getContext(), "你选择了" + items[which], Toast.LENGTH_SHORT).show();
    }
}).setNegativeButton("取消", new DialogInterface.OnClickListener() {
    @Override
    public void onClick(DialogInterface dialog, int which) {
        Toast.makeText(builder1.getContext(), "你取消了选择", Toast.LENGTH_SHORT).show();
    }
}).show();
return;
效果为:
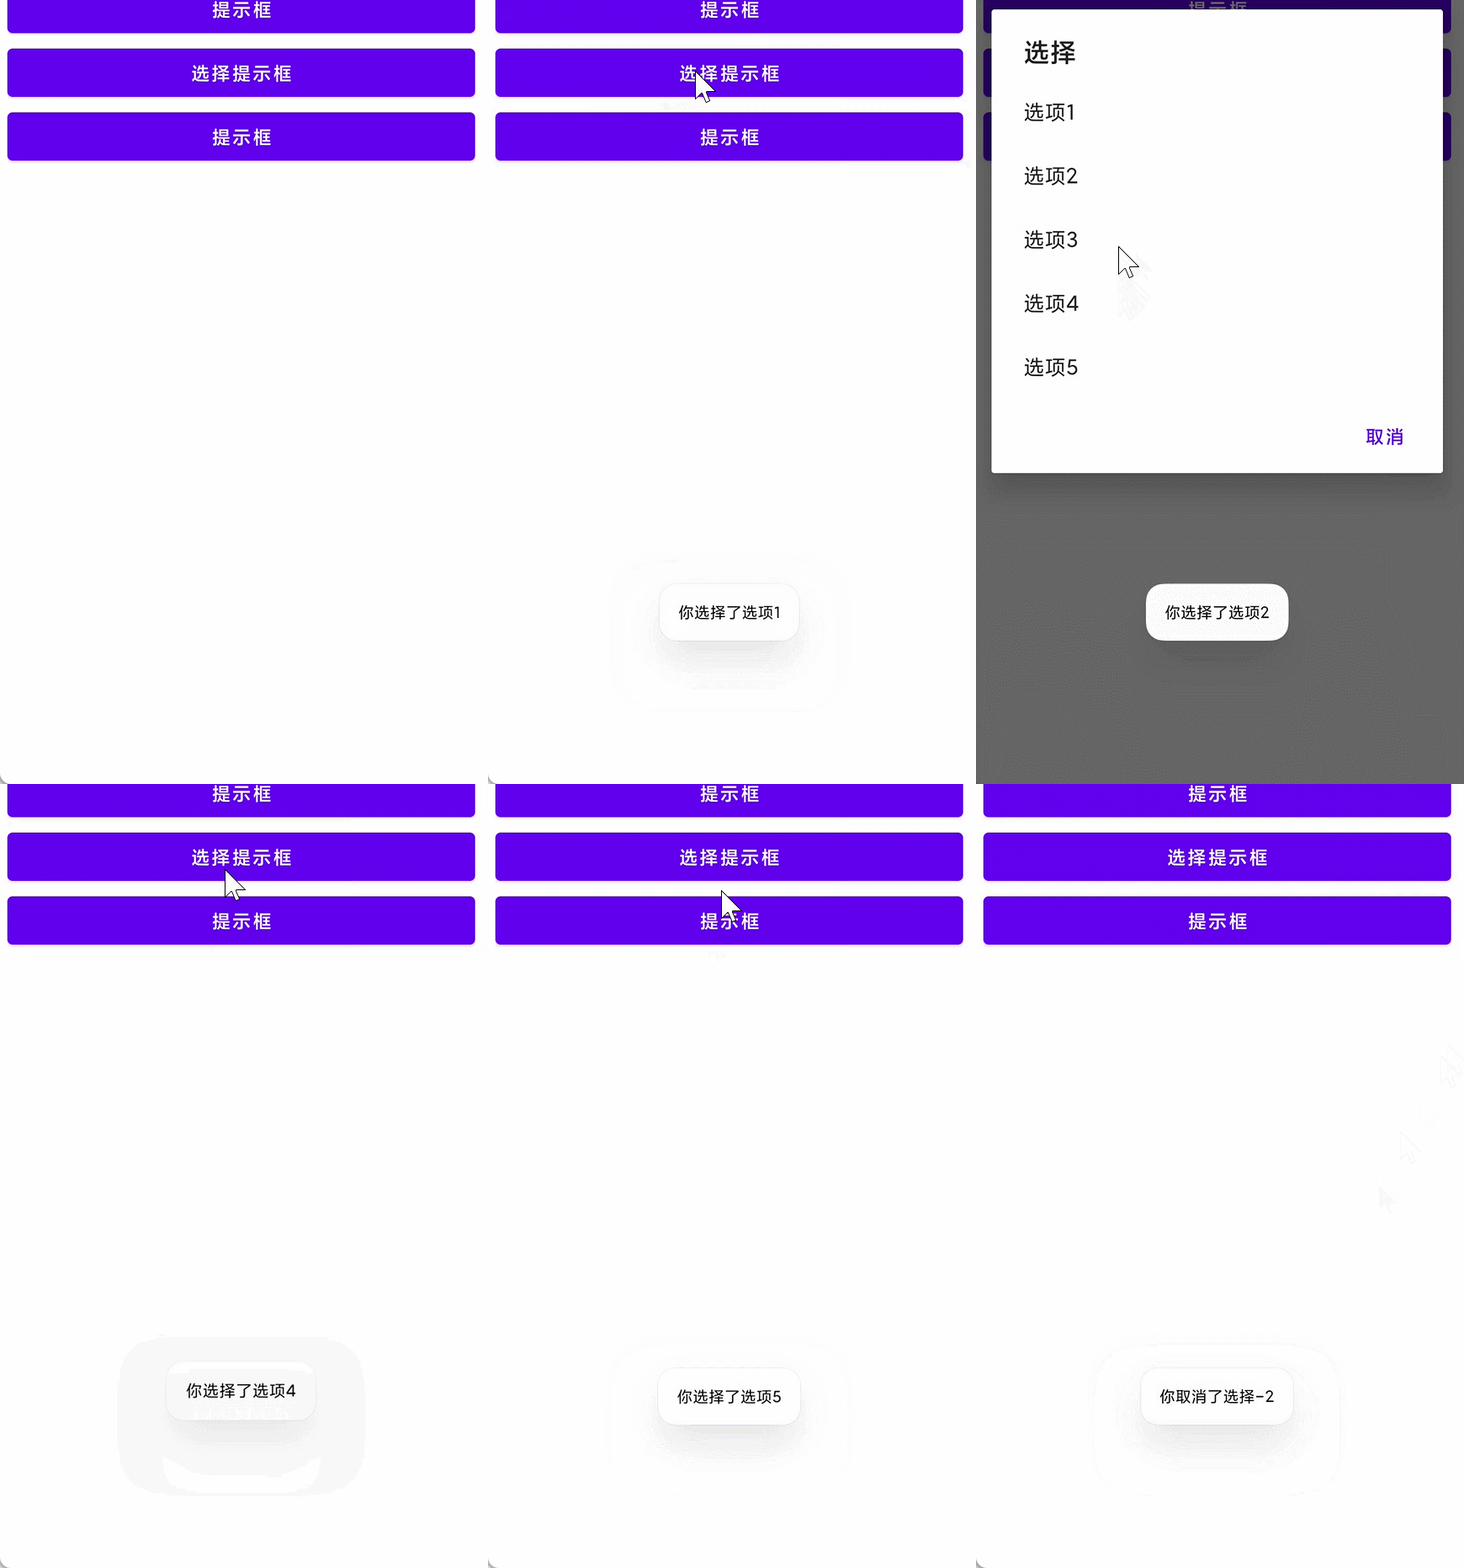
也可以修改为单选形式
单选弹出框
setCancelable(false)设置点击灰色区域不会隐藏对话框
dialog.dismiss();代表点击后隐藏对话框
AlertDialog.Builder builder2 = new AlertDialog.Builder(ToastActivity.this);
String[] items2 = new String[]{"选项1", "选项2", "选项3", "选项4", "选项5"};
builder2.setTitle("单选提示框").setSingleChoiceItems(items2, 0, new DialogInterface.OnClickListener() {
    @Override
    public void onClick(DialogInterface dialog, int which) {
        Toast.makeText(builder2.getContext(), "你选择了" + items2[which], Toast.LENGTH_SHORT).show();
        //点击选项后关闭对话框
        dialog.dismiss();
    }
}).setCancelable(false).setNegativeButton("取消", new DialogInterface.OnClickListener() {
    @Override
    public void onClick(DialogInterface dialog, int which) {
        Toast.makeText(builder2.getContext(), "你取消了选择", Toast.LENGTH_SHORT).show();
    }
}).show();
点击选项后会自动关闭对话框,点击对话框之外的地方不会关闭对话框
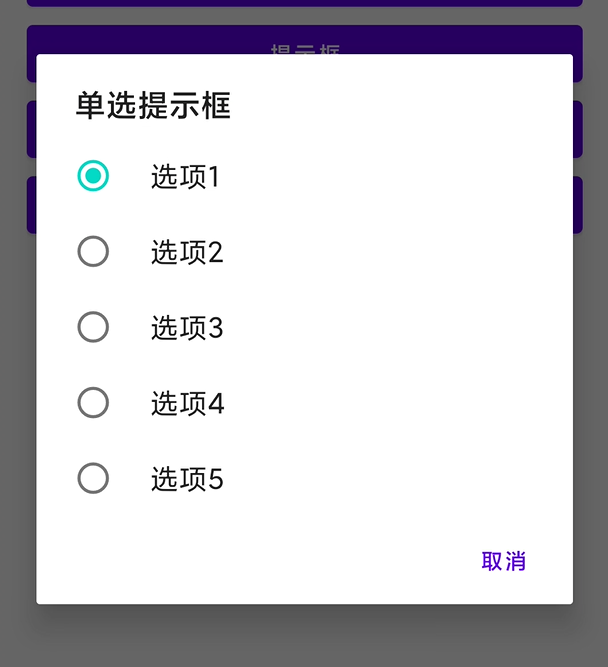
多选提示框
使用setMultiChoiceItems(Stirng数组, Boolean数组, 状态)方法
AlertDialog.Builder builder3 = new AlertDialog.Builder(ToastActivity.this);
String[] items3 = new String[]{"选项1", "选项2", "选项3", "选项4", "选项5"};
// 用来标记有没有被选中
boolean[] isChoose = new boolean[items3.length];
// 使第4个选项默认被选中
isChoose[3] = true;
builder3.setTitle("多选").setMultiChoiceItems(items3, isChoose, new DialogInterface.OnMultiChoiceClickListener() {
    @Override
    public void onClick(DialogInterface dialog, int which, boolean isChecked) {
        // 标记第which个的状态
        isChoose[which] = isChecked;
    }
}).setPositiveButton("确定", new DialogInterface.OnClickListener() {
    @Override
    public void onClick(DialogInterface dialog, int which) {
        String s = "";
        // 遍历整个数组,看有没有被选中
        for (int i = 0; i < items3.length; i++) {
            if (isChoose[i]){
                s += items3[i] + " ";
            }
        }
        Toast.makeText(builder3.getContext(), "你选择了" + s, Toast.LENGTH_SHORT).show();
    }
}).show();
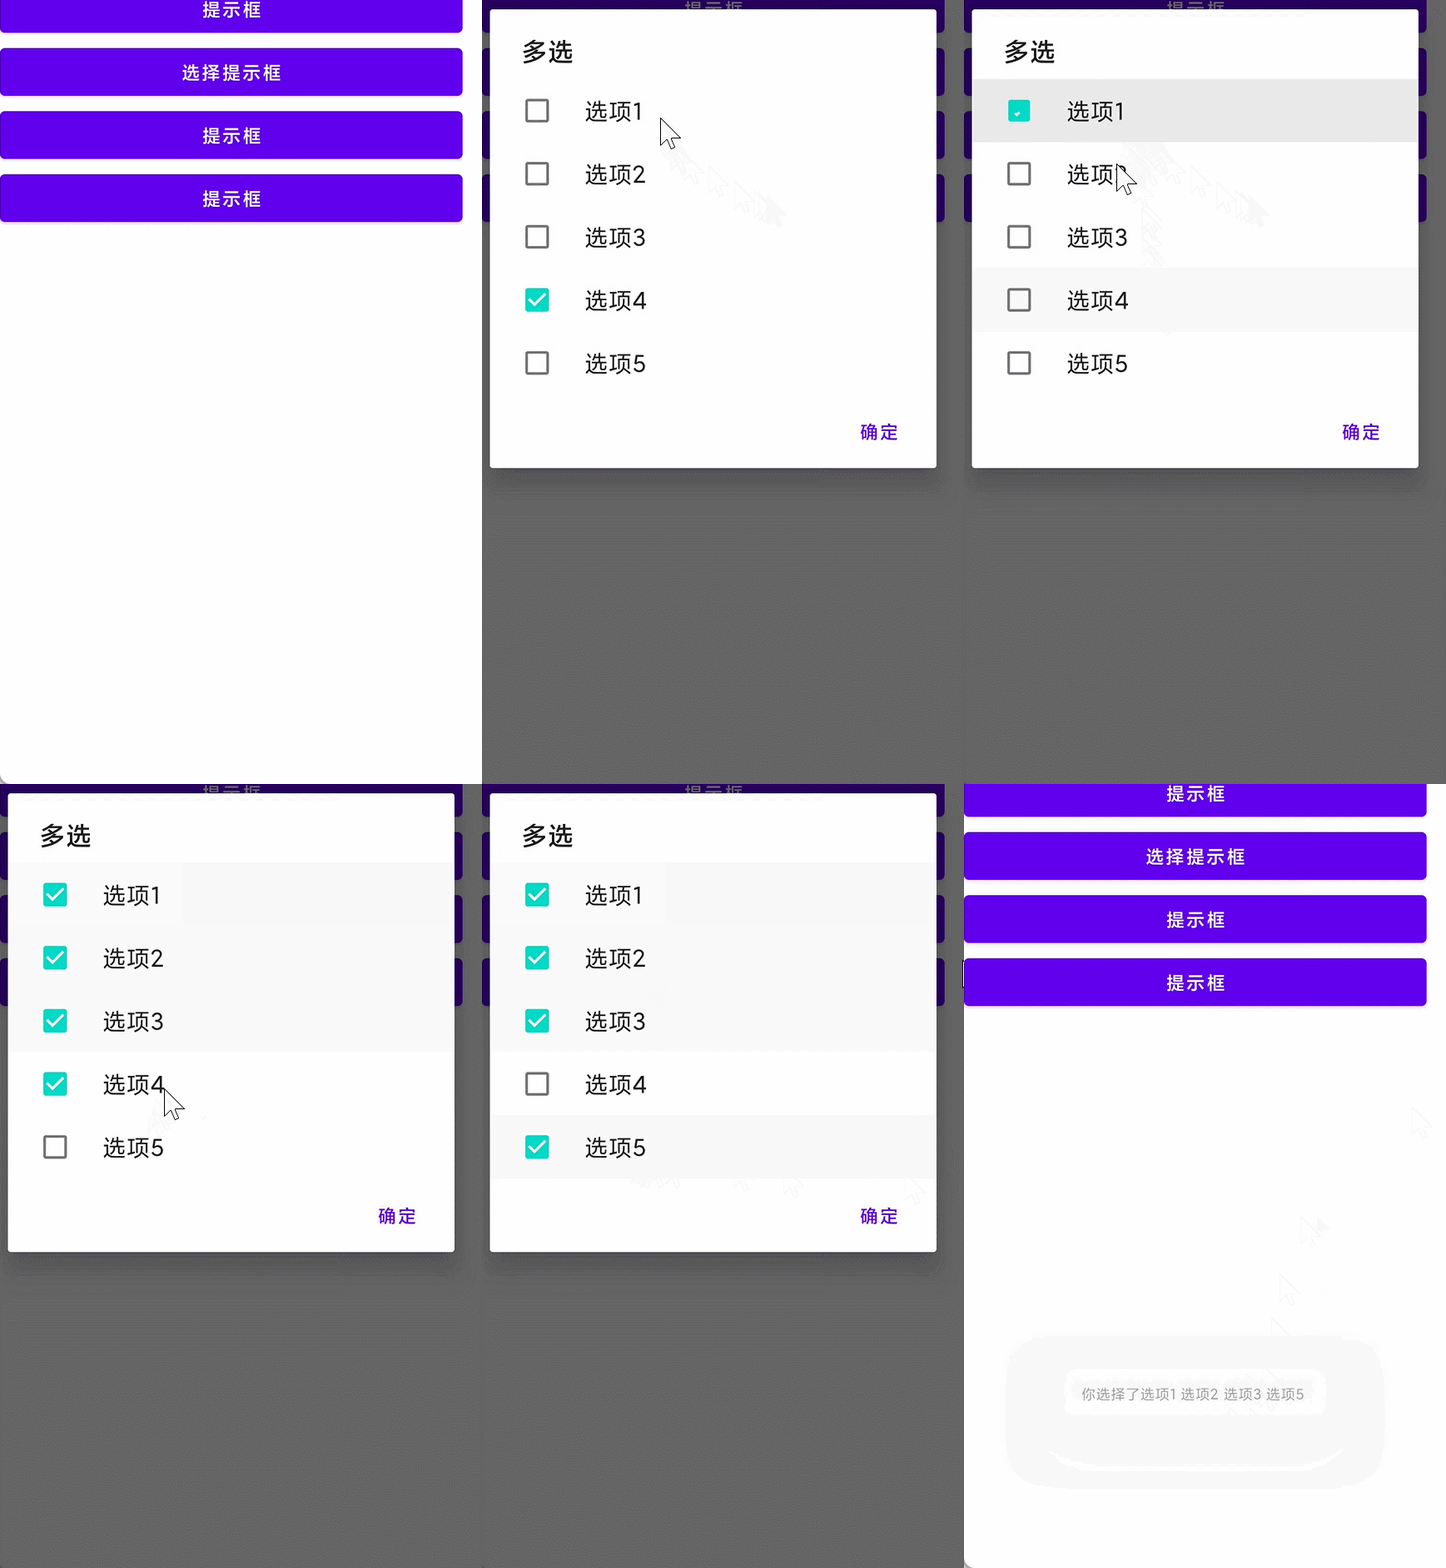
也可以自定义弹出的窗口显示的内容
- 新建一个布局,写上需要的组件
- 使用
LayoutInflater.from(xxx).inflate(xxxx)获取一个view new一个AlertDialog.Builder,为其设置标题- 使用
setView方法设置view 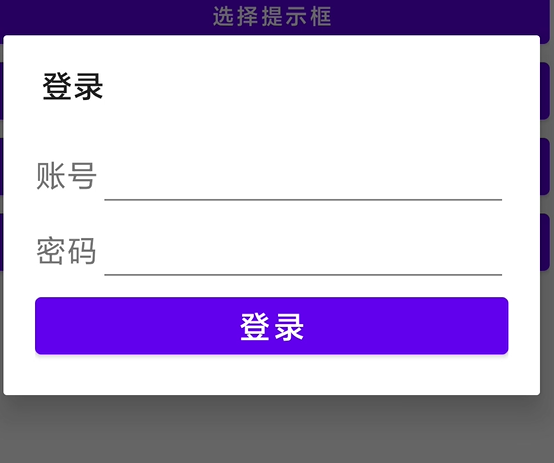
AlertDialog.Builder builder4 = new AlertDialog.Builder(ToastActivity.this);
View view1 = LayoutInflater.from(ToastActivity.this).inflate(R.layout.activity_login, null);
EditText username = view1.findViewById(R.id.username);
EditText password = view1.findViewById(R.id.login_password);
Button login = view1.findViewById(R.id.login_login);
login.setOnClickListener(new View.OnClickListener() {
    @Override
    public void onClick(View v) {

        Toast.makeText(ToastActivity.this, "账号:" + username.getText().toString() + "\n" + "密码:" + password.getText().toString(), Toast.LENGTH_SHORT).show();
    }
});
builder4.setTitle("登录").setView(view1).show();
xml
<?xml version="1.0" encoding="utf-8"?>
<LinearLayout xmlns:android="http://schemas.android.com/apk/res/android"
    xmlns:app="http://schemas.android.com/apk/res-auto"
    xmlns:tools="http://schemas.android.com/tools"
    android:layout_width="match_parent"
    android:layout_height="match_parent"
    tools:context=".Login_activity"
    android:orientation="vertical"
    android:padding="20dp">
    <LinearLayout
        android:layout_width="match_parent"
        android:layout_height="wrap_content"
        android:orientation="horizontal">
        <TextView
            android:layout_width="wrap_content"
            android:layout_height="wrap_content"
            android:text="账号"
            android:textSize="20sp"/>
        <EditText
            android:layout_width="match_parent"
            android:layout_height="wrap_content"
            android:textSize="20sp"
            android:maxLength="20"
            android:maxLines="1"
            android:id="@+id/login_username"/>
    </LinearLayout>
    <LinearLayout
        android:layout_width="match_parent"
        android:layout_height="wrap_content"
        android:orientation="horizontal">
        <TextView
            android:layout_width="wrap_content"
            android:layout_height="wrap_content"
            android:text="密码"
            android:textSize="20sp"/>
        <EditText
            android:layout_width="match_parent"
            android:layout_height="wrap_content"
            android:textSize="20sp"
            android:maxLines="1"
            android:id="@+id/login_password"
            android:inputType="textPassword"
            android:maxLength="20"/>
    </LinearLayout>
    <Button
        android:layout_width="match_parent"
        android:layout_height="wrap_content"
        android:text="登录"
        android:textSize="20dp"
        android:id="@+id/login_login"/>

</LinearLayout>
Progress Bar
progress 中文为进步、进度
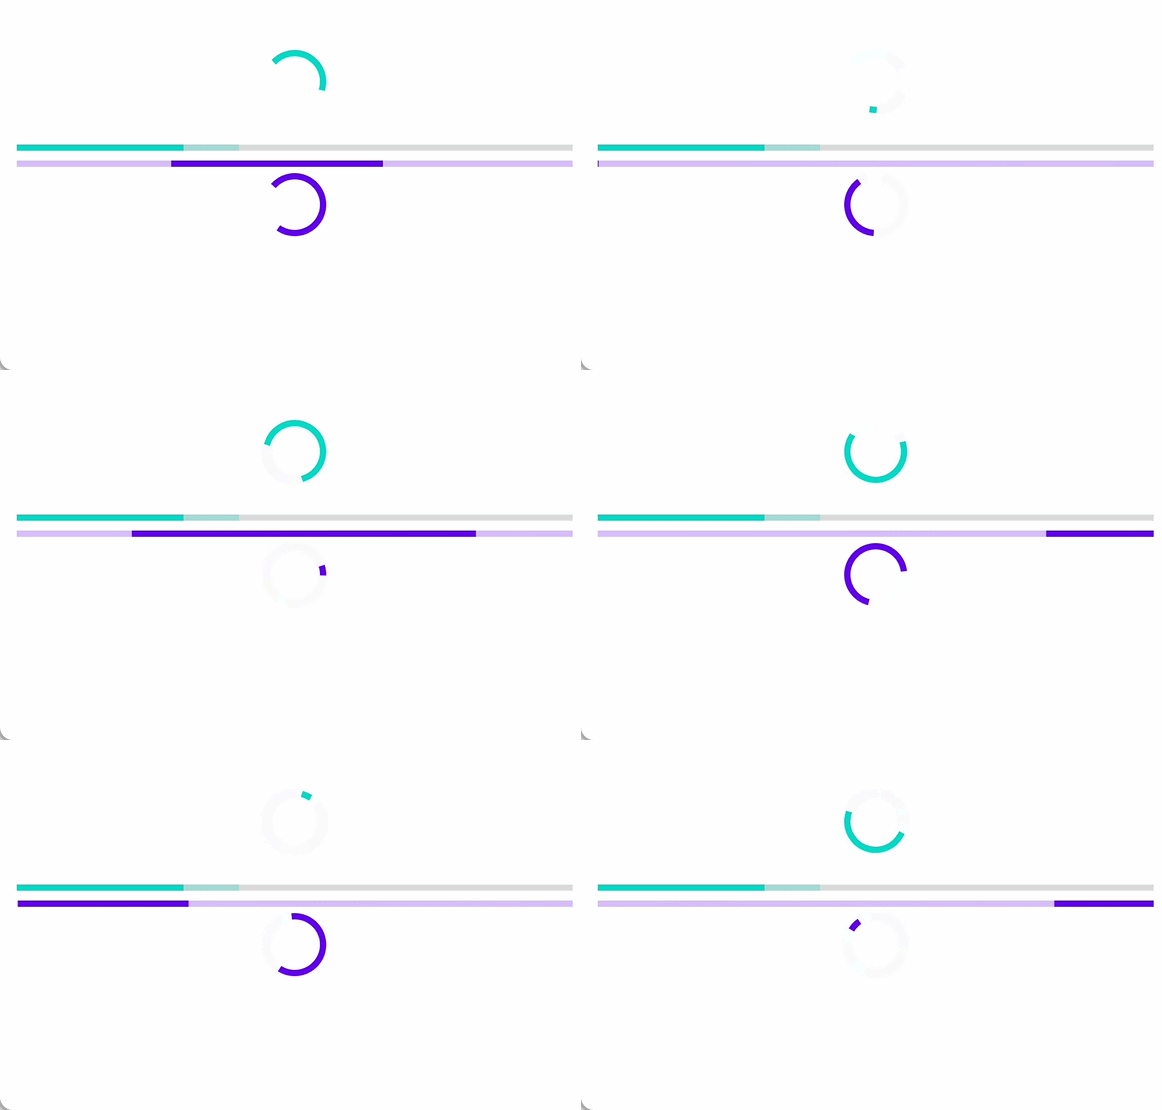
<?xml version="1.0" encoding="utf-8"?>
<LinearLayout xmlns:android="http://schemas.android.com/apk/res/android"
    xmlns:app="http://schemas.android.com/apk/res-auto"
    xmlns:tools="http://schemas.android.com/tools"
    android:layout_width="match_parent"
    android:layout_height="match_parent"
    android:gravity="center"
    android:orientation="vertical"
    android:padding="20dp"
    tools:context=".ProgressActivity">

    <ProgressBar
        android:layout_width="wrap_content"
        android:layout_height="wrap_content" />

    <ProgressBar
        style="@android:style/Widget.Material.ProgressBar.Horizontal"
        android:layout_width="match_parent"
        android:layout_height="wrap_content"
        android:layout_marginTop="10dp"
        android:max="100"
        android:progress="30"
        android:secondaryProgress="40" /><!--第二进度-->
    <!-- Linear progress indicator -->
    <com.google.android.material.progressindicator.LinearProgressIndicator
        android:layout_width="match_parent"
        android:layout_height="wrap_content"
        android:indeterminate="true" />
    <!-- Circular progress indicator -->
    <com.google.android.material.progressindicator.CircularProgressIndicator
        android:layout_width="wrap_content"
        android:layout_height="wrap_content"
        android:indeterminate="true" />

</LinearLayout>
也可以直接拖动出一个progressbar 水平,然后勾选indeterminate,读音:ˌindəˈtərmənət,中文为不定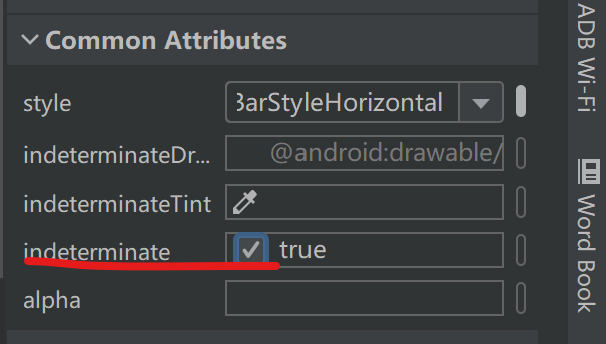
自定义加载进度
方式1
在drawable下新建一个资源文件,root element为animated-rotate
写入以下属性,这个文件中的drawable会进行旋转
<?xml version="1.0" encoding="utf-8"?>
<animated-rotate xmlns:android="http://schemas.android.com/apk/res/android"
    android:drawable="@drawable/load" <!--图片-->
    android:pivotX="50%"
    android:pivotY="50%"><!--设置旋转中心-->

</animated-rotate>
在布局文件中写入:
<ProgressBar
    android:layout_width="wrap_content"
    android:layout_height="wrap_content"
    android:indeterminateDrawable="@drawable/loading"/><!--自定义进度-->
方式2
还是在drawable下新建一个资源文件,root element为animated-rotate
在values/themes/themes.xml中,新建一个<style></style>标签,写入以下内容
<style name="样式名">
    <item name="android:indeterminateDrawable">@drawable/第一步新建的文件</item>
</style>
在布局文件中,将样式修改为刚才指定的样式
<ProgressBar
    android:layout_width="wrap_content"
    android:layout_height="wrap_content"
    style="@style/样式名"/>
Progress Dialog
可以显示加载中的对话框
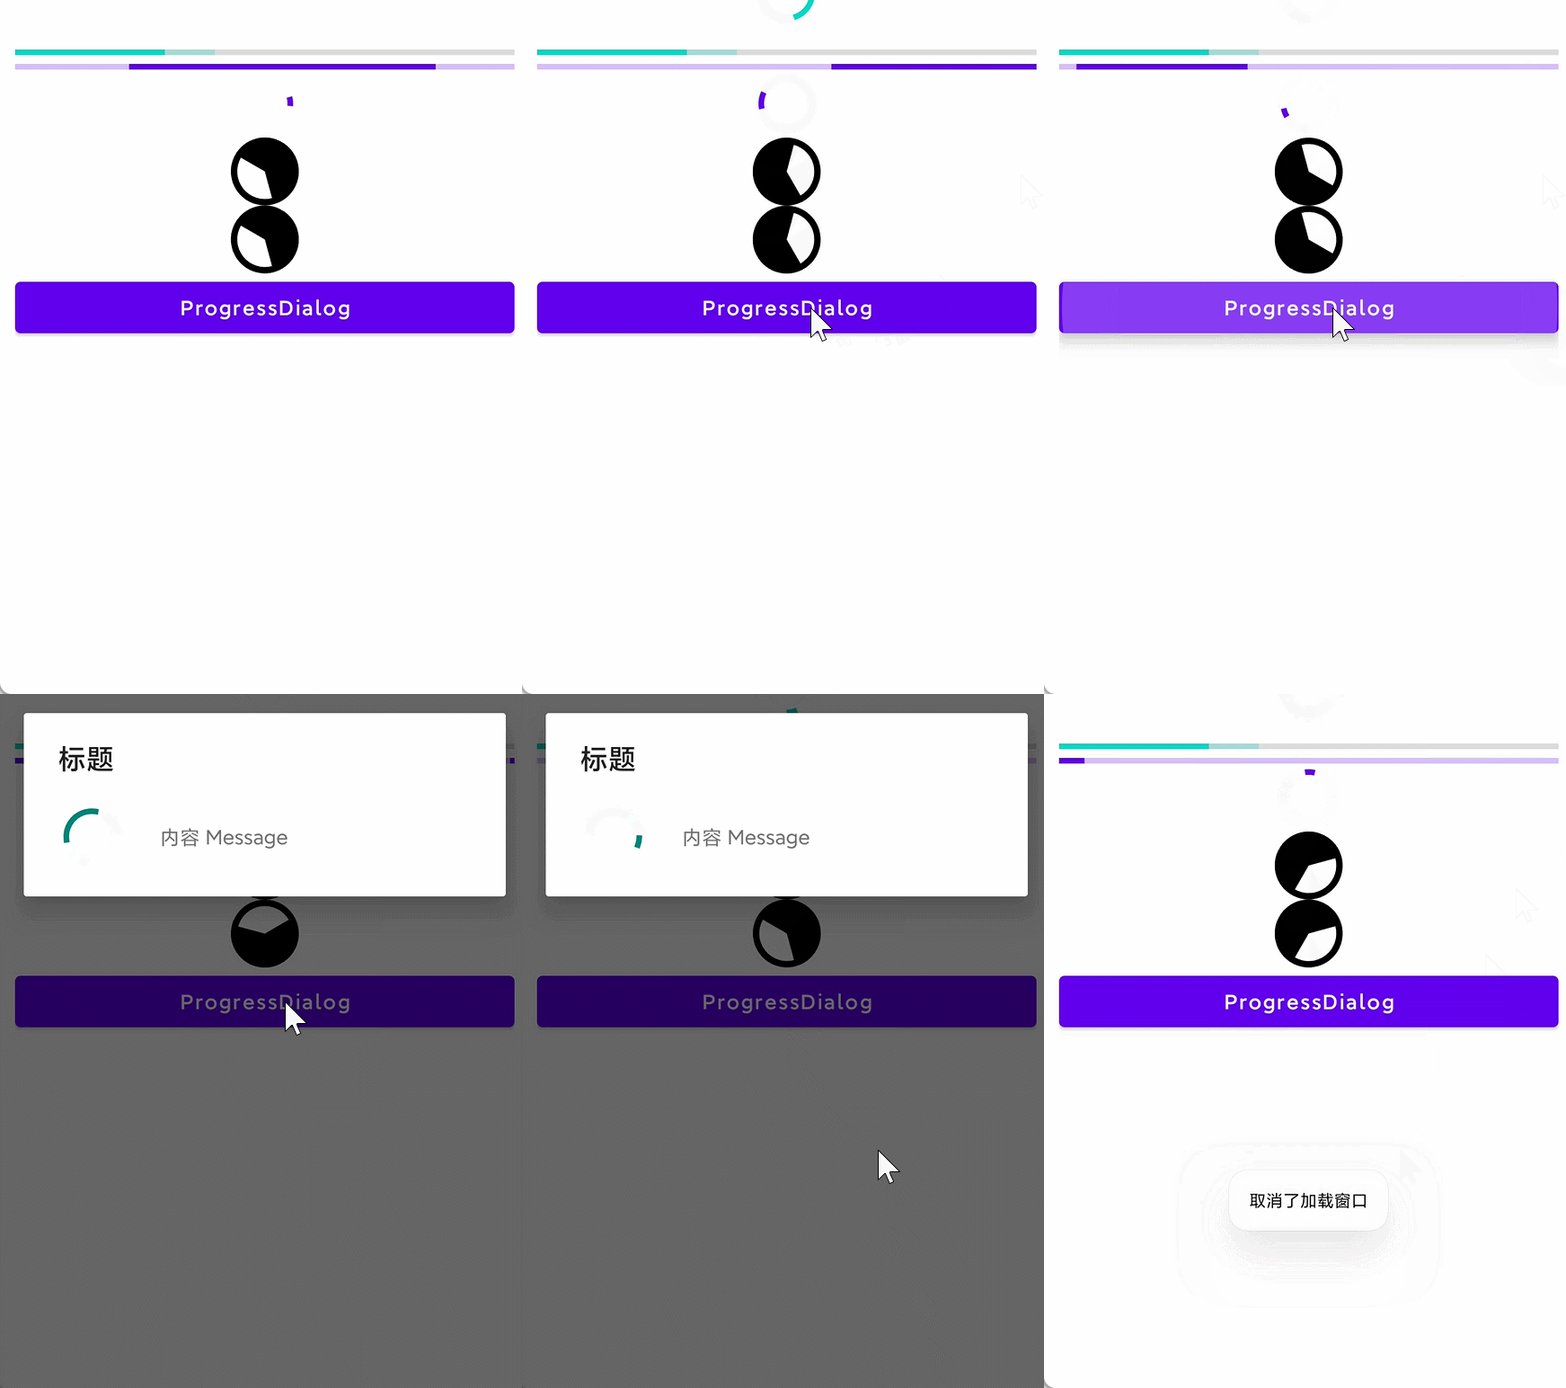
package com.example.layout;

import androidx.appcompat.app.AppCompatActivity;

import android.app.ProgressDialog;
import android.content.DialogInterface;
import android.os.Bundle;
import android.view.View;
import android.widget.Button;
import android.widget.Toast;

public class ProgressActivity extends AppCompatActivity {

    private Button button;

    @Override
    protected void onCreate(Bundle savedInstanceState) {
        super.onCreate(savedInstanceState);
        setContentView(R.layout.activity_progress);
        button = findViewById(R.id.progress_dialog_btn1);
        button.setOnClickListener(new View.OnClickListener() {
            @Override
            public void onClick(View v) {
                ProgressDialog dialog = new ProgressDialog(ProgressActivity.this);
                dialog.setTitle("标题");
                dialog.setMessage("内容 Message");
                dialog.show();
                // 设置按返回键或者按灰色区域取消掉对话框时显示的内容
                dialog.setOnCancelListener(new DialogInterface.OnCancelListener() {
                    @Override
                    public void onCancel(DialogInterface dialog) {
                        Toast.makeText(ProgressActivity.this, "取消了加载窗口", Toast.LENGTH_SHORT).show();
                    }
                });
            }
        });
    }
}
.setCancelable(false);方法可以设置不可取消这个窗口
Activity
回调Call Back
生命周期:
onCreate()- 在系统创建
Activity时触发 - 这个方法必须要实现
- 下一个触发的回调方法一定是
onStart()
- 在系统创建
onStart()- 执行完
onCreate()后触发 - 执行完
onRestart()后触发 - Activity 将进入“已启动”状态,并对用户可见。此回调包含 Activity 进入前台与用户进行互动之前的最后准备工作
- 下一个触发的回调方法一定是
onResume()
- 执行完
onResume()- resume读音为
rɪˈzuːm,中文为重新开始、继续(中断后)、简历、概述 - 下一个触发的回调方法一定是
onPause()
- resume读音为
onPause()- pause读音为
pɔːz,中文为暂停、停顿 - 通常会在当前的
Acttivity失去焦点并进入已暂停状态时执行 - 按下返回按钮、打开最近任务等会执行此状态
- 当
onResume()执行完之后,会执行这个方法 - 下一个触发的回调方法时
onStop()或者onResume()
- pause读音为
onStop()- 当
Activity不可见时会执行此方法 - 当前
Activity销毁时会执行 - 新的
Activity启动时会执行 - 现有的
Activity进入一回复状态并覆盖了已停止的Activity会执行 - 下一个出发的回调方法可能是
onRestart()(Activity重新启动了)或者onDestory()(Activity被终止了)
- 当
onRestart()- 当处于“已停止”状态的
Activity即将重启时,系统就会调用此回调。 - 下一个回调方法是
onStart()
- 当处于“已停止”状态的
onDestory()- 在销毁
Activity时执行 - 通常时
Activity所能接收的最后一个回调
- 在销毁
Google提供的生命周期图

刚打开应用,什么都不干:
onCreate()onStart()onResume()
进入新的Activity:
onPause()onStore()
在新的Activity返回:
onRestart()onStart()onResume()
按下Home键、多任务键:
onPause()onStop()
按下Home键后再打开程序、在多任务页面返回程序:
onRestart()onStart()onResume()
直接退出程序:
onPause()onStop()onDestroy()
横竖屏
在AndroidManifest.xml中的<activity></activity>标签中新增一个属性android:screenOrientation="值"可以锁定
值:
portrait,肖像,ˈpɔːrtrət,横屏
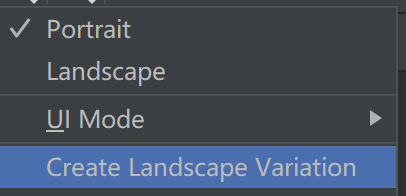
landscape 景观ˈlændskeɪp
variation 变异 ˌveriˈeɪʃn
创建一个横屏的副本
当屏幕翻转时,当前所在的Activity会被销毁掉,然后重新创建一个新的Activity
例如竖屏的Activity被销毁掉后创建一个新的横屏的Activity,横屏的Activity依旧会执行onCreate()、onstart()、onResume()
如果不保存数据,翻转屏幕后会丢失数据
View Model
MVVM模式
- 新建一个类,使其继承自
ViewModel - 在新建的类中写上需要的变量
- 在原本的
Activity所对应的类中,声明一个成员变量 成员变量 = new ViewModelProvider(this).get(新建的类名.class);
也可以将数据保存起来,使屏幕旋转后数据仍然存在,在之后的开发中,所用到的变量都可以声明在新建的类中,实现了分层
provide中文为提供
一个点击按钮数字自动增加的例子
package com.xiaoxu.second;

import androidx.appcompat.app.AppCompatActivity;
import androidx.lifecycle.ViewModelProvider;

import android.os.Bundle;
import android.view.View;
import android.widget.Button;
import android.widget.TextView;

public class NextActivity extends AppCompatActivity {

    NextViewModel viewModel;
    TextView textView;
    Button button;

    @Override
    protected void onCreate(Bundle savedInstanceState) {
        super.onCreate(savedInstanceState);
        setContentView(R.layout.activity_next);
        viewModel = new ViewModelProvider(this).get(NextViewModel.class);
        textView = findViewById(R.id.count);
        button = findViewById(R.id.add);

//        读取数据
        textView.setText(String.valueOf(viewModel.count));

        button.setOnClickListener(new View.OnClickListener() {
            @Override
            public void onClick(View v) {
                textView.setText(String.valueOf(++viewModel.count));
            }
        });
    }
}
package com.xiaoxu.second;

import android.view.View;

import androidx.lifecycle.ViewModel;

public class NextViewModel extends ViewModel {
    public int count = 0;
}
<?xml version="1.0" encoding="utf-8"?>
<androidx.constraintlayout.widget.ConstraintLayout xmlns:android="http://schemas.android.com/apk/res/android"
    xmlns:app="http://schemas.android.com/apk/res-auto"
    xmlns:tools="http://schemas.android.com/tools"
    android:layout_width="match_parent"
    android:layout_height="match_parent"
    tools:context=".NextActivity">

    <TextView
        android:id="@+id/count"
        android:layout_width="wrap_content"
        android:layout_height="wrap_content"
        android:text="TextView"
        android:textSize="48sp"
        app:layout_constraintBottom_toBottomOf="parent"
        app:layout_constraintEnd_toEndOf="parent"
        app:layout_constraintStart_toStartOf="parent"
        app:layout_constraintTop_toTopOf="parent" />

    <androidx.constraintlayout.widget.Guideline
        android:id="@+id/guideline4"
        android:layout_width="wrap_content"
        android:layout_height="wrap_content"
        android:orientation="horizontal"
        app:layout_constraintGuide_percent="0.5" />

    <Button
        android:id="@+id/add"
        android:layout_width="wrap_content"
        android:layout_height="wrap_content"
        android:text="Button"
        app:layout_constraintBottom_toBottomOf="parent"
        app:layout_constraintEnd_toEndOf="parent"
        app:layout_constraintStart_toStartOf="parent"
        app:layout_constraintTop_toTopOf="@+id/guideline4" />
</androidx.constraintlayout.widget.ConstraintLayout>
LiveData
- 写一个类,使其继承自
ViewModel类 - 在新建的类中,需要显示在页面上的成员变量都是
MutableLiveData<类型>类型的,并提供相应的getter,在构造器中new一个相应的成员变量,并赋初值 - 在相应的
Activity对应的类中,声明一个成员变量,并使成员变量 = new ViewModelProvider(this).get(新建的类名.class); - 在
Activity对应的类中,逐个获取MutableLiveData类型的成员变量,并在获取的成员变量上调用observe(this, Observer类型的对象)- 这个方法作用是观察值的改变并通知
- 第二个参数可以是匿名实现的
- 在实现类中,需要写
onChange(类型)方法,这个方法的作用是所观察的值发生改变了所进行的操作,例如发生改变后改变页面上的显示内容
- 在实现类中,需要写
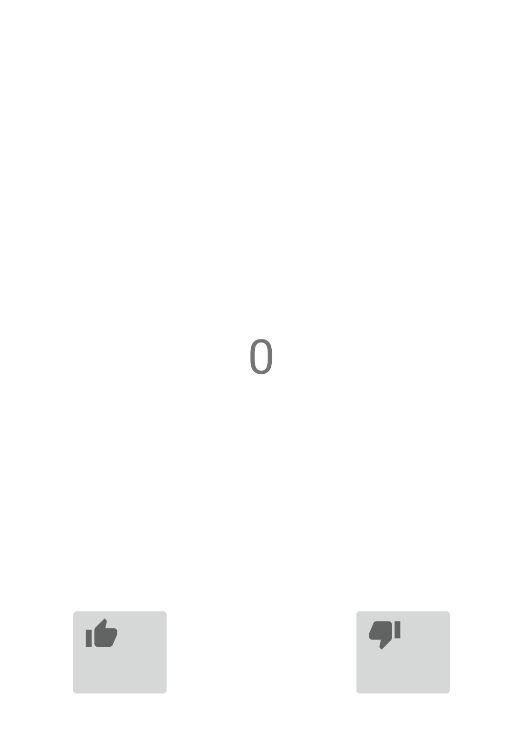 、
、
上图所示的例子中,点第一个按钮,值+1,点第二个按钮,值-1
package com.xiaoxu.second;

import androidx.appcompat.app.AppCompatActivity;
import androidx.lifecycle.Observer;
import androidx.lifecycle.ViewModelProvider;

import android.os.Bundle;
import android.view.View;
import android.widget.ImageButton;
import android.widget.TextView;

public class ThirdActivity extends AppCompatActivity {
    ViewModelWithLiveData data;
    private ImageButton up, down;
    private TextView textView;

    @Override
    protected void onCreate(Bundle savedInstanceState) {
        super.onCreate(savedInstanceState);
        setContentView(R.layout.activity_third);
        up = findViewById(R.id.up_button);
        down = findViewById(R.id.down_button);
        textView = findViewById(R.id.textView);
        // 第一个参数需要传递具有管理功能的对象,一般情况下,每个Activity都有这个功能
        data = new ViewModelProvider(this).get(ViewModelWithLiveData.class);
        // 观察者模式,当数据发生改变时会自动的调用以下的方法
        data.getNum().observe(this, new Observer<Integer>() {
            @Override
            public void onChanged(Integer integer) {
                // 如果这个值发生变化,此时自动将变化后的值显示在textView中
                textView.setText(integer.toString());
            }
        });
        up.setOnClickListener(new View.OnClickListener() {
            @Override
            public void onClick(View v) {
                data.addNum(1);
            }
        });
        down.setOnClickListener(new View.OnClickListener() {
            @Override
            public void onClick(View v) {
                data.addNum(-1);
            }
        });
    }
}
package com.xiaoxu.second;

import androidx.lifecycle.MutableLiveData;
import androidx.lifecycle.ViewModel;

public class ViewModelWithLiveData extends ViewModel {
    MutableLiveData<Integer> num;

    public ViewModelWithLiveData() {
        this.num = new MutableLiveData<>();
        this.num.setValue(0);
    }

    public MutableLiveData<Integer> getNum() {
        return num;
    }

    public void addNum(int n){
        num.setValue(num.getValue() + n);
    }
}
使用这种方式存储的数据,当屏幕旋转后也会正常的显示数据
Data Binding
-
在
build.gradle中的android{}中添加-
buildFeatures {
    dataBinding true
}
用来开启数据绑定
-
-
在布局文件中,
Alt + Enter->Convert to data binding layout,转换为数据绑定布局 -

-
在
Activity对应的类中,声明一个Activity类名Binding类型的成员变量 -
将
onCreate()方法中第二行自动生成的setContentView(R.layout.布局名);注释掉,使Activity类名Binding类型的成员变量 = DataBindingUtil.setContentView(this, R.layout.当前布局名); -
在之后的使用相关的组件时,直接使用
Activity类名Binding类型的成员变量.id
经过观察,转换后的xml中还有一个<data></data>标签,在这个标签中可以声明一些变量进行绑定,例如上例中有两个按钮,一个是赞,一个是踩,还有一个textview
-
赞和踩的数据是由
ViewModelWithLiveData类所管理的,因此可以在<data></data>标签中声明这个类型的变量-
格式
-
<variable name = "变量名" type = "类型,为全类名"/> -
针对上例,声明内容如下
-
<data>
    <variable
        name="data"
        type="com.xiaoxu.second.ViewModelWithLiveData" />
</data>
-
-
-
-
还可以添加
java代码- 在原
Activity的类中,textView有显示的值,这个值就是赞的个数,可以直接为其绑定java代码,直接在xml中按钮的位置添加android:text=@{}属性,在{}中可以填写java代码(针对<data></data>标签中声明的变量) - 赞和踩都有相应的监听事件,此时可以删掉原本的监听事件,通常的监听事件可以是一个方法,直接在
xml中按钮的位置添加android:onClick = @{()->}属性,在{()->}中的->后可以填写方法名(针对<data></data>标签中声明的变量的方法)
- 在原
-
在原
Activity对应的Java类中,使用数据绑定变量.setXxx(变量)为<data></data>标签中的变量设置值 -
最后,设置生命周期为当前对象,即````binding.setLifecycleOwner(this);```
去掉没用的代码后的内容
package com.xiaoxu.second;

import androidx.appcompat.app.AppCompatActivity;
import androidx.databinding.DataBindingUtil;
import androidx.lifecycle.ViewModelProvider;

import android.os.Bundle;

import com.xiaoxu.second.databinding.ActivityThirdBinding;

public class ThirdActivity extends AppCompatActivity {
    ViewModelWithLiveData liveData;

    ActivityThirdBinding binding;

    @Override
    protected void onCreate(Bundle savedInstanceState) {
        super.onCreate(savedInstanceState);
        binding = DataBindingUtil.setContentView(this, R.layout.activity_third);
        // 第一个参数需要传递具有管理功能的对象,一般情况下,每个Activity都有这个功能
        liveData = new ViewModelProvider(this).get(ViewModelWithLiveData.class);
        // 为xml中声明的变量设置实体的对象
        binding.setData(liveData);
        // 设置生命周期为当前对象
        binding.setLifecycleOwner(this);
    }
}
<?xml version="1.0" encoding="utf-8"?>
<layout xmlns:android="http://schemas.android.com/apk/res/android"
    xmlns:app="http://schemas.android.com/apk/res-auto"
    xmlns:tools="http://schemas.android.com/tools">

    <data>
        <variable
            name="data"
            type="com.xiaoxu.second.ViewModelWithLiveData" />
    </data>

    <androidx.constraintlayout.widget.ConstraintLayout
        android:layout_width="match_parent"
        android:layout_height="match_parent"
        tools:context=".ThirdActivity">

        <TextView
            android:id="@+id/textView"
            android:layout_width="wrap_content"
            android:layout_height="wrap_content"
            android:text="@{data.getNum().toString()}"
            android:textSize="34sp"
            app:layout_constraintBottom_toBottomOf="parent"
            app:layout_constraintEnd_toEndOf="parent"
            app:layout_constraintStart_toStartOf="parent"
            app:layout_constraintTop_toTopOf="parent" />

        <ImageButton
            android:id="@+id/up_button"
            android:layout_width="wrap_content"
            android:layout_height="wrap_content"
            android:onClick="@{()->data.addNum(1)}"
            app:layout_constraintBottom_toBottomOf="parent"
            app:layout_constraintEnd_toEndOf="parent"
            app:layout_constraintHorizontal_bias="0.186"
            app:layout_constraintStart_toStartOf="parent"
            app:layout_constraintTop_toTopOf="parent"
            app:layout_constraintVertical_bias="0.856"
            app:srcCompat="@drawable/up" />

        <ImageButton
            android:id="@+id/down_button"
            android:layout_width="wrap_content"
            android:layout_height="wrap_content"
            app:layout_constraintBottom_toBottomOf="parent"
            app:layout_constraintEnd_toEndOf="parent"
            app:layout_constraintHorizontal_bias="0.816"
            app:layout_constraintStart_toStartOf="parent"
            app:layout_constraintTop_toTopOf="parent"
            app:layout_constraintVertical_bias="0.856"
            app:srcCompat="@drawable/down"
            android:onClick="@{()->data.addNum(-1)}"/>

    </androidx.constraintlayout.widget.ConstraintLayout>
</layout>
Intent
Intent传递数据:
-
假设有两个
Activity,分别为Activity1、Activity2 -
在
Activity1中-
Intent intent = new Intent(this, 下一个Activity所在的类.class);
intent.putExtra("键", 值);
startActivity(intent);
-
-
在
Activity2中-
Intent intent = getIntent();
//获取值
intent.getStringExtra("键");
-
分为显式的Intent和隐式的Intent
显式的Intent
Intent intent = new Intent(this, XxxActivity.class);
startActivity(intent);
隐式Intent
隐式的Intent:
- 在清单文件中相应的
<activity></activity>标签中新建一个<intent-filter></intent-filter>标签 - 在
<intent-filter></intent-filter>标签中新建两个空body标签,分别为<action android:name="自定义活动名称" /><category android:name="android.intent.category.DEFAULT" />- category中文为类别,读音为
ˈkætəɡɔːri,只有这只这个值之后才能够作为隐式的Intent
- 此时实例化
Intent时可以将自定义活动名称传递进去匹配构造函数
例如
<activity
    android:name=".CameraActivity"
    android:exported="false">
    <intent-filter>
        <action android:name="a.b.c" />
        <category android:name="android.intent.category.DEFAULT" />
    </intent-filter>
</activity>
Intent intent = new Intent("a.b.c");
btn1 = findViewById(R.id.btn1);
btn1.setOnClickListener(v -> {
    startActivity(intent);
});
此时点击按钮时,会跳转到CameraActivity
一般来说,一个action可以对应多个category,可以调用intent.addCategory("")方法添加一个在当前指向的activiry的写在<intent-filter></intent-filter>中的一个category
category的值也是可以自定义的
获取另外的activity返回的内容
需要在第一个activity中重写onActivityResult方法,这个方法有三个参数
- 参数1为请求码
- 参数2为结果码
- 参数3为Intent
可以使用switch(参数1)来匹配
启动新的Activity时,使用startActivityForResult(intent, 请求码)进行启动,只不过现在这个方法已被标识为过时的
在新的activity中,使用以下语句进行向上个activity传递值:
Intent intent = new Intent();
intent.putExtra("键", "值");
setResult(RESULT_OK, intent);
例如
@Override
protected void onActivityResult(int requestCode, int resultCode, @Nullable Intent data) {
    super.onActivityResult(requestCode, resultCode, data);
    switch (requestCode) {
        case 1:
            if (resultCode == RESULT_OK) {
                String result = data.getStringExtra("return");
                Log.d(TAG, "onActivityResult: " + result);
            }
    }
}
广播
Recever 中文为接受者,读音为rɪˈsiːvər
Broadcast 中文为广播,读音为ˈbrɔːdkæst
接收广播
注册广播:
- 静态广播:
- 在清单文件中注册
- 在Android 8.0系统之后,所有隐式广播都不允许使用静态注册的方式来接收了。隐式广播指的 是那些没有具体指定发送给哪个应用程序的广播,大多数系统广播属于隐式广播,但是少数特 殊的系统广播目前仍然允许使用静态注册的方式来接收。
- 此种方式无法接收隐式的广播
- 动态广播
- 新建一个类,使其继承自
BroadcastReceiver - 重写
onReceive()方法,这个方法中的内容为当监听到某个广播后程序作出的回应,可以做弹出对话框之类的 - 在需要添加广播的
Activity中的类中实例化一个新建的类 - 调用
registerReceiver(广播类, IntentFilter监听的广播)
- 新建一个类,使其继承自
例如,监听事件变化的广播
package com.xiaoxu.second;

import android.content.BroadcastReceiver;
import android.content.Context;
import android.content.Intent;
import android.widget.Toast;

public class MyBroadcastReceiver extends BroadcastReceiver {
    @Override
    public void onReceive(Context context, Intent intent) {
        Toast.makeText(context, "时间发生了改变", Toast.LENGTH_SHORT).show();
    }
}
package com.xiaoxu.second;

import androidx.appcompat.app.AppCompatActivity;

import android.app.AlertDialog;
import android.content.BroadcastReceiver;
import android.content.Intent;
import android.content.IntentFilter;
import android.net.Uri;
import android.os.Bundle;
import android.widget.TextView;

public class IntentActivity extends AppCompatActivity {

    TextView view;
    @Override
    protected void onCreate(Bundle savedInstanceState) {
        super.onCreate(savedInstanceState);
        setContentView(R.layout.activity_intent);
        BroadcastReceiver broadcastReceiver = new MyBroadcastReceiver();
        // 注册广播
        registerReceiver(broadcastReceiver, new IntentFilter("android.intent.action.TIME_TICK"));
    }
}
可以在需要的位置调用unregisterReceiver(广播实例)取消注册广播
查看所有的广播列表:
- 如果没有修改过默认的Android SDK路径的话,那么所有的广播列表的内容是在
C:\Users\singx\AppData\Local\Android\Sdk\platforms\API版本\data\broadcast_actions.txt中
发送广播
此时可以采用在清单文件中声明静态广播以用来接收自定义的广播
<receiver
    android:name=".处理接收广播对应的类"
    android:enabled="true"
    android:exported="true" >
    <intent-filter>
        <action android:name="自定义的广播标识字符串"/>
    </intent-filter>
</receiver>
处理接收广播对应的类
import android.content.BroadcastReceiver;
import android.content.Context;
import android.content.Intent;
import android.widget.Toast;

public class 处理接收广播对应的类 extends BroadcastReceiver {

    @Override
    public void onReceive(Context context, Intent intent) {
        // 接收到广播后执行的代码
    }
}
发送广播
Intent intent = new Intent("自定义的广播标识字符串");
// 设置包名,包名为应用程序的包名
intent.setPackage(getPackageName());
// 发送广播
sendBroadcast(intent);
因为不设置包的情况下默认是隐式广播,所以要为其设置好包名,设置好包名之后,此时会变为显式广播,指定为显式广播后就能够指明这条广播是发给哪个程序的,此时才能够使用清单文件的方式接收广播,显式广播可以使用在清单文件中声明的方式接收广播
发送有序广播
-
发送有序广播,前提是有多个
receiver匹配同一个自定义的广播标识字符串 -
将普通的发送广播的
sendBroadcast(intent)修改为sendOrderedBroadcast(intent, 权限相关的字符串),权限相关的字符串可以为null -
多个有序广播的
receiver可以设置不同的优先级,需要在<intent-filter>标签上添加android:priority="值"-
例如
<receiver android:name=".MyReceiver2" android:enabled="true" android:exported="true"> <intent-filter android:priority="1000"> <action android:name="com.notify"/> </intent-filter> </receiver> -
数字越大,优先级越高,越先被优先的接收处理广播
-
-
如果在相关的处理广播的类中的
onReceive()方法(读音rəˈsēv,中文为收到)中调用了abortBroadcast()方法,此时将会中止接收广播,后续的类中不会接收到这个广播,abortəˈbɔːrt中止
数据存储
Context类提供了OpenFileOutput("文件名", 模式)和OpenFileInput("文件名")
其中针对文件输出的模式有两种:
Context.MODE_PRIVATE,如果文件存在,覆盖之前的文件Context.MODE_APPEND,如果文件存在,将新的文件追加到末尾
文件默认的保存位置为/data/data/包名/files/
下例为将字符串保存为文本
package com.xiaoxu.filesave;

import androidx.appcompat.app.AppCompatActivity;

import android.content.Context;
import android.os.Bundle;
import android.view.View;
import android.widget.Button;
import android.widget.EditText;

import java.io.BufferedReader;
import java.io.BufferedWriter;
import java.io.FileNotFoundException;
import java.io.IOException;
import java.io.InputStreamReader;
import java.io.OutputStreamWriter;

public class MainActivity extends AppCompatActivity {

    EditText editText;
    Button save, get;


    public String getText(){
        BufferedReader bufferedReader = null;
        try {
            bufferedReader = new BufferedReader(new InputStreamReader(openFileInput("1.txt")));
            return bufferedReader.readLine();
        } catch (FileNotFoundException e) {
            e.printStackTrace();
        } catch (IOException e) {
            e.printStackTrace();
        } finally {
            try {
                bufferedReader.close();
            } catch (IOException e) {
                e.printStackTrace();
            }
        }
        return null;
    }

    public void saveText(String s){
        BufferedWriter bufferedWriter = null;
        try {
            bufferedWriter = new BufferedWriter(new OutputStreamWriter(openFileOutput("1.txt", Context.MODE_PRIVATE)));
            bufferedWriter.write(s);
        } catch (FileNotFoundException e) {
            e.printStackTrace();
        } catch (IOException e) {
            e.printStackTrace();
        } finally {
            try {
                bufferedWriter.close();
            } catch (IOException e) {
                e.printStackTrace();
            }
        }
    }

    @Override
    protected void onCreate(Bundle savedInstanceState) {
        super.onCreate(savedInstanceState);
        setContentView(R.layout.activity_main);
        editText = findViewById(R.id.text_save);
        save = findViewById(R.id.submit);
        get = findViewById(R.id.get);
        get.setOnClickListener(new View.OnClickListener() {
            @Override
            public void onClick(View view) {
                editText.setText(getText());
            }
        });
        save.setOnClickListener(new View.OnClickListener() {
            @Override
            public void onClick(View view) {
                saveText(editText.getText().toString());
            }
        });
    }
}
自动保存和自动读取内容
package com.xiaoxu.filesave;

import androidx.appcompat.app.AppCompatActivity;

import android.content.Context;
import android.os.Bundle;
import android.view.View;
import android.widget.Button;
import android.widget.EditText;

import java.io.BufferedReader;
import java.io.BufferedWriter;
import java.io.FileNotFoundException;
import java.io.IOException;
import java.io.InputStreamReader;
import java.io.OutputStreamWriter;

public class MainActivity extends AppCompatActivity {

    EditText editText;
    Button save, get;


    public String getText(){
        BufferedReader bufferedReader = null;
        try {
            bufferedReader = new BufferedReader(new InputStreamReader(openFileInput("1.txt")));
            String t;
            StringBuilder s = new StringBuilder();
            while ((t = bufferedReader.readLine()) != null){
                s.append(t + "\n");
            }
            return s.toString().substring(0, s.toString().length() - 1);
        } catch (FileNotFoundException e) {
            e.printStackTrace();
        } catch (IOException e) {
            e.printStackTrace();
        } finally {
            try {
                bufferedReader.close();
            } catch (IOException e) {
                e.printStackTrace();
            }
        }
        return null;
    }

    public void saveText(String s){
        BufferedWriter bufferedWriter = null;
        try {
            bufferedWriter = new BufferedWriter(new OutputStreamWriter(openFileOutput("1.txt", Context.MODE_PRIVATE)));
            bufferedWriter.write(s);
        } catch (FileNotFoundException e) {
            e.printStackTrace();
        } catch (IOException e) {
            e.printStackTrace();
        } finally {
            try {
                bufferedWriter.close();
            } catch (IOException e) {
                e.printStackTrace();
            }
        }
    }

    @Override
    protected void onCreate(Bundle savedInstanceState) {
        super.onCreate(savedInstanceState);
        setContentView(R.layout.activity_main);
        editText = findViewById(R.id.text_save);
        save = findViewById(R.id.submit);
        get = findViewById(R.id.get);
        get.setOnClickListener(new View.OnClickListener() {
            @Override
            public void onClick(View view) {
                editText.setText(getText());
            }
        });
        save.setOnClickListener(new View.OnClickListener() {
            @Override
            public void onClick(View view) {
                saveText(editText.getText().toString());
            }
        });
    }

    @Override
    protected void onResume() {
        super.onResume();
        editText.setText(getText());
    }

    @Override
    protected void onPause() {
        super.onPause();
        saveText(editText.getText().toString());
    }
}
SharedPreferences存储
中文为分享喜好,这种存储方式是使用键值对的方式进行存储的,存储的格式为xml
在Context类中,拥有getSharedPreferences("文件名", Context.MODE_PRIVATE)方法,可以获取一个SharedPreferences实例,参数2的其他写法已被废弃
在Activity类中,有一个getPreference(Context.MODE_PRIVATE)方法也可以获取一个SharedPreferences实例,只不过此时是以当前的Activity作为类名进行提供的
可以通过SharedPreferences实例的.getXxx("键", 默认值)的方法在xml中获取值,如果键不存在,此时获取的值为设置的默认值
可以通过SharedPreferences实例.edit()方法获取一个SharedPreferences.Editor类型的实例,通过这个实例可以插入一些键值对,调用putXxx("键", 值)可以插入值,最后需要调用apply()方法将这些值存到文件中
允许插入String、long、int、float、Set<String>、boolean类型的值
每个键只能有一个值,即使类型不相同
package com.xiaoxu.filesave;

import androidx.appcompat.app.AppCompatActivity;

import android.content.Context;
import android.content.SharedPreferences;
import android.os.Bundle;

import java.util.Arrays;
import java.util.HashSet;

public class SharedPreferencesActivity extends AppCompatActivity {

    @Override
    protected void onCreate(Bundle savedInstanceState) {
        super.onCreate(savedInstanceState);
        setContentView(R.layout.activity_shared_preferences);
        SharedPreferences test1 = getSharedPreferences("test1", Context.MODE_PRIVATE);
        SharedPreferences.Editor textEdit = test1.edit();
        textEdit.putBoolean("default", true);
        textEdit.putInt("int", 134);
        textEdit.putFloat("float", 666.666f);
        textEdit.putLong("long", 453254254325254L);
        textEdit.putString("string", "value");
        textEdit.apply();
    }
}
此时xml文件中的内容为
<?xml version='1.0' encoding='utf-8' standalone='yes' ?>
<map>
    <boolean name="default" value="true" />
    <string name="string">value</string>
    <set name="stringSet">
        <string>aaa</string>
        <string>ccc</string>
        <string>bbb</string>
        <string>eee</string>
        <string>ddd</string>
    </set>
    <float name="float" value="666.666" />
    <int name="int" value="134" />
    <long name="long" value="453254254325254" />
</map>
此时的存储路径为/data/data/包名/shared_prefs/文件名.xml
前后执行putXxx()或者apply()必须要同一个变量名进行调用
例如以下不会提交成功
test1.edit().putXxx(xxx);
test.edit().apply();
只有以下才会成功
var a = test1.edit();
a.putC(xxx);
a.apply();
类似于记住密码的功能
package com.xiaoxu.filesave;

import androidx.appcompat.app.AppCompatActivity;

import android.content.Context;
import android.content.SharedPreferences;
import android.os.Bundle;
import android.util.Log;
import android.view.View;
import android.widget.Button;
import android.widget.CheckBox;
import android.widget.EditText;
import android.widget.TextView;

import java.util.Arrays;
import java.util.HashSet;
import java.util.Map;

public class SharedPreferencesActivity extends AppCompatActivity {

    EditText username;
    CheckBox checkBox;
    Button button;

    @Override
    protected void onCreate(Bundle savedInstanceState) {
        super.onCreate(savedInstanceState);
        setContentView(R.layout.activity_shared_preferences);
        SharedPreferences preferences = getPreferences(Context.MODE_PRIVATE);
        username = findViewById(R.id.username);
        checkBox = findViewById(R.id.remember);
        button = findViewById(R.id.login);
        username.setText(preferences.getString("username", ""));
        if (!username.getText().toString().equals("")){
            checkBox.setChecked(true);
        }
        button.setOnClickListener(new View.OnClickListener() {
            @Override
            public void onClick(View view) {
                SharedPreferences.Editor edit = preferences.edit();
                if (checkBox.isChecked()){
                    edit.putString("username", username.getText().toString());
                }else{
                    // 如果没有勾选,则删除
                    edit.remove("username");
                }
                edit.apply();
            }
        });
    }
}
edit.clear()方法会将xml文件中保存的所有的属性标签清除掉
SQLite
Android系统自带一个关系型数据库
- 新建一个类,使其继承自
SQLiteOpenHelper - 添加一个成员变量
Context context - 重写
onCreate()、onUpgrade()方法,在onCreate()方法中可以调用sqLiteDatabase.execSQL("sql语句");创建表 - 匹配
public SQLiteOpenHelper(Context context, String name, CursorFactory factory, int version)构造方法,其中第三个参数可以为空,在构造方法为context赋值 - 在
Activity对应的类中创建一个自定义类的实例 - 调用自定义类的
getWriteableDatabases()方法获取一个可写的数据库操作实例,如果有相关的数据库就无需再次创建新的数据库,如果没有,自动的执行自己重写的onCreate()方法
数据库所在的位置/data/data/包名/databases/数据库名.db
SQLiteOpenHelper sqLiteOpenHelper = new SQLiteOpenHelperImpl(SharedPreferencesActivity.this, "user.db", 1);
createDatabases.setOnClickListener(new View.OnClickListener() {
    @Override
    public void onClick(View view) {
        SQLiteDatabase writableDatabase = sqLiteOpenHelper.getWritableDatabase();
    }
});
package com.xiaoxu.filesave;

import android.content.Context;
import android.database.sqlite.SQLiteDatabase;
import android.database.sqlite.SQLiteOpenHelper;
import android.widget.Toast;

import androidx.annotation.Nullable;

public class SQLiteOpenHelperImpl extends SQLiteOpenHelper {
    Context context;
    public SQLiteOpenHelperImpl(@Nullable Context context, @Nullable String name, int version) {
        super(context, name, null, version);
        this.context = context;
    }

    @Override
    public void onCreate(SQLiteDatabase sqLiteDatabase) {
        String sql = "create table user(id int, username varchar(20), password varchar(20));";
        sqLiteDatabase.execSQL(sql);
        Toast.makeText(context, "数据库创建成功", Toast.LENGTH_SHORT).show();
    }

    @Override
    public void onUpgrade(SQLiteDatabase sqLiteDatabase, int i, int i1) {

    }
}
在后续的操作中,再次点击创建数据库按钮将不会提示数据库创建成功,因为已经有创建好的了,可能以后会出现再次创建一个新的数据库表,在上例中实例化对象时传递的最后一个参数为版本号,这时候只需要将版本号修改为一个大于之前的版本号,此时会自动的调用onUpgrade()方法,所以,如果在以后需要更新数据库信息时,可以重写onUpgrade()方法
增
插入数据:
- 实例化一个
ContentValues对象 - 在这个对象中调用
put("key", value)插入值 - 调用
SQLiteDatabase writableDatabase = sqLiteOpenHelper.getWritableDatabase();获取一个可读写的数据库操作对象 - 调用
writableDatabase.insert("表名", null, contentValues);插入到数据库中
删
删除数据:
- 调用
SQLiteDatabase writableDatabase = sqLiteOpenHelper.getWritableDatabase();获取一个可读写的数据库操作对象 - 调用
writableDatabase.delete("表名", "约束条件", new String[]{"填充条件1", ..., "填充条件n"})- 例如
writableDatabase.delete("user", "id = ?", new String[]{"1"});,删除id为1的记录
- 例如
改
修改数据:
- 实例化一个
ContentValues对象 - 在这个对象中调用
put("key", value),针对需要更新的字段部分需要插入值 - 调用
SQLiteDatabase writableDatabase = sqLiteOpenHelper.getWritableDatabase();获取一个可读写的数据库操作对象 - 调用
writableDatabase.update("表名", contentValues, "约束条件", new String[]{"填充条件1", ..., "填充条件n"})
例如更新所有id为1的记录:
SQLiteDatabase writableDatabase = sqLiteOpenHelper.getWritableDatabase();
ContentValues contentValues = new ContentValues();
contentValues.put("username", "第一个");
contentValues.put("password", "bbbb");
writableDatabase.update("user", contentValues, "id = ?", new String[]{"1"});
如果是id大于1可以写为id > ?然后再填充值
查
查比较复杂,总体来说是调用query方法,最少需要7个参数,参数含义
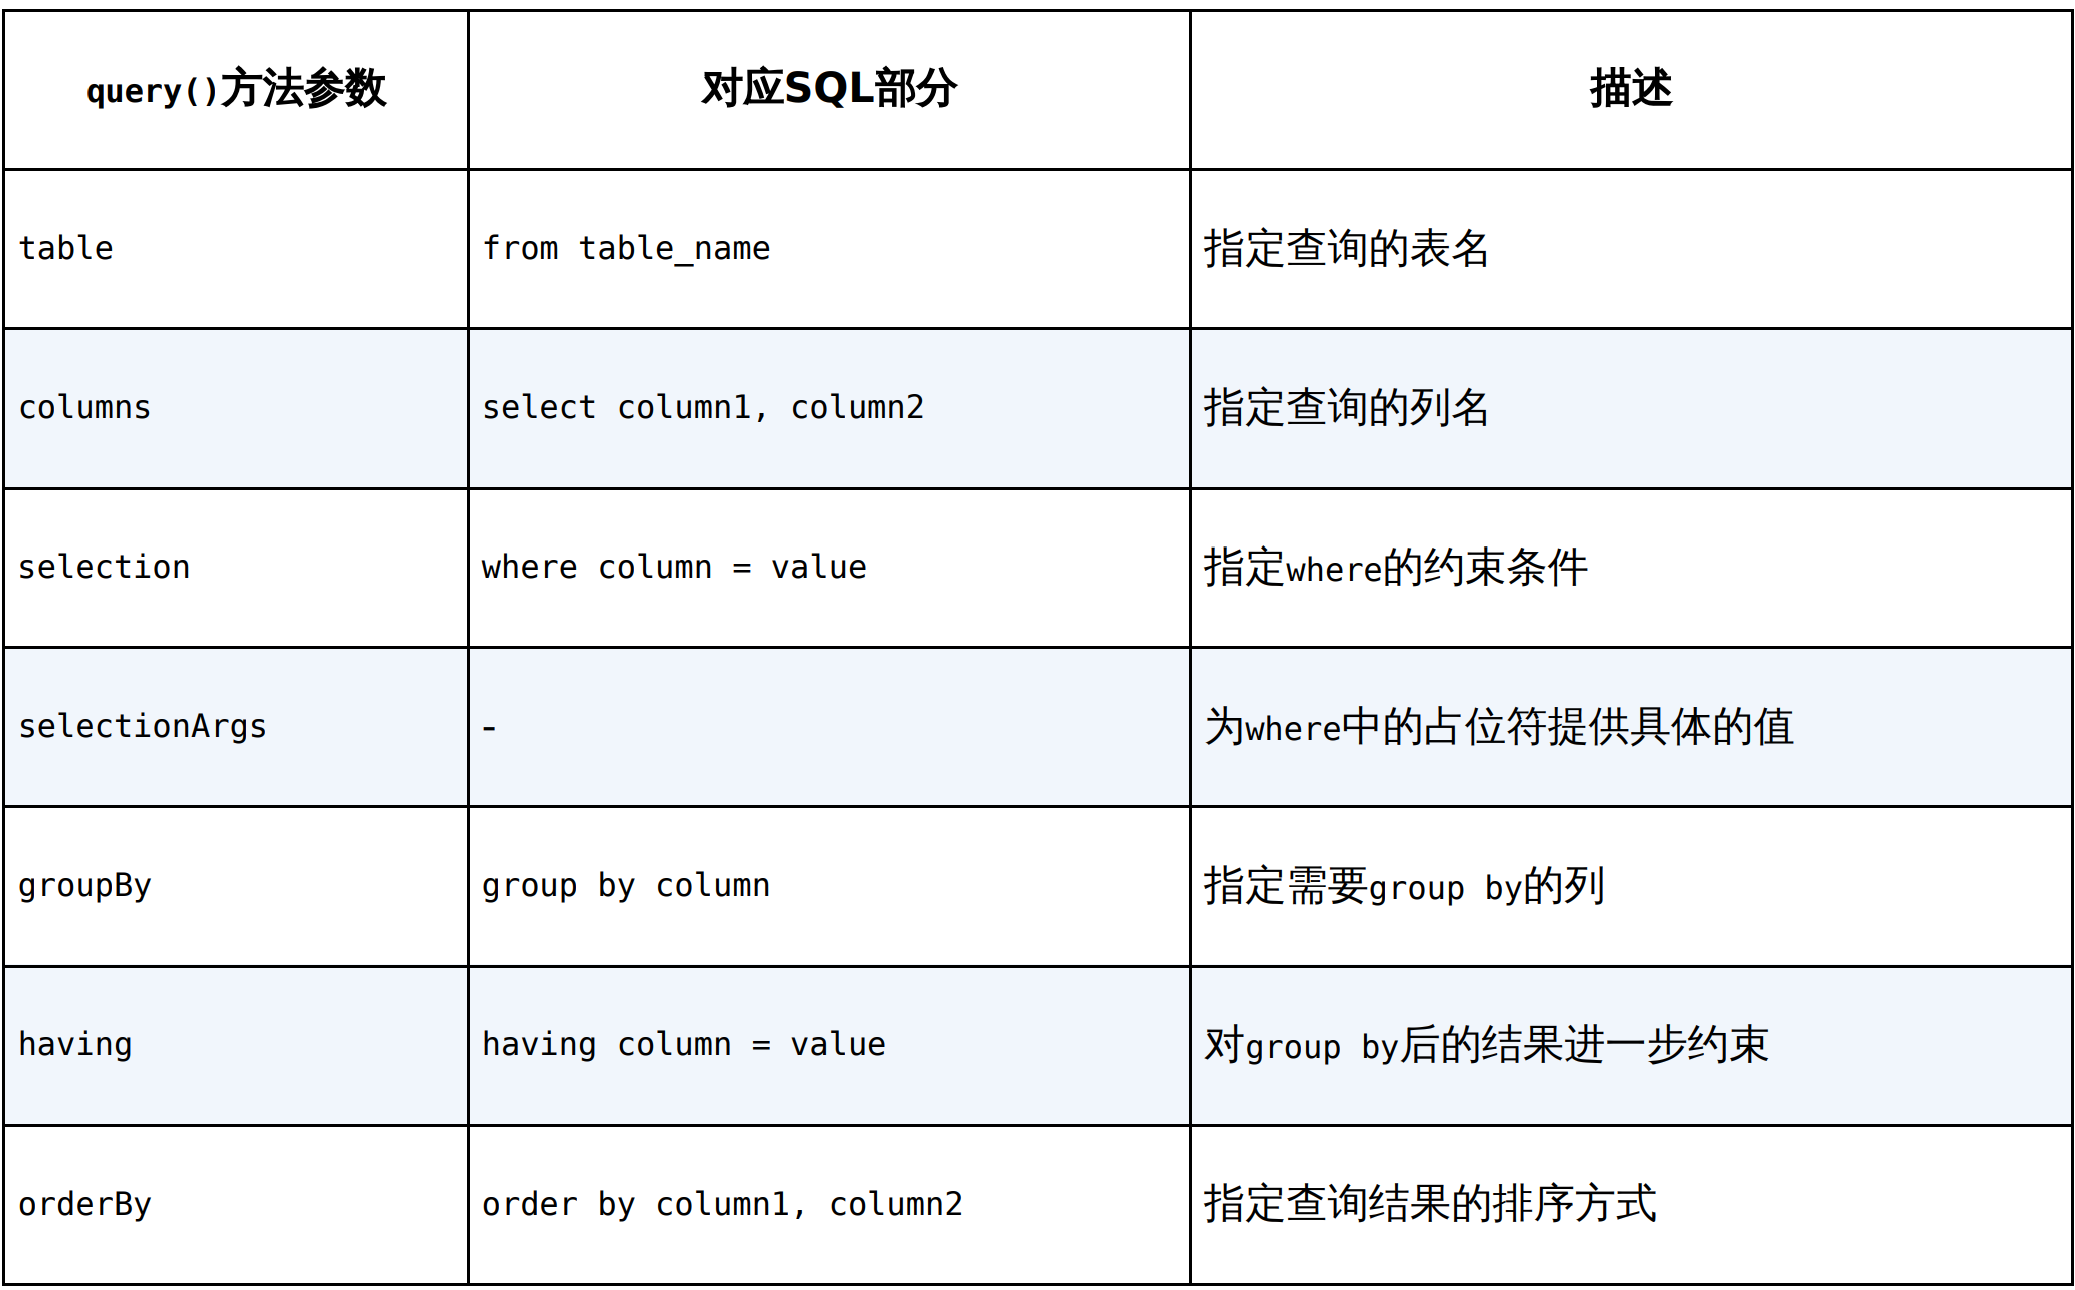
SQLiteDatabase writableDatabase = sqLiteOpenHelper.getWritableDatabase();
Cursor user = writableDatabase.query("user", null, null, null, null, null, null);
String TAG = "SQL";
while(user.moveToNext()){
    Log.d(TAG, "id = " + user.getInt(user.getColumnIndex("id")));
    Log.d(TAG, "username = " + user.getString(user.getColumnIndex("username")));
    Log.d(TAG, "id = " + user.getString(user.getColumnIndex("password")));
}
使用SQL语句
针对普通的增删改可以使用writableDatabase.execSQL(String sql);(无占位符)或者writableDatabase.execSQL(String sql, Object[] args);(填充占位符)
对于查询语句,可以使用writableDatabase.rawQuery(String sql, String[] args),返回一个Cursor实例,可以和上例一样获取每一行中的数据,raw读音rɔː,中文为原始、未经加工的
cursor读音为ˈkɜːrsər,中文为光标、游标
SQLite也支持开启事务
Android 运行时权限
在Android6时,引入了运行时权限,在运行时申请权限,用户可以自行的选择授予或者拒绝
所有权限列表可参阅官方文档
权限分类:
- 普通权限
- 是指不会威胁到用户安全隐私的权限,系统会自动授权
- 危险权限(运行时权限)
- 需要手动授权
申请运行时权限:
-
在清单文件中声明需要的权限
-
在
manifest标签中按照:<uses-permission android:name="权限名" /> -
permission读音为pərˈmɪʃn,中文为允许、许可
-
-
判断是否有某项权限
- 调用
ContextCompat(这个类封装了一些针对Context的操作方法)的checkSelfPermission(context, Mainfest.permission.权限名)方法检查是否有相应的权限,如果有 返回PackageManager.PERMISSION_GRANTED(许可授予),如果没有,则返回PackageManager.PERMISSION_DENIED(没有权限)compat中文为兼容granted中文为授予,读音为ˈɡræntɪddenied,中文为否认,读音为dɪˈnaɪd
- 如果有,直接进行后续操作
- 如果没有,则进行申请权限:
- 使用
ActivityCompat类的requestPermission(Activity, String[], 请求码)- 参数1为请求权限的
Activity,一般都是为当前的活动请求,可以填写this - 参数2为权限的字符串数组,可以为
Manifest.permission.权限名 - 参数3为请求码,只要不重复即可
- 参数1为请求权限的
- 使用
- 调用
-
在当前Activity对应的类中,重写
onRequestPermissionResult(requestCode, permissions: String[], grantResults: int[])方法,这个方法是权限请求结果方法,无论结果如果,这个方法始终都会作为回调方法进行调用- 参数1为请求码,在请求权限时可以将设置的请求码传递进去
- 参数2为权限名数组
- 参数3为请求权限的结果,为一个整型数组,与权限名数组所代表的权限一一对应,可以和
PackageManager.PERMISSION_GRATEND和PackageManager.PERMISSION_DENIED的值进行判断,从而得出有没有申请到相应的权限
打电话的例子
package com.xiaoxu.battery;

import androidx.annotation.NonNull;
import androidx.appcompat.app.AppCompatActivity;
import androidx.core.app.ActivityCompat;
import androidx.core.content.ContextCompat;

import android.Manifest;
import android.content.BroadcastReceiver;
import android.content.Context;
import android.content.Intent;
import android.content.IntentFilter;
import android.content.pm.PackageManager;
import android.net.Uri;
import android.os.Bundle;
import android.widget.Button;
import android.widget.Toast;

public class MainActivity extends AppCompatActivity {

    Button button;

    @Override
    protected void onCreate(Bundle savedInstanceState) {
        super.onCreate(savedInstanceState);
        setContentView(R.layout.activity_main);
        button = findViewById(R.id.call);
        button.setOnClickListener(view -> {
            // 判断和申请相机和拨打电话的权限
            if (ContextCompat.checkSelfPermission(this, Manifest.permission.CALL_PHONE) != PackageManager.PERMISSION_GRANTED &&
                    ContextCompat.checkSelfPermission(this, Manifest.permission.CAMERA) != PackageManager.PERMISSION_GRANTED
            ) {
                ActivityCompat.requestPermissions(this, new String[]{Manifest.permission.CALL_PHONE, Manifest.permission.CAMERA}, 1);
            } else {
                call();
            }
        });
    }

    @Override
    public void onRequestPermissionsResult(int requestCode, @NonNull String[] permissions, @NonNull int[] grantResults) {
        super.onRequestPermissionsResult(requestCode, permissions, grantResults);
        switch (requestCode) {
            case 1:
                String s = "已授予的权限:";
                for (int i = 0; i < permissions.length; i++) {
                    s += permissions[i] + (grantResults[i] == PackageManager.PERMISSION_GRANTED) + "\n";
                }
                Toast.makeText(this, s, Toast.LENGTH_SHORT).show();
                if (grantResults[0] == PackageManager.PERMISSION_GRANTED && grantResults[2] == PackageManager.PERMISSION_GRANTED) {
                    call();
                } else {
                    Toast.makeText(this, "无权限", Toast.LENGTH_SHORT).show();
                }
        }
    }

    public void call() {
        try {
            Intent intent = new Intent(Intent.ACTION_CALL);
            intent.setData(Uri.parse("tel:10086"));
            startActivity(intent);
        } catch (Exception e) {
            // 如果没有相关的权限会抛出异常
            Toast.makeText(this, "无权限异常", Toast.LENGTH_SHORT).show();
            e.printStackTrace();
        }
    }
}
清单文件声明的需要的权限:
<uses-permission android:name="android.permission.CALL_PHONE" />
<uses-permission android:name="android.permission.CAMERA"/>
ContentProvider
中文为内容提供者
可以实现跨应用程序之间数据共享,能够保证被访问到的数据的安全性
分为两种方式,一种方式为读取其他应用程序的数据,另外一种是开放给其他应用程序
resolver中文为解析器
需要通过context中提供的getContentResolver()方法获取一个实例,通常在一个Activity所在的类中,可以使用
ContentResolver contentResolver = getContentResolver();
进行获取
需要通过Uri类将要获取的资源进行转义,通常格式为:
content://包名.provider/表名
可以使用Uri.parse("content://包名.provider/表名")将其转换并返回一个Uri实例
contentResolver
可以使用这个实例的query方法查询,参数如下
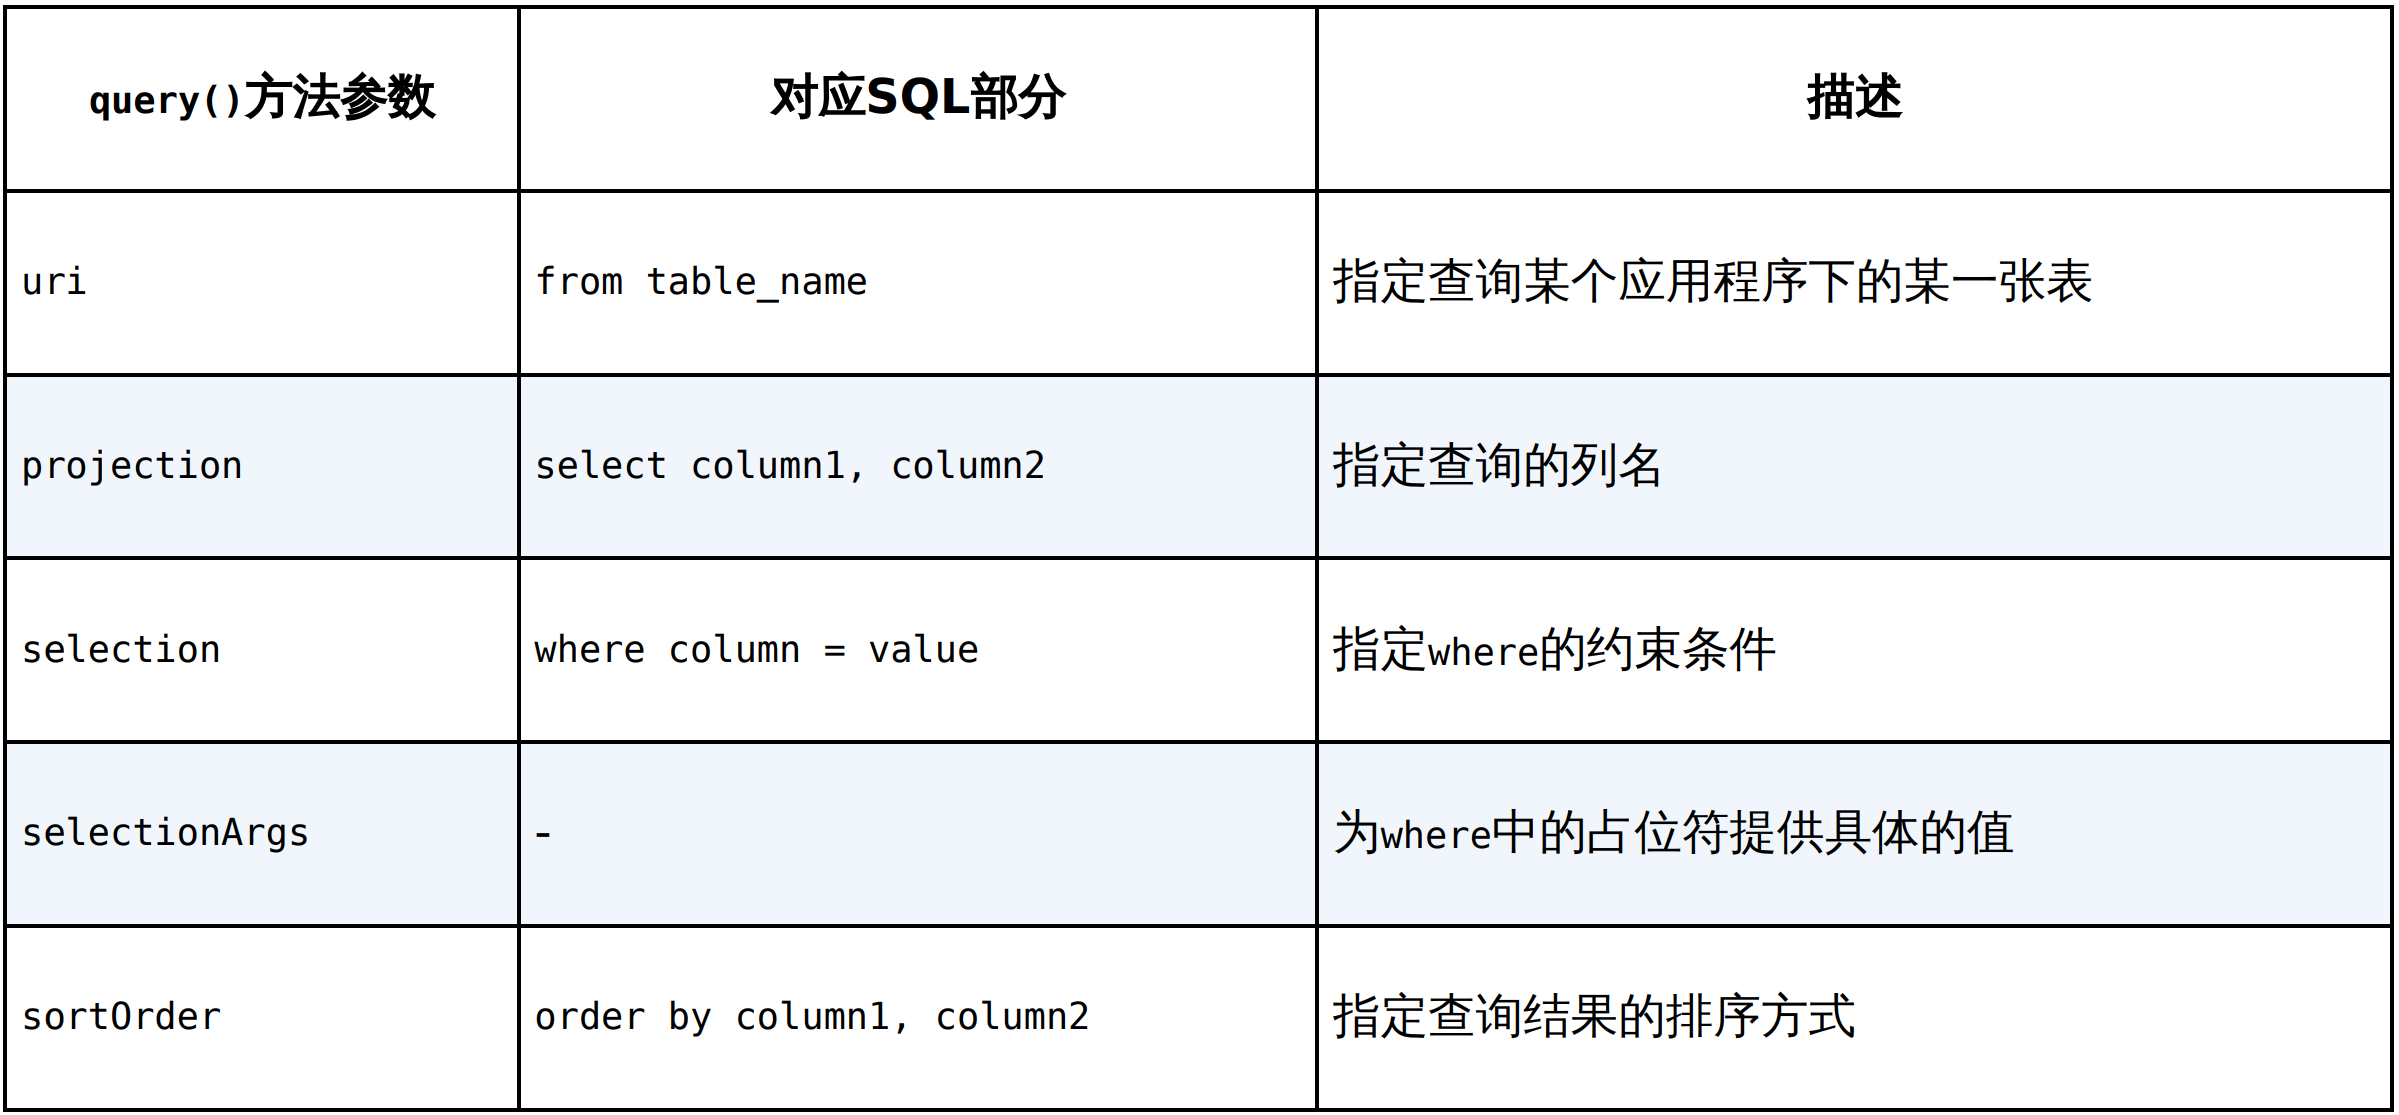
可以通过insert()方法插入数据、update()方法修改数据
delete()方法删除数据
获取通讯录案例
package com.xiaoxu.battery;

import androidx.annotation.NonNull;
import androidx.appcompat.app.AppCompatActivity;
import androidx.core.app.ActivityCompat;
import androidx.core.content.ContextCompat;
import androidx.recyclerview.widget.DividerItemDecoration;
import androidx.recyclerview.widget.LinearLayoutManager;
import androidx.recyclerview.widget.RecyclerView;
import androidx.recyclerview.widget.SimpleItemAnimator;

import android.Manifest;
import android.annotation.SuppressLint;
import android.content.BroadcastReceiver;
import android.content.ContentResolver;
import android.content.Context;
import android.content.Intent;
import android.content.IntentFilter;
import android.content.pm.PackageManager;
import android.database.Cursor;
import android.net.Uri;
import android.os.Bundle;
import android.provider.ContactsContract;
import android.widget.Adapter;
import android.widget.Button;
import android.widget.Toast;

import java.util.ArrayList;
import java.util.List;

public class MainActivity extends AppCompatActivity {

    RecyclerView recyclerView;
    List<User> list = new ArrayList<User>();
    MyAdapter myAdapter;
    @Override
    protected void onCreate(Bundle savedInstanceState) {
        super.onCreate(savedInstanceState);
        setContentView(R.layout.activity_main);
        recyclerView = findViewById(R.id.recylerView1);


        recyclerView.setLayoutManager(new LinearLayoutManager(this));
        //水平分割线
        recyclerView.addItemDecoration(new DividerItemDecoration(
                this, DividerItemDecoration.VERTICAL));
        myAdapter = new MyAdapter(list);
        recyclerView.setAdapter(myAdapter);

        // 申请权限
        if (ContextCompat.checkSelfPermission(this, Manifest.permission.READ_CONTACTS) != PackageManager.PERMISSION_GRANTED) {
            ActivityCompat.requestPermissions(this, new String[]{Manifest.permission.READ_CONTACTS}, 1);
        } else {
            read();
        }
    }

    @Override
    public void onRequestPermissionsResult(int requestCode, @NonNull String[] permissions, @NonNull int[] grantResults) {
        super.onRequestPermissionsResult(requestCode, permissions, grantResults);
        switch (requestCode) {
            case 1:
                if (grantResults[0] != PackageManager.PERMISSION_GRANTED) {
                    Toast.makeText(this, "无权限", Toast.LENGTH_SHORT);
                } else {
                    read();
                }
        }
    }

    @SuppressLint({"Range", "NotifyDataSetChanged"})
    public void read() {
        // 使用这个工具类进行操作
        ContentResolver contentResolver = getContentResolver();
        // 使用通讯录api
        Cursor query = contentResolver.query(ContactsContract.CommonDataKinds.Phone.CONTENT_URI, null, null, null, null);
        while (query.moveToNext()) {
            String name = query.getString(query.getColumnIndex(ContactsContract.CommonDataKinds.Phone.DISPLAY_NAME));
            String phone = query.getString(query.getColumnIndex(ContactsContract.CommonDataKinds.Phone.NUMBER));
            list.add(new User(name, phone));
        }
        myAdapter.notifyDataSetChanged();
    }
}
自行创建ContentProvider
步骤如下图
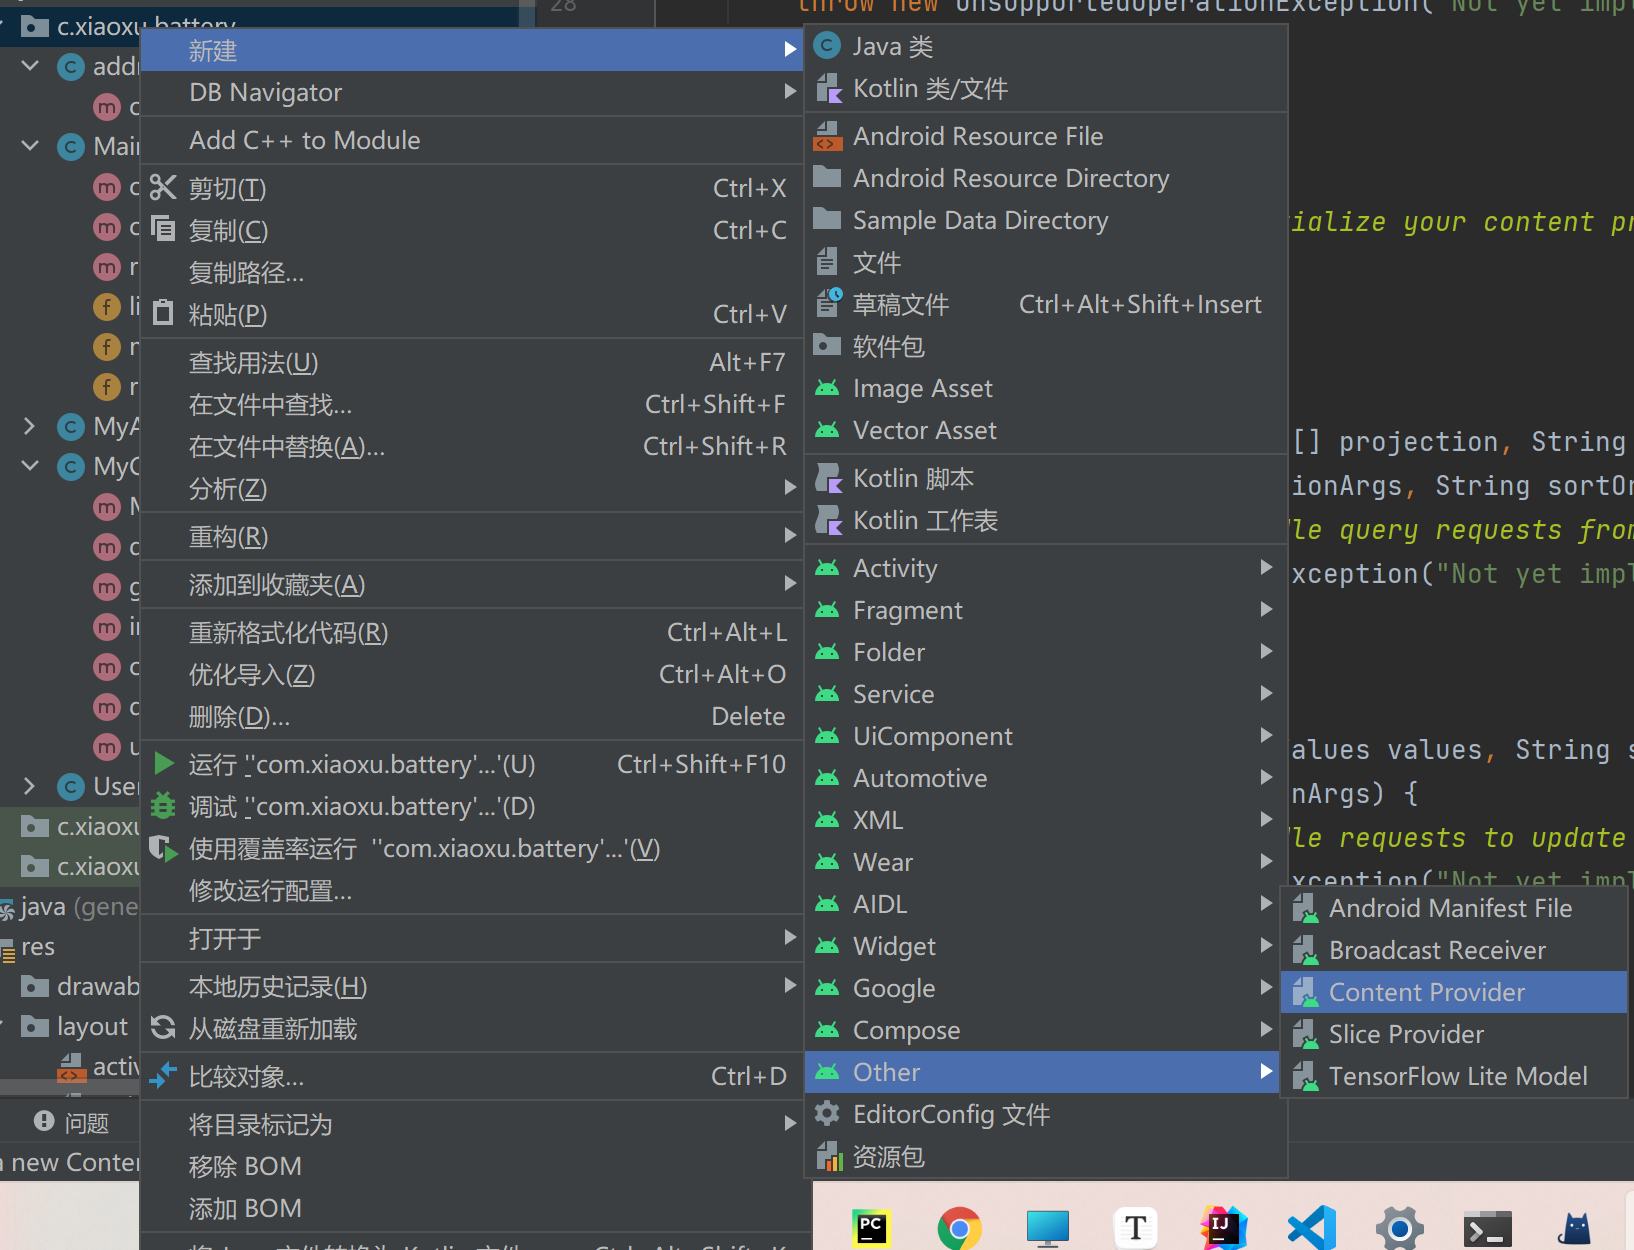
Exported属性表示是否允许外部程序访问我们 的ContentProvider
Enabled属性表示是否启用这个ContentProvider。
此时清单文件中的<manifest> <application></application> </manifest>标签中会自动生成
<provider
    android:name=".MyContentProvider"
    android:authorities="com.xiaoxu.battery.provider"
    android:enabled="true"
    android:exported="true"></provider>
通知
在Android8.0引入通知渠道,可以自定义选择屏蔽掉一些渠道的通知
通知不仅可以在Activity中进行发送,还可以在service和广播中发送
发送通知过程:
-
通过
content的getSystemService(Context.NOTIFICATION_SERVICE)获取系统服务方法获取一个NotificationManager(需要强制类型转换)类型的通知管理实例 -
实例化一个
NotificationChannel实例作为通知渠道,在构造方法中传递3个参数- 参数1为通知的标识符,标识符为字符串,需要靠这个标识符标记通知
- 参数2为通知的渠道的名称,值为字符串
- 参数3为通知等级,可以通过
NotificationManager.XXXX获取等级,等级从高到低分为:IMPORTANCE_HIGHIMPORTANCE_DEFAULTIMPORTANCE_LOWIMPORTANCE_MINimportance中文为重要性
-
通过
notificationManager.createNotificationChannel(上一步通知渠道的实例)方法创建通知渠道 -
通过
NotificationCompat(通知兼容,为了兼容之前的低版本的api)类中的建造者类Builder进行设置通知,即实例化NotificationCompat.Builder类,返回一个Notification实例,需要传递的参数有:- 参数1
context - 参数2字符串类型,即之前设置的通知渠道的
id
- 参数1
-
由于上一步是使用的建造者进行构建的对象,因此,可以调用相关的建造方法完善通知内容
-
setContentTitle("通知标题") .setContentText("通知内容") .setSmallIcon(R.drawable.icon2) // 通知的小图标,即状态栏显示的 .setLargeIcon(BitmapFactory.decodeResource(getResources(), R.drawable.icon3)) // 大的图标,下滑后显示的图标 .build(); // 最后调用build方法完成构建 -
在文字过长时,超出的内容会以
...显示,解决方案为:-
使用以下的方式
-
.setContentText("通知内容通知内容通知内容通知内容通知内容通知内容通知内容通知内容通知内容通知内容通知内容通知内容通知内容通知内容通知内容通知内容通知内容通知内容通知内容通知内容通知内容通知内容通知内容通知内容通知内容通知内容通知内容通知内容")
.setStyle(new NotificationCompat.BigTextStyle().bigText("通知内容通知内容通知内容通知内容通知内容通知内容通知内容通知内容通知内容通知内容通知内容通知内容通知内容通知内容通知内容通知内容通知内容通知内容通知内容通知内容通知内容通知内容通知内容通知内容通知内容通知内容通知内容通知内容"))
-
-
也可以在通知中带有图片:
-
.setStyle(new NotificationCompat.BigPictureStyle().bigPicture(new BitmapFactory().decodeResource(getResources(), R.drawable.t)))
-
-
-
最后调用通知管理实例的
notify(id: int, 上一步的Notification实例)- id可以随意指定一个整数,如果有一个通知没有被处理,并且又有一个新的通知使用相同的
id则新通知将会覆盖之前的通知
- id可以随意指定一个整数,如果有一个通知没有被处理,并且又有一个新的通知使用相同的
NotificationManager notificationManager = (NotificationManager) getSystemService(Context.NOTIFICATION_SERVICE);
NotificationChannel notificationChannel = new NotificationChannel("notify", "发出通知", NotificationManager.IMPORTANCE_DEFAULT);
notificationManager.createNotificationChannel(notificationChannel);
Notification notify = new NotificationCompat.Builder(this, "notify").setContentTitle("通知标题")
        .setContentText("通知内容")
        .setSmallIcon(R.drawable.icon2)
        .setLargeIcon(BitmapFactory.decodeResource(getResources(), R.drawable.icon3)).build();
notificationManager.notify(1, notify);
处理通知 PendingIntent
在通知点击后,会发现此时的通知将不会有任何的反应,这是因为还没有处理
Pending中文为待办,Intent中文为意图
PendingIntent和Intent有许多相似之处,例如都可以启动一个新的活动、启动新的服务、发送广播。可以把PendingIntent看作是延迟执行的Intent
获取PendingIntent:
获取方法有很多,如图所示,PendingIntent类中提供了多个静态方法用来获取

- 可以根据需求来选择是使用
getActivity()方法、getBroadcast()方法,还是getService()方法 - 这三个方法的参数大致有:
- 参数1:
context - 参数2:请求码,整型,可以随意填写
- 参数3:
Intent,所以还需要提前新建一个Intent,写好这个Intent要进行的操作,然后这个PendingIntent就会执行这个Intent - 参数4:为
PendingIntent的行为,值为在PendingIntent中的静态常量,分别为:FLAG_ONE_SHOT:当前描述的PendingIntent只能被使用一次,同类型的通知栏只能使用一次,后续的通知栏单击后将无法打开之前设置的Intent的内容FLAG_NO_CREATE:当之前的PendingIntent不存在,则返回null(基本用不到),点击通知后还可以继续执行IntentFLAG_CANCEL_CURRENT:如果PendingIntent已存在,都会被cancel,然后系统创建一个新的PendingIntentFLAG_UPDATE_CURRENT:如果PendingIntent已经存在,则他们都会被更新,就是Intent中的extra都会被更新
- 参数1:
此时可以通过建造通知实例时,调用setContentIntent(pendingIntent)方法设置点击后的操作
但此时点击后,通知依旧存在,此时有两种解决方案:
-
方案1,在建造通知实例时调用
setAutoCancel(true) -
方案2,在打开的
Activity中获取一个通知管理的服务,在服务中调用.cancel(通知id)-
NotificationManager notificationManager = (NotificationManager) getSystemService(Context.NOTIFICATION_SERVICE);
notificationManager.cancel(1);
notificationManager.cancel(2);
-
采用方案1的解决方法
Intent intent = new Intent(this, NotificationActivity.class);
PendingIntent pendingIntent = PendingIntent.getActivities(this, 0, new Intent[]{intent}, PendingIntent.FLAG_UPDATE_CURRENT);

NotificationManager notificationManager = (NotificationManager) getSystemService(Context.NOTIFICATION_SERVICE);
NotificationChannel notificationChannel = new NotificationChannel("notify", "发出通知", NotificationManager.IMPORTANCE_HIGH);
notificationManager.createNotificationChannel(notificationChannel);
Notification notify = new NotificationCompat.Builder(this, "notify").setContentTitle("通知标题")
        .setContentText("通知内容")
        .setSmallIcon(R.drawable.icon2)
        .setLargeIcon(BitmapFactory.decodeResource(getResources(), R.drawable.icon3))
        .setContentIntent(pendingIntent) // 设置PendingIntent
        .setAutoCancel(true).build();
notificationManager.notify(1, notify);
notificationManager.notify(2, notify);
媒体
使用File externalCacheDir = getExternalCacheDir();可以获取一个缓存的路径:
/storage/emulated/0/Android/data/包名/cache
File externalCacheDir = new File(getExternalCacheDir(), "1.txt");
BufferedWriter bufferedWriter = null;
try {
    bufferedWriter = new BufferedWriter(new OutputStreamWriter(new BufferedOutputStream(new FileOutputStream(externalCacheDir))));
    try {
        bufferedWriter.write("你好,世界");
    } catch (IOException e) {
        e.printStackTrace();
    }
} catch (FileNotFoundException e) {
    e.printStackTrace();
} finally {
    try {
        if (bufferedWriter != null) {
            bufferedWriter.close();
        }
    } catch (IOException e) {
        e.printStackTrace();
    }
}
放入到缓存文件夹的文件都可以通过设置中的应用管理清除缓存
以下代码为点击按钮打开文件选择器(选择图片)
button.setOnClickListener(v -> {
    Intent intent = new Intent(Intent.ACTION_OPEN_DOCUMENT);
    intent.addCategory(Intent.CATEGORY_OPENABLE);
    intent.setType("image/*");
    startActivity(intent);
});
在弹出的选择图片的Activity中选择图片
package com.xiaoxu.battery;

import androidx.annotation.Nullable;
import androidx.appcompat.app.AppCompatActivity;
import androidx.core.content.ContentResolverCompat;
import androidx.core.content.FileProvider;

import android.content.ContentProvider;
import android.content.ContentResolver;
import android.content.Intent;
import android.graphics.BitmapFactory;
import android.net.Uri;
import android.os.Bundle;
import android.os.ParcelFileDescriptor;
import android.util.Log;
import android.widget.Button;
import android.widget.ImageView;
import android.widget.Toast;

import java.io.BufferedOutputStream;
import java.io.BufferedWriter;
import java.io.File;
import java.io.FileDescriptor;
import java.io.FileNotFoundException;
import java.io.FileOutputStream;
import java.io.IOException;
import java.io.OutputStreamWriter;

public class CameraActivity extends AppCompatActivity {

    final String TAG = "FLAG_D";
    Button button;
    ImageView imageView;

    @Override
    protected void onCreate(Bundle savedInstanceState) {
        super.onCreate(savedInstanceState);
        setContentView(R.layout.activity_camera);
        button = findViewById(R.id.photo);
        imageView = findViewById(R.id.picture);
        button.setOnClickListener(v -> {
            Intent intent = new Intent(Intent.ACTION_OPEN_DOCUMENT);
            intent.addCategory(Intent.CATEGORY_OPENABLE);
            intent.setType("image/*");
            startActivityForResult(intent, 1);
        });
    }

    @Override
    protected void onActivityResult(int requestCode, int resultCode, @Nullable Intent data) {
        super.onActivityResult(requestCode, resultCode, data);
        switch (requestCode) {
            case 1:
                if (resultCode == RESULT_OK && data != null) {
//                    将打开的图片做一个转换
                    Uri uri = Uri.parse(data.getDataString());
//                    获取一个内容解析器
                    ContentResolver contentResolver = getContentResolver();
                    try {
//                        通过内容解析器获取一个文件描述
                        ParcelFileDescriptor fileDescriptor = contentResolver.openFileDescriptor(uri, "r");
//                        将文件传递进去
                        imageView.setImageBitmap(BitmapFactory.decodeFileDescriptor(fileDescriptor.getFileDescriptor()));
                    } catch (FileNotFoundException e) {
                        e.printStackTrace();
                    }
                }
        }
    }
}
音乐播放
package com.xiaoxu.battery;

import androidx.annotation.Nullable;
import androidx.appcompat.app.AppCompatActivity;

import android.content.Intent;
import android.media.MediaPlayer;
import android.net.Uri;
import android.os.Bundle;
import android.util.Log;
import android.widget.Button;
import android.widget.ImageButton;

import java.util.Locale;

public class MusicActivity extends AppCompatActivity {

    final String TAG = "FLAG_D";
    Button open;
    ImageButton play, pause, stop;
    MediaPlayer mediaPlayer;

    @Override
    protected void onCreate(Bundle savedInstanceState) {
        super.onCreate(savedInstanceState);
        setContentView(R.layout.activity_music);
        open = findViewById(R.id.open);
        play = findViewById(R.id.play);
        pause = findViewById(R.id.pause);
        stop = findViewById(R.id.stop);
        open.setOnClickListener(v -> {
            Intent intent = new Intent(Intent.ACTION_OPEN_DOCUMENT);
            intent.addCategory(Intent.CATEGORY_OPENABLE);
            intent.setType("*/*");
            startActivityForResult(intent, 1);
        });
        play.setOnClickListener(v -> {
            mediaPlayer.start();
        });
        pause.setOnClickListener(v -> {
            mediaPlayer.pause();
        });
        stop.setOnClickListener(v -> {
            mediaPlayer.stop();
        });
    }

    @Override
    protected void onActivityResult(int requestCode, int resultCode, @Nullable Intent data) {
        super.onActivityResult(requestCode, resultCode, data);
        switch (requestCode) {
            case 1:
                if (resultCode == RESULT_OK && data != null) {
                    Log.d(TAG, "onActivityResult: " + data.getDataString());
                    Uri uri = Uri.parse(data.getDataString());
                    mediaPlayer = MediaPlayer.create(this, uri);
                }
        }
    }
}
如果是网络资源,需要准备好后才能播放:
-
调用
mediaPlayer.setDataSource(url: String),设置网络资源链接 -
再调用
mediaPlayer.prepareAsync()准备好资源 -
在清单文件的
<application></application>标签中添加android:usesCleartextTraffic="true"属性 -
package com.xiaoxu.music;

import androidx.appcompat.app.AppCompatActivity;

import android.content.Intent;
import android.media.MediaPlayer;
import android.net.Uri;
import android.os.Bundle;
import android.util.Log;
import android.widget.Button;
import android.widget.Toast;

import java.io.IOException;

public class PlayMusicActivity extends AppCompatActivity {
    Button play, pause, stop;
    MediaPlayer mediaPlayer;

    @Override
    protected void onCreate(Bundle savedInstanceState) {
        super.onCreate(savedInstanceState);
        setContentView(R.layout.activity_play_music);
        play = findViewById(R.id.play);
        pause = findViewById(R.id.pause);
        stop = findViewById(R.id.stop);
        Intent intent = getIntent();

//        mediaPlayer = MediaPlayer.create(this, Uri.parse(intent.getStringExtra("url")));
        try {
            mediaPlayer = new MediaPlayer();
            mediaPlayer.setDataSource(intent.getStringExtra("url").toString());
//            准备资源
            mediaPlayer.prepareAsync();
//            准备好资源后自动播放
            mediaPlayer.setOnPreparedListener(new MediaPlayer.OnPreparedListener() {
                @Override
                public void onPrepared(MediaPlayer mediaPlayer) {
                    mediaPlayer.start(); // 准备好了就播放
                }
            });

        } catch (IOException e) {
            e.printStackTrace();
        }
        play.setOnClickListener(v -> {
            mediaPlayer.start(); });
        pause.setOnClickListener(v -> {
            mediaPlayer.pause();
        });
        stop.setOnClickListener(v -> {
            mediaPlayer.stop();
        });
    }

    @Override
    protected void onDestroy() {
        super.onDestroy();
//        mediaPlayer.release();
    }
}
视频播放
package com.xiaoxu.battery;

import androidx.annotation.Nullable;
import androidx.appcompat.app.AppCompatActivity;

import android.content.Intent;
import android.media.MediaPlayer;
import android.net.Uri;
import android.os.Bundle;
import android.util.Log;
import android.widget.Button;
import android.widget.ImageButton;
import android.widget.VideoView;

public class VideoActivity extends AppCompatActivity {

    final String TAG = "FLAG_D";
    Button open;
    ImageButton play, pause, stop;
    VideoView videoView;

    @Override
    protected void onCreate(Bundle savedInstanceState) {
        super.onCreate(savedInstanceState);
        setContentView(R.layout.activity_video);
        open = findViewById(R.id.open2);
        play = findViewById(R.id.play2);
        pause = findViewById(R.id.pause2);
        stop = findViewById(R.id.stop2);
        videoView = findViewById(R.id.videoView1);
        open.setOnClickListener(v -> {
            Intent intent = new Intent(Intent.ACTION_OPEN_DOCUMENT);
            intent.addCategory(Intent.CATEGORY_OPENABLE);
            intent.setType("*/*");
            startActivityForResult(intent, 1);
        });
        play.setOnClickListener(v -> {
            videoView.start();
        });
        pause.setOnClickListener(v -> {
            videoView.pause();
        });
        stop.setOnClickListener(v -> {
            videoView.resume();
        });
    }
    @Override
    protected void onActivityResult(int requestCode, int resultCode, @Nullable Intent data) {
        super.onActivityResult(requestCode, resultCode, data);
        switch (requestCode) {
            case 1:
                if (resultCode == RESULT_OK && data != null) {
                    Log.d(TAG, "onActivityResult: " + data.getDataString());
                    Uri uri = Uri.parse(data.getDataString());
                    videoView.setVideoURI(uri);
                }
        }
    }
}
Service
使Android应用实现后台运行的解决方案
Service不是运行在单独的进程中,而是依赖于创建Service所在的进程,当要给应用程序被杀掉时,相关的Service也将会被杀掉
Service并不会自动开启线程,所有的代码 都是默认运行在主线程当中的。也就是说,我们需要在Service的内部手动创建子线程,并在这 里执行具体的任务,否则就有可能出现主线程被阻塞的情况
Android 多线程
创建线程的方式和Java相同
可以先尝试着在另外的线程中修改view的值,例如
TextView textView;
Button button;
@Override
protected void onCreate(Bundle savedInstanceState) {
    super.onCreate(savedInstanceState);
    setContentView(R.layout.activity_thread);
    textView = findViewById(R.id.tip);
    button = findViewById(R.id.change);
    button.setOnClickListener(v -> {
        new Thread(() -> {
            textView.setText("123");
        }).start();
    });
}
运行,尝试修改:
此时程序将会崩溃,并且会给出Only the original thread that created a view hierarchy can touch its views.的提示,中文为只有创建视图层次结构的原始线程才能接触其视图,所以在子线程中不能够直接修改原有线程的内容
异步消息处理机制
Android提供了异步消息处理机制,可以使得在子线程中对view进行操作
步骤(在Activity中):
- 增加一个
Handler类型的成员变量 - 匹配只有一个参数的构造方法,内容为
Looper.getMainLooper() - 使用继承的方式重写
handleMessage(Message msg) - 使用
switch(msg.what)匹配请求码处理的语句(例如更新View中的内容)
步骤(在多线程中):
- 实例化一个
Message的实例 - 为这个对象的
what设置一个值,这个值将作为请求码 - 调用
Handler类型的成员变量的sendMessage(之前的Message实例)
public class ThreadActivity extends AppCompatActivity {

    TextView textView;
    Button button;
    Handler handler;
    @Override
    protected void onCreate(Bundle savedInstanceState) {
        super.onCreate(savedInstanceState);
        setContentView(R.layout.activity_thread);
        handler = new Handler(Looper.getMainLooper()){
            @Override
            public void handleMessage(@NonNull Message msg) {
                super.handleMessage(msg);
                switch (msg.what) {
                    case 1:
                        textView.setText("123");
                }
            }
        };
        textView = findViewById(R.id.tip);
        button = findViewById(R.id.change);
        button.setOnClickListener(v -> {
            new Thread(() -> {
                Message message = new Message();
                message.what = 1;
                handler.sendMessage(message);
            }).start();
        });
    }
}
Message可以看作是在线程之间传递的消息,可以使用arg1和arg2成员变量来携带一些整型数据,使用obj成员变量携带一个Object对象Handler为处理者,用来发送和处理消息,发送消息使用sendMeassage,接收消息通过这个类的handleMessage(Message msg)MessageQueue为消息队列,用来存放所有通过Handler发送的消息,每个线程只有一个消息队列对象Looper相当于每个线程中的消息队列的关键,当调用调用Looper的loop()方法后,就会进入 一个无限循环当中,然后每当发现MessageQueue中存在一条消息时,就会将它取出,并 传递到Handler的handleMessage()方法中。每个线程中只会有一个Looper对象
流程图:
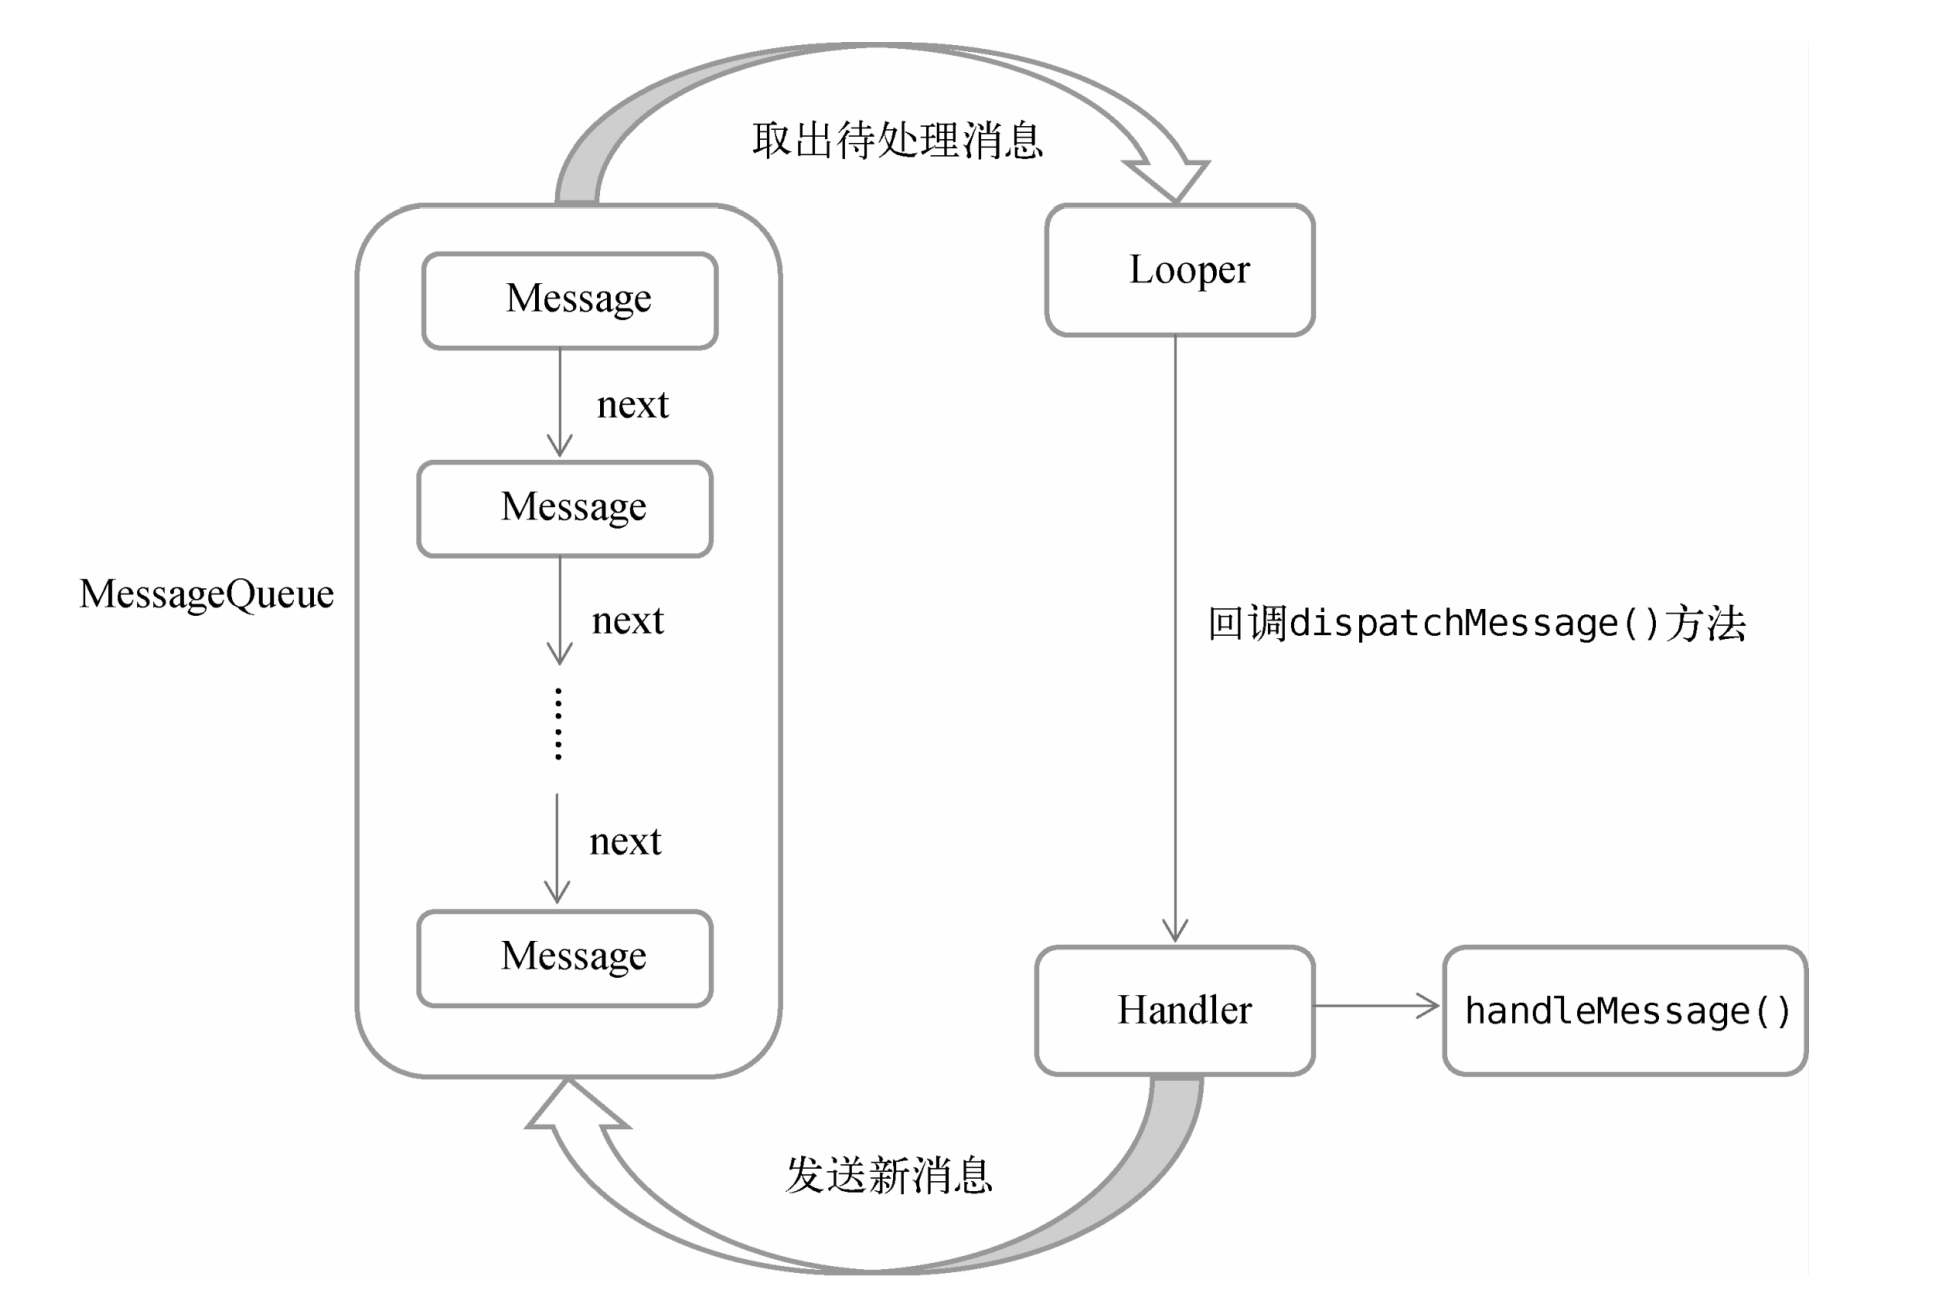
runOnUiThread() 方法
这个方法属于Activity中的成员方法,可以用来修改View中的内容
使用方式:
runOnUiThread(() -> {
    //操作
});
参数为Runnable实例
例如
runOnUiThread(() -> {
    textView.setText(text);
});
Service用法
新建:
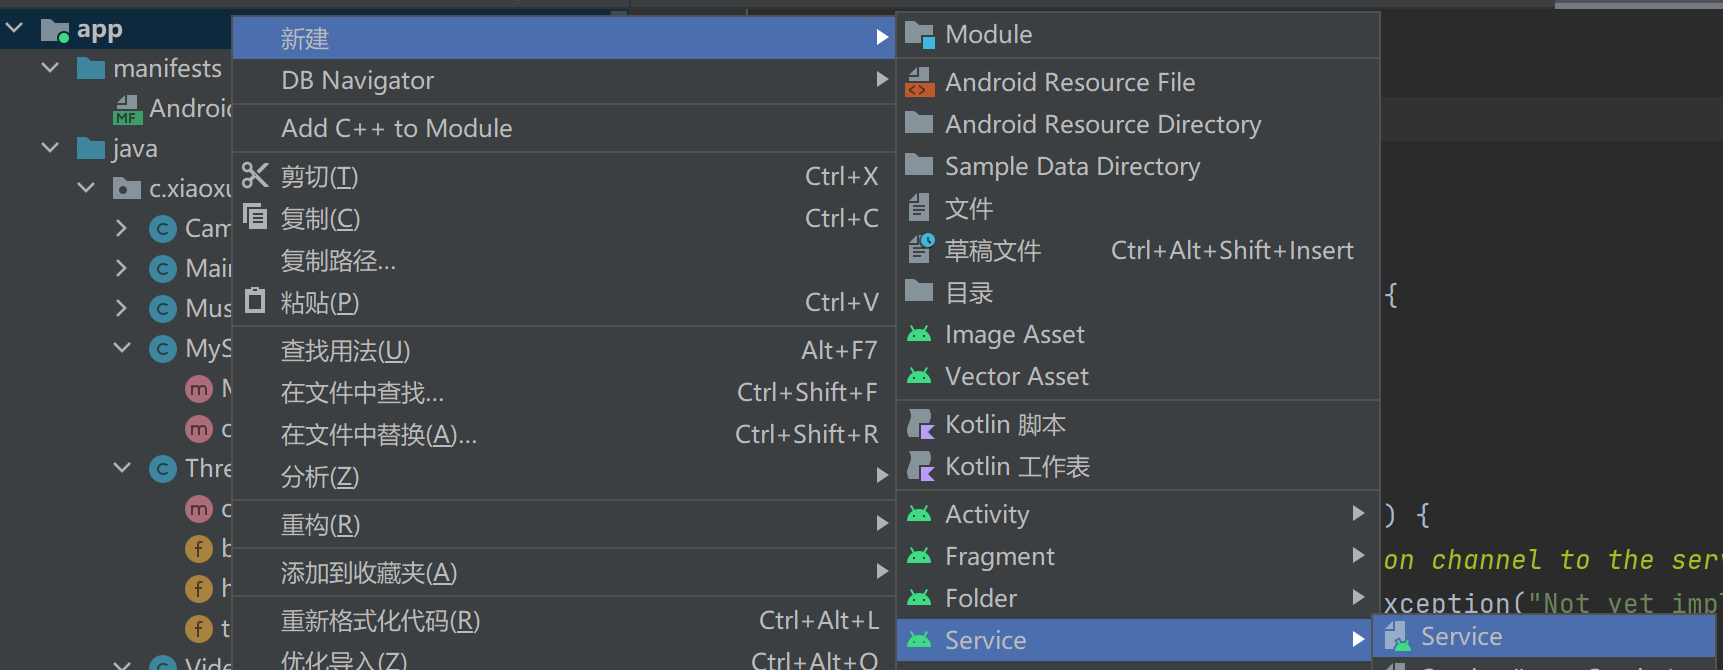
每个Service都会在清单文件中的<application></application>标签中注册,Android Studio会自动完成这个操作
<service
    android:name=".MyService"
    android:enabled="true"
    android:exported="true">

</service>
开启和关闭service都是通过Intent完成的
start = findViewById(R.id.start);
stop = findViewById(R.id.stopService);
Intent intent = new Intent(this, MyService.class);
// 开启
start.setOnClickListener(v -> {
    startService(intent);
});
// 关闭
stop.setOnClickListener(v -> {
    stopService(intent);
});
package com.xiaoxu.battery;

import android.app.Service;
import android.content.Intent;
import android.os.IBinder;
import android.util.Log;

public class MyService extends Service {
    final String TAG = "FLAG_D";
    public MyService() {
    }

    @Override
    public void onCreate() {
        super.onCreate();
        Log.d(TAG, "onCreate: " + "service创建了");
    }

    @Override
    public void onDestroy() {
        super.onDestroy();
        Log.d(TAG, "onCreate: " + "service销毁了");
    }

    @Override
    public IBinder onBind(Intent intent) {
        // TODO: Return the communication channel to the service.
        throw new UnsupportedOperationException("Not yet implemented");
    }
}
Activity与Service进行通信
在之前的代码中,service虽然启动了,但启动之后就和Activity的关系不大了,所以需要借助Service随对应的类中的onBind()方法,具体的步骤如下:
- 在
Service所在的类中,创建一个静态的内部类,使其继承自Binder类- 静态的内部类中可以写一些方法
- 在
Service所在的类中增加一个成员变量,类型为所定义的静态内部类的类型 - 重写
Service随对应的类中的onBind()方法,方法的内容需要包含给这个成员变量赋值并返回 - 在
Activity所在的类中:- 增加两个成员变量:
- 自定义的内部类的实例变量
- 使用匿名内部类实现的
ServiceConnection类型的成员变量- 需要实现两个方法
- 在
onServiceConnected方法中将自定义的内部类的实例变量赋值,值为(自定义的内部类) 参数2,进行强制类型转换- 在这个方法中还可以调用写在自定义内部类中的方法
- 在
- 需要实现两个方法
- 在合适的位置绑定
Service,调用bindService(intent, connection, Context.BIND_AUTO_CREATE)进行绑定 - 取消绑定可以调用
unbindService(connection)方法
- 增加两个成员变量:
service所在的类
package com.xiaoxu.battery;

import android.app.Service;
import android.content.Intent;
import android.os.Binder;
import android.os.IBinder;
import android.util.Log;

public class MyService extends Service {
    public static final String TAG = "FLAG_D";
    MyBinder myBinder;
    public static class MyBinder extends Binder {
        // 随便写的方法,用来调用测试
        public void start() {
            Log.d(TAG, "start: " + "binder开始");
        }
    }

    public MyService() {
    }

    @Override
    public void onCreate() {
        super.onCreate();
        Log.d(TAG, "onCreate: " + "service创建了");
    }

    @Override
    public void onDestroy() {
        super.onDestroy();
        Log.d(TAG, "onCreate: " + "service销毁了");
    }

    @Override
    public IBinder onBind(Intent intent) {
        return myBinder = new MyBinder();
    }
}
Activity所在的类
package com.xiaoxu.battery;

import androidx.annotation.NonNull;
import androidx.appcompat.app.AppCompatActivity;

import android.content.ComponentName;
import android.content.Context;
import android.content.Intent;
import android.content.ServiceConnection;
import android.os.AsyncTask;
import android.os.Bundle;
import android.os.Handler;
import android.os.IBinder;
import android.os.Looper;
import android.os.Message;
import android.util.Log;
import android.widget.Button;
import android.widget.TextView;

public class ThreadActivity extends AppCompatActivity {

    final String TAG = "FLAG_D";
    Button bind, unbind;
    MyService.MyBinder myBinder;
    ServiceConnection connection = new ServiceConnection() {
        @Override
        public void onServiceConnected(ComponentName name, IBinder service) {
            myBinder = (MyService.MyBinder) service;
            myBinder.start();
        }

        @Override
        public void onServiceDisconnected(ComponentName name) {
            Log.d(TAG, "onServiceDisconnected: " + "断开连接");
        }
    };


    @Override
    protected void onCreate(Bundle savedInstanceState) {
        super.onCreate(savedInstanceState);
        setContentView(R.layout.activity_thread);
        Intent intent = new Intent(this, MyService.class);
        bind = findViewById(R.id.bind);
        unbind = findViewById(R.id.unbind);
        bind.setOnClickListener(v -> {
            bindService(intent, connection, Context.BIND_AUTO_CREATE);
        });
        unbind.setOnClickListener(v -> unbindService(connection));
    }
}
绑定即可打开这个Service,取消绑定将会销毁这个Service
生命周期
一旦在项目的任何位置调用了Context的startService()方法,相应的Service就会启动, 并回调onStartCommand()方法。如果这个Service之前还没有创建过,onCreate()方法会 先于onStartCommand()方法执行。Service启动了之后会一直保持运行状态,直到 stopService()或stopSelf()方法被调用,或者被系统回收。注意,虽然每调用一次 startService()方法,onStartCommand()就会执行一次,但实际上每个Service只会存在 一个实例。所以不管你调用了多少次startService()方法,只需调用一次stopService() 或stopSelf()方法,Service就会停止。 另外,还可以调用Context的bindService()来获取一个Service的持久连接,这时就会回调 Service中的onBind()方法。类似地,如果这个Service之前还没有创建过,onCreate()方 法会先于onBind()方法执行。之后,调用方可以获取到onBind()方法里返回的IBinder对象 的实例,这样就能自由地和Service进行通信了。只要调用方和Service之间的连接没有断开, Service就会一直保持运行状态,直到被系统回收。 当调用了startService()方法后,再去调用stopService()方法。这时Service中的 onDestroy()方法就会执行,表示Service已经销毁了。类似地,当调用了bindService() 方法后,再去调用unbindService()方法,onDestroy()方法也会执行,这两种情况都很好 理解。但是需要注意,我们是完全有可能对一个Service既调用了startService()方法,又 调用了bindService()方法的,在这种情况下该如何让Service销毁呢?根据Android系统的 机制,一个Service只要被启动或者被绑定了之后,就会处于运行状态,必须要让以上两种条件 同时不满足,Service才能被销毁。所以,这种情况下要同时调用stopService()和 unbindService()方法,onDestroy()方法才会执行。
使用前台Service
Android8.0开始,只有应用在前台可见的状态下,Service才可以稳定运行,应用进入后台之后,Service随时都有可能被系统回收,可以使用前台Service保证Service正常运行
前台Service和普通Service最 大的区别就在于,它一直会有一个正在运行的图标在系统的状态栏显示,下拉状态栏后可以看 到更加详细的信息,非常类似于通知的效果
步骤:
-
Android9.0即以后的版本需要在清单文件声明权限
-
<uses-permission android:name="android.permission.FOREGROUND_SERVICE" />
-
-
以下操作都是在服务的
onCreate方法中进行的 -
通过系统服务获取通知管理实例
-
实例化通知渠道
-
创建注册通知渠道
-
实例化一个
Intent和PendingIntent -
创建通知实例
-
调用
startForeground(id: int, 通知实例)
foreground中文为前景、瞩目地位、重要位置,读音为ˈfɔːrɡraʊnd
@Override
public void onCreate() {
    super.onCreate();
    Log.d(TAG, "onCreate: " + "service创建了");
    NotificationManager manager = (NotificationManager) getSystemService(Context.NOTIFICATION_SERVICE);
    NotificationChannel notificationChannel = new NotificationChannel("service", "前台通知", NotificationManager.IMPORTANCE_HIGH);
    manager.createNotificationChannel(notificationChannel);
    Intent intent = new Intent(this, MyService.class);
    PendingIntent pendingIntent = PendingIntent.getService(this, 1, intent, PendingIntent.FLAG_UPDATE_CURRENT);
    Notification notification = new Notification.Builder(this, "service")
            .setSmallIcon(R.drawable.play)
            .setLargeIcon(BitmapFactory.decodeResource(getResources(), R.drawable.icon2))
            .setContentTitle("请注意")
            .setContentText("服务正在运行")
            .setContentIntent(pendingIntent)
            .build();
    startForeground(2, notification);
}
服务启动后,状态栏就有一个常驻的通知
使用Log.d(TAG, "onCreate: " + Thread.currentThread().getName());可以看出:Service是在主线程中运行的
网络编程
使用okHttp
引入依赖:
implementation("com.squareup.okhttp3:okhttp:4.9.3")
okHttp
get请求:
不带参:
                OkHttpClient client = new OkHttpClient();
				Request request = new Request.Builder()
                        .url("https://music-api.heheda.top/search")
                        .build();
                try {
                    Response response = client.newCall(request).execute();
                    // 通过流获取内容
                    InputStream inputStream = response.body().byteStream();
                    BufferedReader bufferedReader = new BufferedReader(new InputStreamReader(inputStream));
                    String s;
                    String ss = "";
                    while((s = bufferedReader.readLine()) != null) {
                        ss += s;
                    }
                    change(ss);
                } catch (IOException e) {
                    e.printStackTrace();
                }
            }
带有参数的GET请求:
添加参数
HttpUrl.Builder httpBuilder = HttpUrl.parse("https://music-api.heheda.top/search").newBuilder();
httpBuilder.addQueryParameter("key", "值");
请求
new Thread(() -> {
    OkHttpClient client = new OkHttpClient();
    HttpUrl.Builder httpBuilder = HttpUrl.parse("https://music-api.heheda.top/search").newBuilder();
    httpBuilder.addQueryParameter("keywords", "这");
    Request request = new Request.Builder()
            .url(httpBuilder.build())
            .build();
    try {
        Response response = client.newCall(request).execute();
        InputStream inputStream = response.body().byteStream();
        BufferedReader bufferedReader = new BufferedReader(new InputStreamReader(inputStream));
        String s;
        String ss = "";
        while((s = bufferedReader.readLine()) != null) {
            ss += s;
        }
        change(ss);
        bufferedReader.close();
        inputStream.close();
        response.close();
    } catch (IOException e) {
        e.printStackTrace();
    }
}).start();
POST请求
添加参数
RequestBody requestBody = new FormBody.Builder()
        .add("good", "kkk")
        .add("key", "value").build();
构建
Request request = new Request.Builder()
        .url("https://httpbin.org/post")
        .post(requestBody)
        .build();
和前边一样,都可以获取流把内容返回
**可以直接通过response.body().string()**直接将响应的内容返回!!
Fragment
fragment,中文为分段、碎片,读音为fræɡˈment
是一个可以嵌入到Activity中的UI片段,可以看作是一个迷你型的Activity
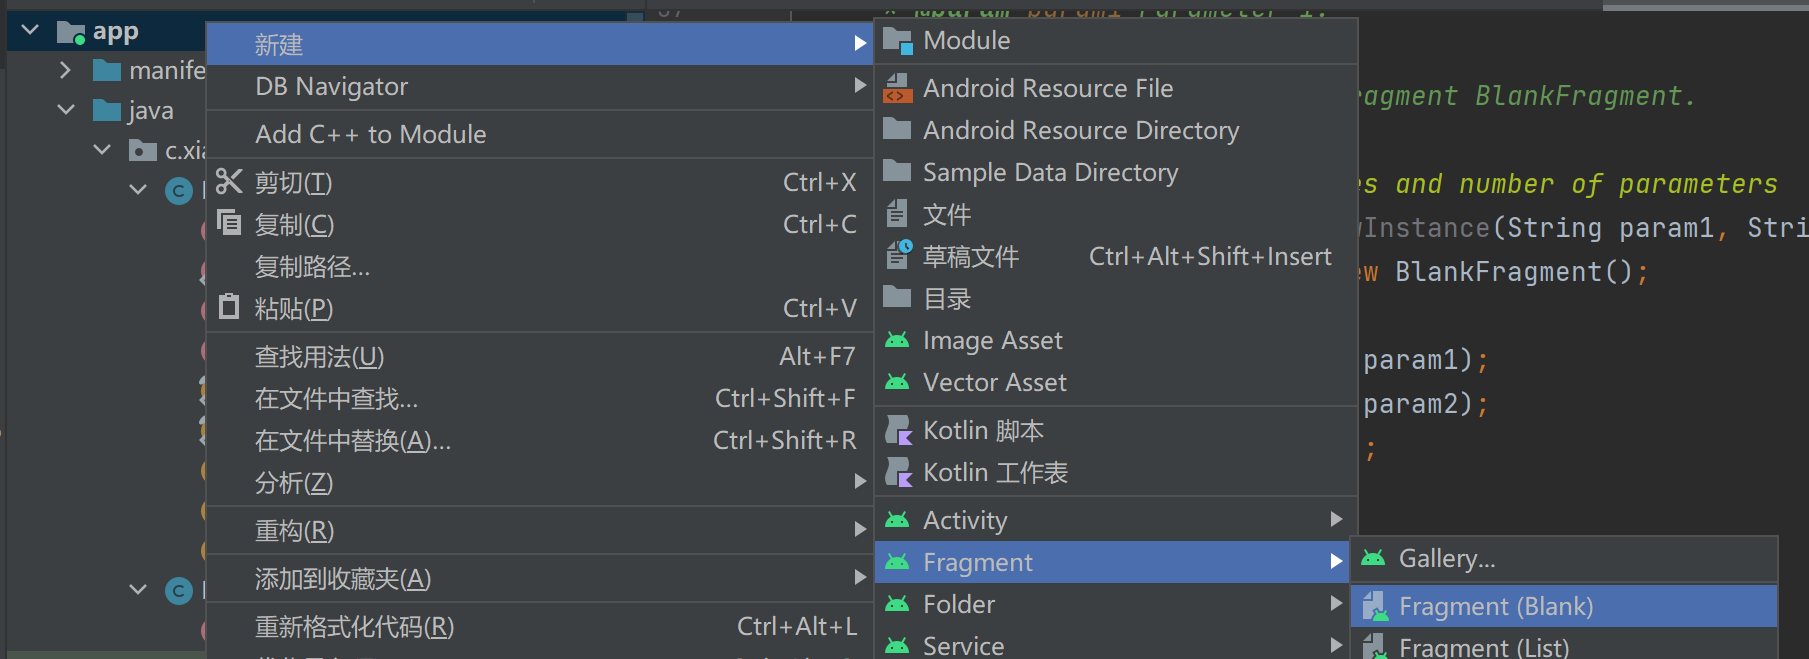
新建后,会自动在layout中新建一个xml,还会有一个类与之对应
这个时候可以在其他布局中引入这个fragment,引入方式:
<fragment
    android:id="@+id/top"
    android:name="fragment所对应的类的全类名"
    android:layout_width="wrap_content"
    android:layout_height="wrap_content"/>
动态加载Fragment
可以将Fragment填充到一个布局中
有以下布局,效果是点击按钮时,替换replaceHolder所在的布局中的内容
<?xml version="1.0" encoding="utf-8"?>
<androidx.constraintlayout.widget.ConstraintLayout xmlns:android="http://schemas.android.com/apk/res/android"
    xmlns:app="http://schemas.android.com/apk/res-auto"
    xmlns:tools="http://schemas.android.com/tools"
    android:layout_width="match_parent"
    android:layout_height="match_parent"
    tools:context=".MainActivity">

    <fragment
        android:id="@+id/top"
        android:name="com.xiaoxu.fragmentproject.BlankFragment"
        android:layout_width="wrap_content"
        android:layout_height="wrap_content"
        app:layout_constraintBottom_toBottomOf="parent"
        app:layout_constraintEnd_toEndOf="parent"
        app:layout_constraintStart_toStartOf="parent"
        app:layout_constraintTop_toTopOf="parent" />

    <LinearLayout
        android:id="@+id/replaceHolder"
        android:layout_width="wrap_content"
        android:layout_height="wrap_content"
        android:layout_weight="1"
        app:layout_constraintBottom_toBottomOf="parent"
        app:layout_constraintEnd_toEndOf="parent"
        app:layout_constraintStart_toStartOf="parent"
        app:layout_constraintTop_toBottomOf="@+id/top"
        android:orientation="horizontal" >
    </LinearLayout>


    <Button
        android:id="@+id/replace"
        android:layout_width="wrap_content"
        android:layout_height="wrap_content"
        android:text="替换"
        app:layout_constraintStart_toStartOf="parent"
        app:layout_constraintTop_toTopOf="parent" />
</androidx.constraintlayout.widget.ConstraintLayout>
protected void onCreate(Bundle savedInstanceState) {
    super.onCreate(savedInstanceState);
    setContentView(R.layout.activity_main);
    button = findViewById(R.id.replace);
    button.setOnClickListener(v -> {
        replaceFragment(new MyFragment2());
    });
    replaceFragment(new BlankFragment());
}

public void replaceFragment(Fragment fragment) {
    // 获取一个管理器
    FragmentManager fragmentManager = getSupportFragmentManager();
    // 开启事务
    FragmentTransaction fragmentTransaction = fragmentManager.beginTransaction();
    // 替换
    fragmentTransaction.replace(R.id.replaceHolder, fragment);
    // 提交
    fragmentTransaction.commit();
}
- 创建待添加Fragment的实例
- 获取FragmentManager,在Activity中可以直接调用getSupportFragmentManager() 方法获取
- 开启一个事务,通过调用beginTransaction()方法开启
- 向容器内添加或替换Fragment,一般使用replace()方法实现,需要传入容器的id和待添 加的Fragment实例
- 提交事务,调用commit()方法来完成。
返回栈
如果动态的加载Fragment后按下返回键,此时也会将这个Activity给结束掉,如果想要实现按返回键可以将替换的layout返回到上一个Fragment,需要调用fragmentTransaction.replace(R.id.replaceHolder, fragment);
public void replaceFragment(Fragment fragment) {
    // 获取一个管理器
    FragmentManager fragmentManager = getSupportFragmentManager();
    // 开启事务
    FragmentTransaction fragmentTransaction = fragmentManager.beginTransaction();
    // 替换
    fragmentTransaction.replace(R.id.replaceHolder, fragment);
    // 返回栈
    fragmentTransaction.addToBackStack(null);
    // 提交
    fragmentTransaction.commit();
}
这时就实现了功能
为组件添加事件
以按钮为例,每个fragment所在的类中有重写的onCreateView(参数)方法,所以可以在这个方法中为组件添加事件
可以按照以下的写法:
@Override
public View onCreateView(LayoutInflater inflater, ViewGroup container,
                         Bundle savedInstanceState) {
    View view = inflater.inflate(R.layout.布局, container, false);
    Button button = view.findViewById(R.id.btn1);
    button.setOnClickListener(v -> {
        Toast.makeText(getActivity(), "Fragment", Toast.LENGTH_SHORT).show();
    });
    return view;
}
生命周期回调方法
- onAttach():当Fragment和Activity建立关联时调用
- onCreateView():为Fragment创建视图(加载布局)时调用
- onActivityCreated():确保与Fragment相关联的Activity已经创建完毕时调用
- onDestroyView():当与Fragment关联的视图被移除时调用。 onDetach():当Fragment和Activity解除关联时调用。
Q.E.D.


