

Vue
引入:查看官网介绍:https://cn.vuejs.org/v2/guide/installation.html#Vue-Devtools
引入后,在浏览器控制台输入Vue,会看到以下的内容
Webpack
是前端工程化的解决方案,提供了前端模块化的支持、代码压缩、JavaScript兼容性、性能优化的功能
配置
-
安装
webpack和webpack-cli -
在根目录新建
webpack.config.js-
文件内容如下:
module.exports = {
    mode: "development" //用来指定构建模式,有两种:development和production
}
-
-
如果src下没有使用
index.js等具有一定意义的名称,则需要手动的指定打包的入口文件,即添加entry属性-
module.exports = { mode: "development", entry: './src/1.js', } -
也可以使用
path模块拼接路径 -
const path = require("path")

module.exports = {
    mode: "development",
    entry: path.join(__dirname, './src/1.js') // __dirname为当前文件所在的绝对路径
}
-
-
打包后的js文件会在
dist目录下的main.js
即:默认的打包入口文件为./src/index.js,默认打包文件的输出路径和文件为./dist/main.js
此时打开main.js会发现,这个文件没有被压缩,如果将模式改为生成,此时main.js会被压缩在一行
也可以自定义打包输出的文件夹和文件名,只需要添加output对象
-
output对象中有两个属性- 属性1是
path,值为字符串,也可以使用path模块拼接为路径 - 属性2是
filename,值为字符串,为生成的文件名
- 属性1是
-
const path = require("path")

module.exports = {
    mode: "development",
    entry: path.join(__dirname, './src/1.js'),
    output: {
        path: path.join(__dirname, "./dist"),
        filename: "1.js"
    }
}
webpack-dev-server插件
在之前的代码中,如果随着项目越来越大,每次预览前都必须要执行npm run dev,会比较麻烦,所以可以引入这个插件,每次修改文件后自动的打包
npm install webpack-dev-server --save-dev
将package.json中的srcipt中的dev的值修改为webpack serve
"scripts": {
  "dev": "webpack serve"
},
当修改代码后,按下ctrl+s会自动的重新执行打包
只有这个插件也不能实现访问,因此此时是放到内存中的,所以想要通过localhost:8080实时的预览生成的文件,还需要另外的插件
html-webpack-plugin
npm i --save-dev html-webpack-plugin
插件的配置
- 引入插件
- 创建插件实例对象
- 暴露
所以,整体步骤:
-
在
webpack.config.js中引入文件const HtmlWebpackPlugin = require("html-webpack-plugin") -
实例化这个对象,并指定要复制的文件和路径
const htmlWebpackPlugin = new HtmlWebpackPlugin({ // 指定赋值的文件,只有这样才能够通过localhost:8080访问到 template: "./src/index.html", // 指定复制出来的路径 filename: "./index.html" }); -
在
module.exports中添加plugins属性,属性值为数组,数组中存放插件对象module.exports = { mode: "development", entry: path.join(__dirname, './src/1.js'), output: { path: path.join(__dirname, "./dist"), filename: "1.js" }, // 挂载插件 plugins: [htmlWebpackPlugin] } -
最后,
webpack.config.js文件的内容为const path = require("path") const HtmlWebpackPlugin = require("html-webpack-plugin") const htmlWebpackPlugin = new HtmlWebpackPlugin({ // 指定赋值的文件,只有这样才能够通过localhost:8080访问到 template: "./src/index.html", // 指定复制出来的路径 filename: "./index.html" }); module.exports = { mode: "development", entry: path.join(__dirname, './src/1.js'), output: { path: path.join(__dirname, "./dist"), filename: "1.js" }, // 挂载插件 plugins: [htmlWebpackPlugin] }
devServer
可以在webpack.config.json文件中的module.exports中添加新的属性,属性为devServer,可以指定:
- 打包后是否自动打开浏览器
- 打开的端口
- 打开的地址
截止目前为止webpack.config.json文件中的内容为:
const path = require("path")
const HtmlWebpackPlugin = require("html-webpack-plugin")

const htmlWebpackPlugin = new HtmlWebpackPlugin({
    // 指定赋值的文件,只有这样才能够通过localhost:8080访问到
    template: "./src/index.html",
    // 指定复制出来的路径
    filename: "./index.html"
});


module.exports = {
    mode: "development",
    entry: path.join(__dirname, './src/1.js'),
    // output: {
    //     path: path.join(__dirname, "./dist"),
    //     filename: "1.js"
    // },
    // 挂载插件
    plugins: [htmlWebpackPlugin],
    devServer: {
        // 打包后自动打开浏览器
        open: true,
        // 端口
        port: 54325,
        // 打包后的地址
        host: "127.0.0.1"
    }
}
loader
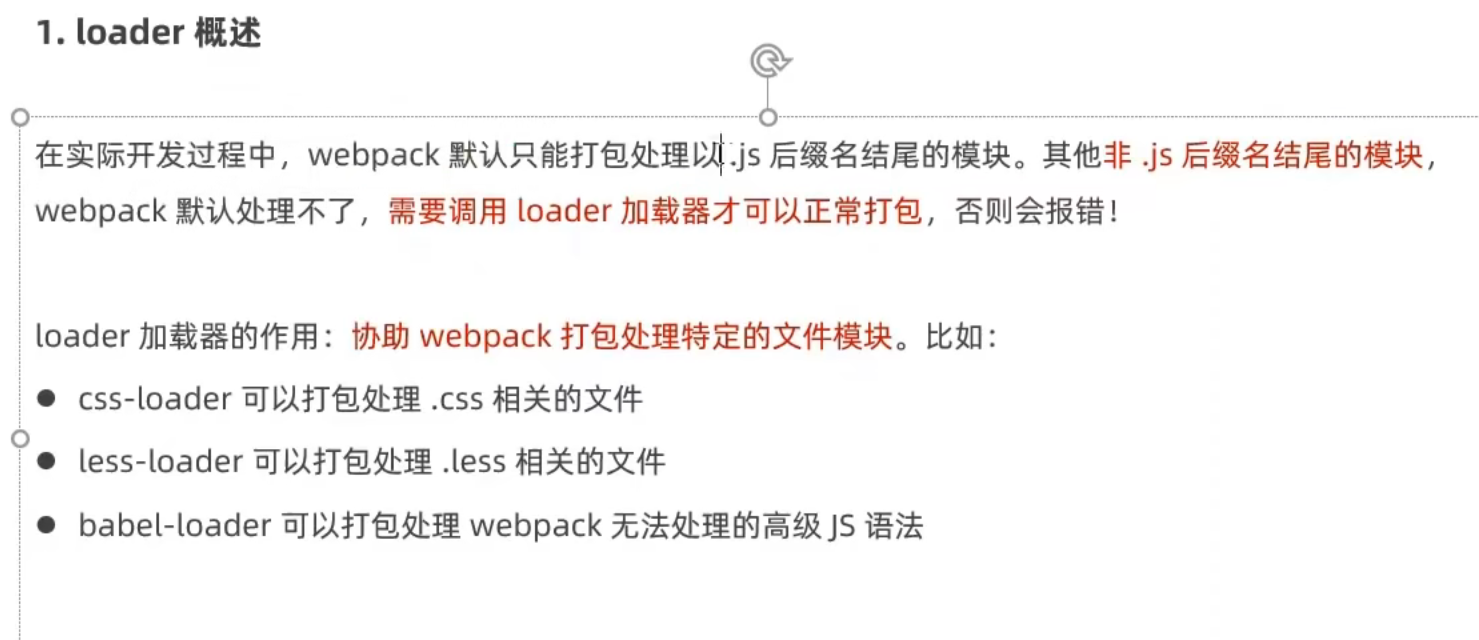
在js中导入css
import '路径/xxx.css'
如果没有相应的loader,会报错
需要安装以下的加载器:
npm install --save-dev style-loader
和
npm install --save-dev css-loader
并在webpack.config.json添加以下内容:
module: {
    rules: [
        {test: /\.css$/, use:['style-loader', 'css-loader']}
    ]
}
此时文件的内容为:
const path = require("path")
const HtmlWebpackPlugin = require("html-webpack-plugin")

const htmlWebpackPlugin = new HtmlWebpackPlugin({
    // 指定赋值的文件,只有这样才能够通过localhost:8080访问到
    template: "./src/index.html",
    // 指定复制出来的路径
    filename: "./index.html"
});


module.exports = {
    mode: "development",
    entry: path.join(__dirname, './src/1.js'),
    // output: {
    //     path: path.join(__dirname, "./dist"),
    //     filename: "1.js"
    // },
    // 挂载插件
    plugins: [htmlWebpackPlugin],
    devServer: {
        // 打包后自动打开浏览器
        open: true,
        // 端口
        port: 54325,
        // 打包后的地址
        host: "127.0.0.1"
    },
    module: {
        rules: [
            {test: /\.css$/, use:['style-loader', 'css-loader']}
        ]
    }
}
代表匹配js文件交给后边两个loader处理,执行顺序是从后往前依次执行,即先交给css-loader再给style-loader,当style-loader处理完后,将文件再做一个转交给webpack,user后的数组中的顺序不能乱写,需要看文档
打包构建
在package.json中的script属性中添加bulid属性,值为webpack --mode production
运行:npm run build
使用
一个简单的案例
<!--
 * @Created by : SongXiaoxu
 * @Copyright © 2021年 by: 宋晓旭. All rights reserved
 * @Date: 2021-11-04 10:05:06
 * @LastEditTime: 2021-11-04 10:37:10
-->
<!DOCTYPE html>
<html lang="en">

<head>
    <meta charset="UTF-8">
    <meta http-equiv="X-UA-Compatible" content="IE=edge">
    <meta name="viewport" content="width=device-width, initial-scale=1.0">
    <title>Document</title>
    <script type="text/javascript" src="vue/vue.js"></script>
</head>

<body>
    <!-- 初始化一个容器 -->
    <div id="root">
        <h1>你好,{{name}}</h1>
        <h1>你好,{{age}}</h1>
    </div>
    <script type="text/javascript">
        const vue = new Vue({
            // 使vue实例和容器建立起来联系,值通常为css选择器的选择器名
            el: '#root',
            data: {
                name: '世界',
                age: 88
            }
        });
    </script>
</body>

</html>
el对容器操作的标签一定要写在容器的后边,例如上例的第二个<script></script>标签如果写在div的上边,那么此时的div中的h1的{{属性}}将无法得到解析
容器中的代码称为vue模板
一个vue实例不能接管两个实例,例如
<div class="root">
        <h1>你好,{{name}}</h1>
        <h1>你好,{{age}}</h1>
    </div>
    <div class="root">
        <h1>你不好,{{name}}</h1>
        <h1>你不好,{{age}}</h1>
    </div>
    <script type="text/javascript">
        const vue = new Vue({
            // 使vue实例和容器建立起来联系,值通常为css选择器的选择器名
            el: '.root',
            data: {
                name: '世界',
                age: 88
            }
        });
    </script>
页面中的内容为
你好,世界
你好,88
你不好,{{name}}
你不好,{{age}}
此时只有最前边的被接管了,一个Vue实例只能对应一个容器,反过来,一个容器也是只能对应一个Vue实例
在{{js表达式}}中必须写js表达式,例如写一个{{1+1}}也能够正常的识别
Vue的整体框架为
<!--
 * @Created by : SongXiaoxu
 * @Copyright © 2021年 by: 宋晓旭. All rights reserved
 * @Date: 2021-11-04 10:05:06
 * @LastEditTime: 2021-11-04 10:59:35
-->
<!DOCTYPE html>
<html lang="zh-cn">

<head>
    <meta charset="UTF-8">
    <meta http-equiv="X-UA-Compatible" content="IE=edge">
    <meta name="viewport" content="width=device-width, initial-scale=1.0">
    <title>Document</title>
    <script type="text/javascript" src="vue/vue.js"></script>
</head>

<body>

</body>

</html>
也可以使用层级结构写属性名
<body>
    <div id="root">
        school.name=
        <span>{{school.name}}</span>
        <br> user.name=
        <span>{{user.name}}</span>
    </div>
    <script type="text/javascript">
        const vue = new Vue({
            el: '#root',
            data: {
                url: 'https://www.google.com',
                school: {
                    name: "学校"
                },
                user: {
                    name: "用户名"
                }
            }
        })
    </script>
Vue模板
之前用到的{{}}属于插值语法,也是Vue模板
指令语法
例如在<a href="地址">a标签</a>标签中,想要动态的指定一个要跳转的地址,不能使用插值语法,只能使用指令语法
例如错误写法如下
	<div id="root">
        <a href="{{url}}">错误写法</a>
    </div>
    <script type="text/javascript">
        const vue = new Vue({
            el: '#root',
            data: {
                url: 'https://www.google.com'
            }
        })
    </script>
指令语法1:v-band:属性="js表达式"
-
<a v-bind:href="url">正确写法</a> - 此时会将引号中的表达式当成js表达式进行处理
在指令语法中,每次都写v-bind会特别的麻烦,可以使用简写形式
指令语法2::属性="js表达式"
<a :href="url">正确写法</a>- 此时的这个写法和指令语法1的作用相同
由此可见,插值语法常用于标签体中,即<>这里</>,指令语法用于属性前
数据绑定
单向绑定:页面中某个属性值的数据和自定义的vue实例中的data中的某个属性相对应,当页面中某个属性值改变时,vue实例中相应属性值不会改变,而当vue实例中相应的属性值改变时页面中对应的属性值会改变,v-bind:是默认绑定
双向绑定:当页面中某个属性值改变时,也会影响vue实例中相应属性值改变,反过来,当页面中某个属性值改变时,vue实例中相应属性值也会改变,此时使用v-model:
v-model一般用于表单类的元素,因为只有表单类的元素有value属性,例如可以绑定单选/复选框
	<div id="root">
        单向绑定:<input type="text" :value="value">
        <br>双向绑定:
        <input type="text" v-model:value="value">
    </div>
    <script type="text/javascript">
        const vue = new Vue({
            el: '#root',
            data: {
                value: "value"
            }
        })
    </script>
v-model:value=也可以简写为v-model=
    <div id="root">
        单向绑定:<input type="text" :value="value">
        <br>双向绑定:
        <input type="text" v-model="value">
    </div>
v-model中还有3个修饰符,分别是:
v-model.number,将数据绑定转换为整型,即将填写的数据自动转换为number类型v-model.trim,trim中文为修剪,去掉两端的空格v-model.lazy,lazy中文为懒惰,当输入框失去焦点的时候再进行同步的绑定数据,如果不使用这个修饰符,输入框中的值没改变一次就同步一次
<!DOCTYPE html>
<html lang="zh-cn">
<head>
    <meta charset="UTF-8">
    <title>Title</title>
    <style>
        .box {
            width: 300px;
            height: 300px;
            background-color: red;
        }
    </style>
    <script src="./js/vue.js"></script>
</head>
<body>
<div id="root" title="33333333333">
    <input type="text" v-model.number="first"> +
    <input type="text" v-model.number="second"> = {{first + second}}
    <br>
    v-model.trim: <input type="text" v-model.trim="value">value:"{{value}}" <br>
    v-model.lazy: <input type="text" v-model.lazy="lazyValue">lazyValue:"{{lazyValue}}" <br>
</div>
<script>
    new Vue({
        el: "#root",
        data: {
            first: "",
            second: "",
            value: "",
            lazyValue: ""
        },
        methods: {}
    });
</script>
</body>
</html>
el和data的两种写法
容器绑定和实例化Vue可以分开
	<script type="text/javascript">
        const vue = new Vue({
            data: {
                value: "value"
            }
        })
        vue.$mount('#root')//从不在实例化时指定
    </script>
使用函数返回data
	<script type="text/javascript">
        const vue = new Vue({
            data: function() {
                return {
                    value: "value"
                }
            }
        })
        vue.$mount('#root')
    </script>
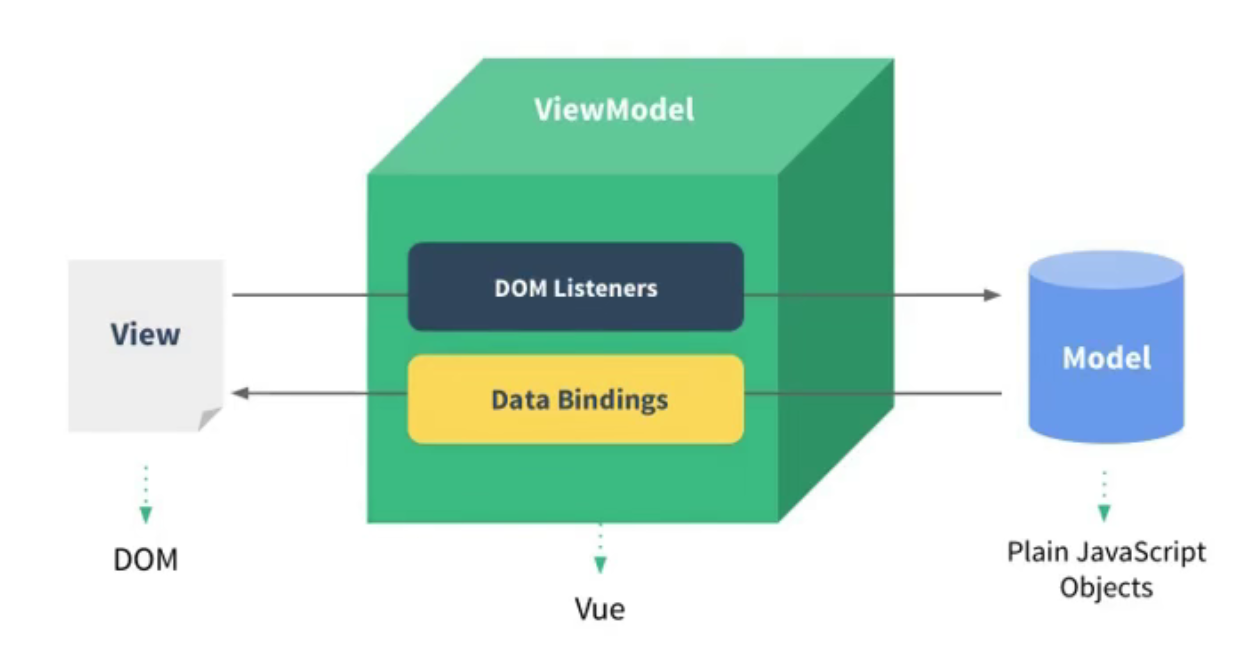
MVVM模型
-
M为Model,即模型,对应的是data中的数据
-
V为View,即视图,模板
-
VM为ViewModel,即视图模型,对应的是Vue实例对象

通常使用 变量名vm来接收Vue实例对象,vm变量中有的东西,都可以通过视图View使用,
例如使用console.log输出一下vm中的内容
    <script type="text/javascript">
        const vm = new Vue({
            el: '#root',
            data:{
                value: "123"
            }
        }
        )
        console.log(vm);
    </script>
内容如图所示
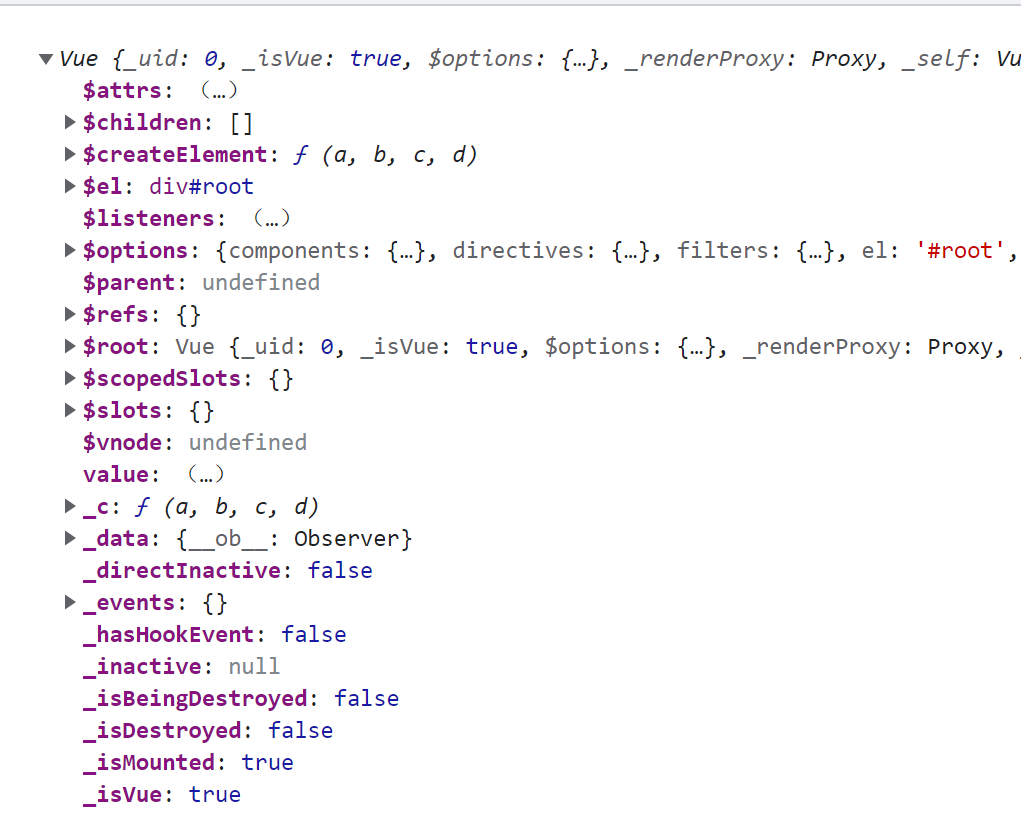
在输出内容时,可以输出以上内容中的值,例如<h1>$refs</h1>
数据代理
首先时添加属性
Object.defineProperty(对象, '属性', {
    value:值
})
添加属性,这种方式添加的属性默认不参与遍历,默认的值不能被修改、删除
        let person = {
            name: "erzi",
            age:18
        };
        Object.defineProperty(person, 'sex', {
            value:"男"
        });
使用delete 对象.属性可以把这个对象的属性给删除掉
数据代理的定义:通过一个对象,代理对另一个对象中的属性的读写操作
    <script type="text/javascript">
        let obj1 = {
            x: 200
        }
        let obj2 = {
            y = 300
        }
        // 此时让obj2代理obj1中的x,提供了get和set方法,可以在控制台中测试
        Object.defineProperty(obj2, 'x', {
            get(){
                return obj1.x;
            },
            set(x){
                obj1.x = x;
            }
        })
    </script>
obj1
{x: 200}

obj2
{y: 300}

obj2.x
200

obj2.x=3
3

obj1
{x: 3}

obj1.x=8
8

obj2.x
8
一个案例
<head>
    <meta charset="UTF-8">
    <meta http-equiv="X-UA-Compatible" content="IE=edge">
    <meta name="viewport" content="width=device-width, initial-scale=1.0">
    <title>Vue</title>
    <script type="text/javascript" src="/vue/vue.js">

    </script>
    <script type="text/javascript">

    </script>
</head>

<body>
    <div id = "root">
        <h1>名称:{{name}}</h1>
        <h1>地址:{{address}}</h1>
    </div>
    <script type="text/javascript">
        const vm = new Vue({
            el: "#root",
            data: {
                name: "测试",
                address: "地址"
            }
        })
    </script>
</body>
在这个案例中,在控制台输入vm可以查看这个实例的详情内容,会发现以下的方法:
- get address: ƒ proxyGetter()
- set address: ƒ proxySetter(val)
- get name: ƒ proxyGetter()
- set name: ƒ proxySetter(val)
也就是说,占位符中的内容都是通过代理实现的
事件处理
点击事件:新建一个按钮,为其绑定一个事件
<div id = "root">
    <button v-on:click = "方法名">按钮</button>
</div>
在vue实例中,写点击按钮后的方法,需要在外层新建一个属性,属性为methods,methods中放一些方法
方法不用写function关键字
<script type="text/javascript">
        const vm = new Vue({
            el: "#root",
            data: {

            },
            methods: {
                方法名(){
                    //操作
                }
            }
        })
    </script>
每个方法中,默认的带有 一个event参数,此时的v-on:也可以简写,可以用@代替
<div id = "root">
        <button @click = "buttonFun1">点击这里</button>
    </div>
    <script type="text/javascript">
        const vm = new Vue({
            el: "#root",
            data: {

            },
            methods: {
                buttonFun1(){
                    alert(event);
                    alert("hello");
                }
            }
        })
    </script>
event也可以手动指定
<!DOCTYPE html>
<html lang="zh-cn">
<head>
    <meta charset="UTF-8">
    <title>Title</title>
    <style>
        .box{
            width: 300px;
            height: 300px;
            background-color: red;
        }
    </style>
    <script src="./js/vue.js"></script>
</head>
<body>
<div id="root" title="33333333333">
    <p>count = {{count}}</p>
	<!--此时手动指定了event为e,因此add不能写成add()-->
    <button @click = "add">+1</button>
</div>
<script>
    new Vue({
        el: "#root",
        data:{
            count: 0
        },
        methods: {
            // 手动指定event
            add(e){
                this.count++;
                console.log(e);
            }
        }
    });
</script>
</body>
</html>
在有参数的情况下,要想获取到event,就需要写两个参数,第二个参数传递的值为$event
<!DOCTYPE html>
<html lang="zh-cn">
<head>
    <meta charset="UTF-8">
    <title>Title</title>
    <style>
        .box{
            width: 300px;
            height: 300px;
            background-color: red;
        }
    </style>
    <script src="./js/vue.js"></script>
</head>
<body>
<div id="root" title="33333333333">
    <p>count = {{count}}</p>
<!--    此时有参数,如果想要获取到event,需要使用$event-->
    <button @click = "add(count, $event)">+1</button>
</div>
<script>
    new Vue({
        el: "#root",
        data:{
            count: 1
        },
        methods: {
            add(n, e){
                this.count += n;
                if (this.count % 2 === 0){
                    e.target.style.backgroundColor = "red";
                }else{
                    e.target.style.backgroundColor = "blue";
                }
                console.log(e);
            }
        }
    });
</script>
</body>
</html>
也可以将参数传递到方法中,只需要在方法名后添加参数
<div id = "root">
        <button @click = "buttonFun1(6666)">点击这里</button>
    </div>
    <script type="text/javascript">
        const vm = new Vue({
            el: "#root",
            data: {

            },
            methods: {
                buttonFun1(num){
                    alert("传入的数字为:" + num);
                }
            }
        })
    </script>
也就是想要传递一个参数,那么就加括号和参数,如果不传递,就不需要加括号,也可以将这些方法放到vm的data中,但不建议这么做,会使vue效率变低
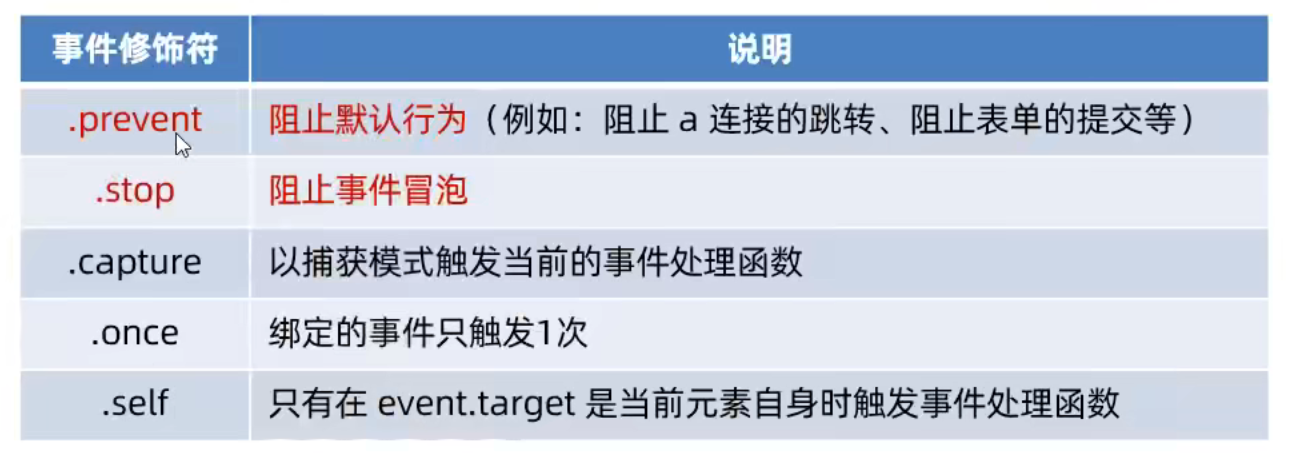
事件修饰符
如果多个修饰符同时使用,可以用.进行连接,例如既要阻止默认事件,又要防止事件冒泡,可以写为@click.prevent.stop
阻止默认事件
event.preventDefault()代表阻止默认事件,可以在方法中写
在vue中可以直接在@click后写,即@click.prevent,例如<a href="https://www.google.com" @click.prevent = "info">点击提示信息,而不是打开页面</a>
阻止事件冒泡
事件的冒泡:当父标签和子标签都有事件时,触发子标签的事件后,父标签的事件也会被触发
原生的解决方案:在子标签的事件的方法第一行添加event.stopPropagation();
vue的解决方案:使用@click.stop
<body>
    <div id = "root">
        <div @click = "divMethod">
            <p @click.stop="pMethod">这是p标签</p>
        </div>
    </div>
    <script type="text/javascript">
        const vm = new Vue({
            el: "#root",
            data: {
            },
            methods: {
                pMethod(){
                    alert("p标签");
                },
                divMethod(){
                    alert("这是div标签");
                }
            }
        })
    </script>
</body>
事件只触发一次
@click.once
表示事件只能被触发一次,无法再次触发
键盘事件 keyup/keydown
keyup为抬起某个按键,keydown为按下某个按键,通常都使用keydown因为keyup对于某一些按键不会生效
原生方式:
event.keyCode可以获取到键盘按键的keyCode值
<div id = "root">
        <input type="text" placeholder="选中文本框后,尝试按键盘按键" @keydown="enter" size = 30>
    </div>
    <script type="text/javascript">
        const vm = new Vue({
            el: "#root",
            data: {
            },
            methods: {
                enter(){
                    alert("您按了键盘,按的按键的编码是:" + event.keyCode);
                }
            }
        })
    </script>
可以利用这个做出按回车触发事件,回车的keyCode值为13
<div id = "root">
        <input type="text" placeholder="选中文本框输入内容并按回车" @keydown="enter" size = 30>
    </div>
    <script type="text/javascript">
        const vm = new Vue({
            el: "#root",
            data: {
            },
            methods: {
                enter(){
                    if(event.keyCode === 13){
                        alert("输入的内容为:" + event.target.value);
                    }
                }
            }
        })
    </script>
可以直接使用@keydown.enter获取到回车,.enter可以被称为别名,vue对常用的按键都起了别名
<div id = "root">
        <input type="text" placeholder="选中文本框输入内容并按回车" @keydown.enter="enter" size = 30>
    </div>
    <script type="text/javascript">
        const vm = new Vue({
            el: "#root",
            data: {
            },
            methods: {
                enter(){
                    alert("你输入的内容为:" + event.target.value);
                }
            }
        })
    </script>
别名如下: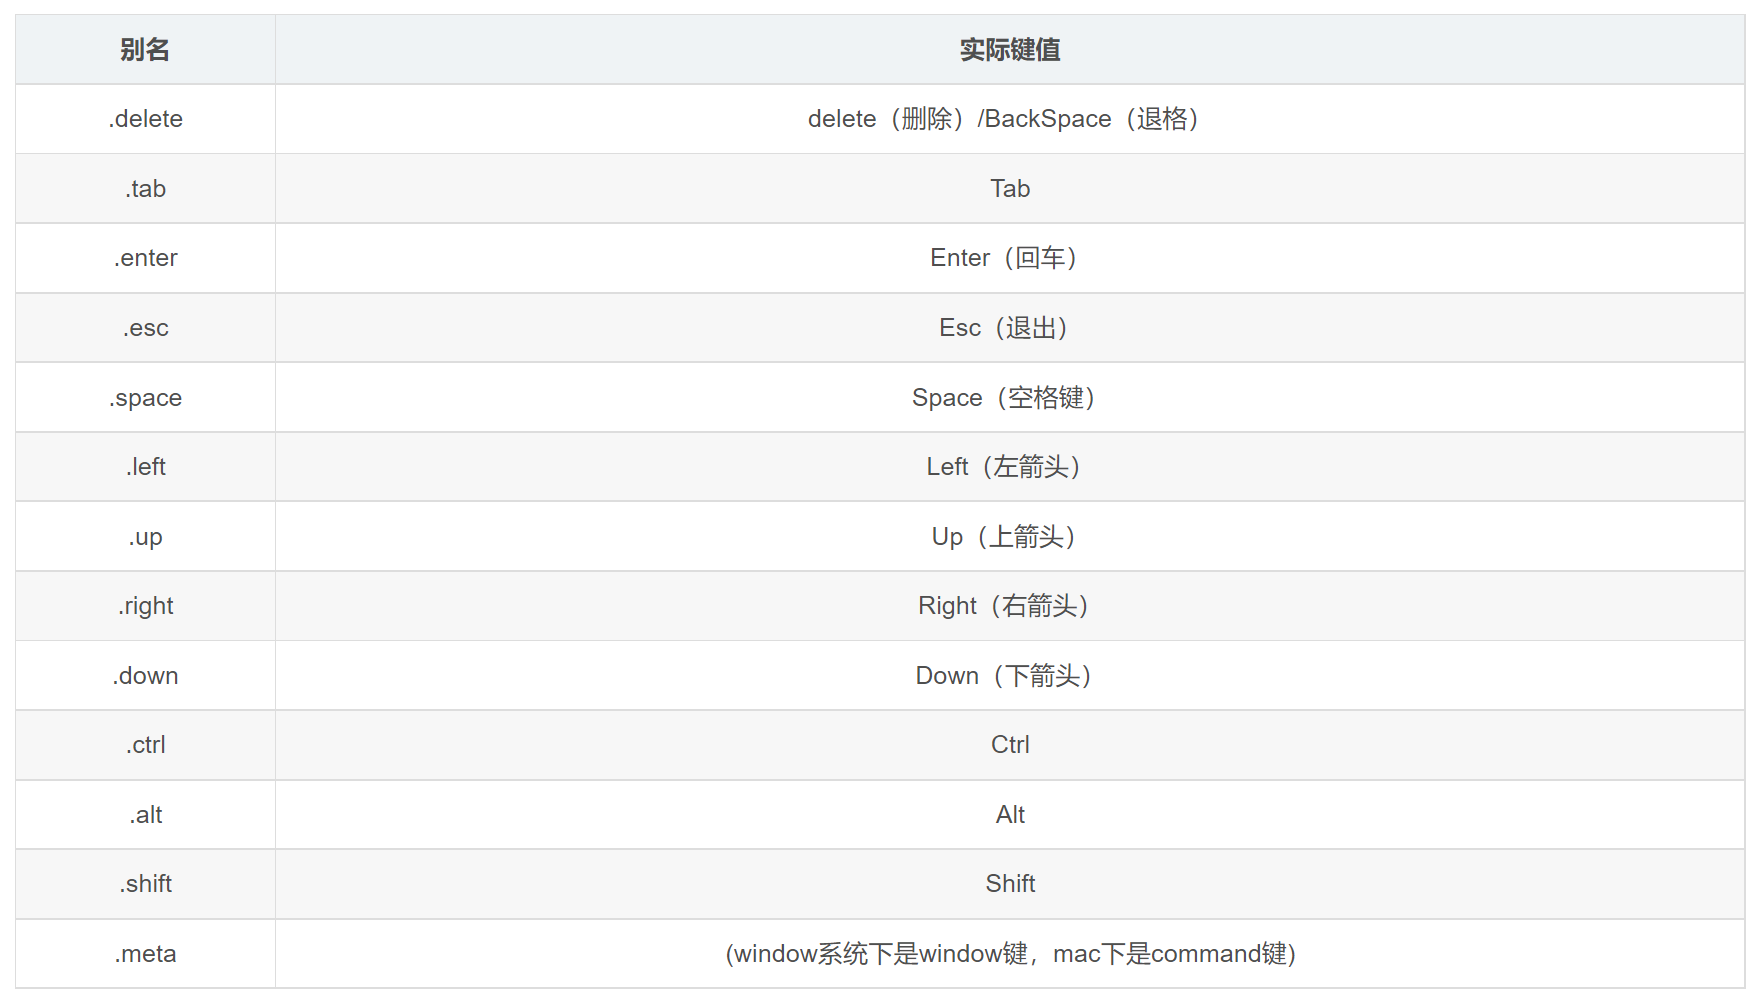
vue也支持多个别名/keyCode融合,即可以通过@keydown.keyCode进行匹配,例如回车@keydown.13
<div id = "root">
        <input type="text" placeholder="选中文本框后按下Ctrl + C"  @keydown.ctrl.67 = "enter">
    </div>
    <script type="text/javascript">
        const vm = new Vue({
            el: "#root",
            data: {
            },
            methods: {
                enter(){
                    alert("你按了Ctrl + C");
                }
            }
        })
    </script>
也可以自定义别名,例如把回车定义为huiche
<script type="text/javascript">
        Vue.config.keyCodes.huiche = 13;
        const vm = new Vue({
            el: "#root",
            data: {
            },
            methods: {
            }
        })
    </script>
计算属性
引入一个案例,下图效果有多种方式实现
使用插值语法:
<!DOCTYPE html>
<html lang="zh-cn">

<head>
    <meta charset="UTF-8">
    <meta http-equiv="X-UA-Compatible" content="IE=edge">
    <meta name="viewport" content="width=device-width, initial-scale=1.0">
    <title>Vue</title>
    <script type="text/javascript" src="/vue/vue.js">

    </script>
    <script type="text/javascript">

    </script>
</head>

<body>
    <div id="root">
        <input type="text" placeholder="姓" v-model=lastname><br>
        <input type="text" placeholder="名" v-model=firstname><br>
        全名:{{lastname}}-{{firstname}}
    </div>
    <script type="text/javascript">
    Vue.config.keyCodes.huiche = 13;
        const vm = new Vue({
            el: "#root",
            data: {
                lastname: "",
                firstname: ""
            },
            methods: {

            }
        })
    </script>
</body>

</html>
使用methods:
<!DOCTYPE html>
<html lang="zh-cn">

<head>
    <meta charset="UTF-8">
    <meta http-equiv="X-UA-Compatible" content="IE=edge">
    <meta name="viewport" content="width=device-width, initial-scale=1.0">
    <title>Vue</title>
    <script type="text/javascript" src="/vue/vue.js">

    </script>
    <script type="text/javascript">

    </script>
</head>

<body>
    <div id="root">
        <input type="text" placeholder="姓" v-model=lastname><br>
        <input type="text" placeholder="名" v-model=firstname><br>
        全名:{{fullName()}}
    </div>
    <script type="text/javascript">
    Vue.config.keyCodes.huiche = 13;
        const vm = new Vue({
            el: "#root",
            data: {
                lastname: "",
                firstname: ""
            },
            methods: {
                fullName(){
                    return this.lastname + "-" + this.firstname;
                }
            }
        })
    </script>
</body>

</html>
此时是将函数返回的内容放到页面中,如果只写函数名不写(),就代表把这个函数放到页面中(效果:function () { [native code] }),如果想要将返回值放到页面中,则必须要加()
只要数据一发生变化,vue的模板就进行一次解析,即每次都会刷新
这种方式写法效率不高!!
使用计算属性:
含义:拿已有的属性进行加工计算使其生成一个新的结果
在vue实例中添加一个新的配置项,新的配置项为computed,computed中的内容通常是多个对象,需要为这个对象提供一个get()方法
computed中文为计算
<!DOCTYPE html>
<html lang="zh-cn">

<head>
    <meta charset="UTF-8">
    <meta http-equiv="X-UA-Compatible" content="IE=edge">
    <meta name="viewport" content="width=device-width, initial-scale=1.0">
    <title>Vue</title>
    <script type="text/javascript" src="/vue/vue.js">

    </script>
    <script type="text/javascript">

    </script>
</head>

<body>
    <div id="root">
        <input type="text" placeholder="姓" v-model=lastname><br>
        <input type="text" placeholder="名" v-model=firstname><br>
        全名:{{fullName}}
    </div>
    <script type="text/javascript">
    Vue.config.keyCodes.huiche = 13;
        const vm = new Vue({
            el: "#root",
            data: {
                lastname: "",
                firstname: ""
            },
            methods: {
            },
            computed: {
                fullName: {
                    get(){
                        return this.lastname + "-" + this.firstname;
                    }
                }
            }
        })
    </script>
</body>

</html>
computed默认带有缓存,只有第一次调用或者所以依赖的数据发生改变后,才会调用里边的get()方法
也可以提供一个set方法,有了这个方法才能够修改值,底层使用数据代理
如果确定了只会读取数据而不修改数据,也就是只有get()方法时,可以使用简写形式,也就是直接将这个对象当成函数使用
最终方案
<!DOCTYPE html>
<html lang="zh-cn">

<head>
    <meta charset="UTF-8">
    <meta http-equiv="X-UA-Compatible" content="IE=edge">
    <meta name="viewport" content="width=device-width, initial-scale=1.0">
    <title>Vue</title>
    <script type="text/javascript" src="/vue/vue.js">

    </script>
    <script type="text/javascript">

    </script>
</head>

<body>
    <div id="root">
        <input type="text" placeholder="姓" v-model=lastname><br>
        <input type="text" placeholder="名" v-model=firstname><br>
        全名:{{fullName}}
    </div>
    <script type="text/javascript">
    Vue.config.keyCodes.huiche = 13;
        const vm = new Vue({
            el: "#root",
            data: {
                lastname: "",
                firstname: ""
            },
            methods: {
            },
            computed: {
                fullName: function(){
                    return this.lastname + "-" + this.firstname;
                }
                //或者
                fullName(){
                    return this.lastname + "-" + this.firstname;
                }
            }
        })
    </script>
</body>

</html>
也就是这个方法代替了原有的get()方法
监视属性 监听器
使用计算属性
<!DOCTYPE html>
<html lang="zh-cn">

<head>
    <meta charset="UTF-8">
    <meta http-equiv="X-UA-Compatible" content="IE=edge">
    <meta name="viewport" content="width=device-width, initial-scale=1.0">
    <title>Vue</title>
    <script type="text/javascript" src="/vue/vue.js">

    </script>
    <script type="text/javascript">

    </script>
</head>

<body>
    <div id="root">
        今天天气很{{status}}
        <br>
        <button @click="change">切换</button>
    </div>
    <script type="text/javascript">
        const vm = new Vue({
            el: "#root",
            data: {
                flag: true
            },
            methods: {
                change(){
                    this.flag = !this.flag;
                }
            },
            computed: {
                status(){
                    return this.flag === true ? "凉爽" : "炎热";
                }
            }
        })
    </script>
</body>

</html>
监视属性:新添加一个配置项,配置项为watch,在上例中,每按一次按钮,flag中的值会发生改变,可以使用一个监视器进行监视,每次发生变化时,做相应的处理
 <script type="text/javascript">
        const vm = new Vue({
            el: "#root",
            data: {
                flag: true
            },
            methods: {
                change() {
                    this.flag = !this.flag;
                }
            },
            computed: {
                status() {
                    return this.flag === true ? "凉爽" : "炎热";
                }
            },
            watch: {
                flag: {
                    handler(v1, v2) {
                        console.log("flag值被改变,新的值为:" + v1 + ",旧的值为:" + v2);
                    }
                }
            }
        })
handler方法中的参数名可以随便写,第一个参数为旧的值,第二个参数为新的值
watch中的属性名必须要和需要监视的属性的名称相同!!
以上的watch中的属性名都是简写的,完整写法为'属性名'
watch中还有一个属性,是一个布尔值,默认为false,为true时代表刚加载页面就执行监视,为false时,只有需要时才会进行监视,immediate,读音iˈmēdēət,中文为即时、直接、立刻
不止只有data中的数据变化可以被监测到,computed中的属性返回值发生变化时也可以被监测到
也可以在Vue实例外进行监视,格式:
Vue实例.$watch('需要监视的属性名', {
	handler(参数){
		处理语句;
	}
})
例如:
		vm.$watch('status', {
            handler(v1, v2){
                console.log("status返回的值被改变,新的值为:" + v1 + ",旧的值为:" + v2);
            }
        })
最终的为
<!DOCTYPE html>
<html lang="zh-cn">

<head>
    <meta charset="UTF-8">
    <meta http-equiv="X-UA-Compatible" content="IE=edge">
    <meta name="viewport" content="width=device-width, initial-scale=1.0">
    <title>Vue</title>
    <script type="text/javascript" src="/vue/vue.js">

    </script>
    <script type="text/javascript">

    </script>
</head>

<body>
    <div id="root">
        今天天气很{{status}}
        <br>
        <button @click="change">切换</button>
    </div>
    <script type="text/javascript">
        const vm = new Vue({
            el: "#root",
            data: {
                flag: true
            },
            methods: {
                change() {
                    this.flag = !this.flag;
                }
            },
            computed: {
                status() {
                    return this.flag === true ? "凉爽" : "炎热";
                }
            },
            watch: {
                flag: {
                    handler(v1, v2) {
                        console.log("flag值被改变,新的值为:" + v1 + ",旧的值为:" + v2);
                    }
                }
            }
        })
        vm.$watch('status', {
            handler(v1, v2){
                console.log("status返回的值被改变,新的值为:" + v1 + ",旧的值为:" + v2);
            }
        })
    </script>
</body>

</html>
如果监测的值是一个对象中的属性时,在watch中与之匹配的属性名必须要加''
例如
<body>
    <div id="root">
        num.a的值为{{num.a}}
        <br>
        <button @click="num.a++">num.a++</button>
    </div>
    <script type="text/javascript">
        const vm = new Vue({
            el: "#root",
            data: {
                num: {
                    a: 1,
                    b: 1
                }
            },
            methods: {
            },
            computed: {
            },
            watch: {
                'num.a': {
                    handler(v1,  v2){
                        console.log("num.a的值被改变,新的值为:" + v1 + ",旧的值为:" + v2);
                    }
                }
            }
        })
    </script>
</body>
在上例中,如果想要监视整个num对象的变化(即有任意一个值发生变化时进行监视),需要开启深度监视
            watch: {
                num: {
                    deep: true,
                    handler(){
                        console.log("num中的一个值被改变");
                    }
                }
            }
如果不开启深度监视,那么只有在加入新的属性时,才会进行监视
简写形式
如果一个监视不需要开启deep和immediate时,可以采用简写形式
例如将之前的flag进行简写,可以写为
flag(v1, v2){
	console.log("flag值被改变,新的值为:" + v1 + ",旧的值为:" + v2);
},
在实例外进行监视时,也可以使用简写形式
例如之前监视的status可以写为
vm.$watch('status', function (v1, v2) {
	console.log("status返回的值被改变,新的值为:" + v1 + ",旧的值为:" + v2);
})
在计算属性中有一个姓名的案例,这个案例也可以使用watch写
<body>
    <div id="root">
        姓:<input type="text" v-model="firstName"><br>
        名:<input type="text" v-model="lastName"><br>
        全名:{{name}}
    </div>
    <script type="text/javascript">
        const vm = new Vue({
            el: "#root",
            data: {
                firstName: "张",
                lastName: "三",
                name: "0"
            },
            watch: {
                firstName: {
                    immediate: true,
                    handler(){
                        this.name = this.firstName + "-" + this.lastName;
                    }
                },
                lastName: {
                    immediate: true,
                    handler(){
                        this.name = this.firstName + "-" + this.lastName;
                    }
                }
            }
        })
    </script>
</body>
watch可以进行异步操作
条件渲染 v-if
只有符合条件时才会显示相关的内容
<p v-if="el中的元素,只有这个元素为true时执行这个标签">此时flag为true</p>
<p v-else>此时flag为false</p>
v-if后可以写表达式或者使用vm中存在的值,与之配对的有v-else-if=""、v-else
<!DOCTYPE html>
<html lang="zh-cn">
<head>
    <meta charset="UTF-8">
    <title>Title</title>
    <script src="https://cdn.jsdelivr.net/npm/vue@2/dist/vue.js">

    </script>
</head>
<body>
<div id="root">
    <p v-if="val > 10 && val <=20">此时大于10</p>
    <p v-else-if="val > 20">此时大于20</p>
    <p v-else>此时小于等于10</p>
</div>
<script type="text/javascript">
    const vm = new Vue({
        el: "#root",
        data: {
            val: 2
        },
        watch: {}
    })
</script>
</body>
</html>
v-if、v-else-if、v-else,结构不能够被打断,如果为不展示的dom元素直接移除
v-show
写法和v-if一致,不展示的元素是隐藏掉,而不是移除,适用于切换频率比较高的场景
<标签 v-show="表达式"></标签>
列表渲染 v-for
可以用来遍历数组之类的元素
语法
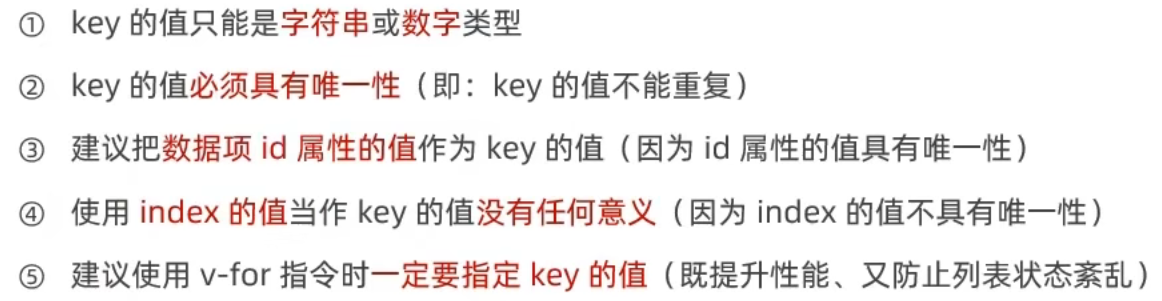
<标签 v-for="变量 in 元素" :key="变量.属性">{{变量}}</标签>
通常使用:key绑定一个值,这个值可以看作是这个标签的标识,一般绑定字符串和数字,在之后的vue文件中,必须要指定:key
<标签 v-for="(变量1, 变量2) in 元素" :key="变量2">{{变量}}</标签>
例如
div id="root">
    <ul>
        <li v-for="i in array">{{i}}</li>
    </ul>
</div>
<script type="text/javascript">
    const vm = new Vue({
        el: "#root",
        data: {
            val: 2,
            array: [22, 33, 44, 55, 66]
        },
        watch: {}
    })
</script>
in之前的变量可以有两个,第一个变量为目前正在遍历的数据项,第二个变量为索引值
<body>
<div id="root">
    <ul>
        <li v-for="(i, j) in arr">{{i}},{{j}}</li>
    </ul>
</div>
<script type="text/javascript">
    const vm = new Vue({
        el: "#root",
        data: {
            arr: ["aaaa", "bbb", "ccc"]
        },
        methods: {

        }
    })
</script>
</body>
结果为
aaaa,0
bbb,1
ccc,2
也可以用来遍历对象,遍历对象时,可以使用
<标签 v-for="(变量1, 变量2, 变量3) in 对象">输出值</标签>
此时变量1为对象中的value,变量2为key,变量3为索引的下标值
遍历对象时,也可以通过循环变量.属性获取某个属性的值
<!DOCTYPE html>
<html lang="zh-cn">
<head>
    <meta charset="UTF-8">
    <title>Title</title>
    <style>
        .box {
            width: 300px;
            height: 300px;
            background-color: red;
        }
    </style>
    <script src="./js/vue.js"></script>
</head>
<body>
<div id="root" title="33333333333">
    <ul>
        <li v-for="i in result">{{i}}</li>
    </ul>
    <div v-for="i in test">
        <p>code: {{i.code}}, msg: {{i.msg}}, data: {{i.data}}, time: {{i.time}}</p>
    </div>
</div>
<script>
    new Vue({
        el: "#root",
        data: {
            result: ["vue", "vue框架", "vue官网", "vue.js", "vue面试题", "vue教程", "vue是什么软件", "vue生命周期", "vue vlog剪辑教程", "vue3.0"],
            test: [{
                "code": 500,
                "msg": "管理员关闭了游客上传!",
                "data": null,
                "time": 1544245931
            }, {
                "code": 500,
                "msg": "管理员关闭了游客上传!",
                "data": null,
                "time": 1544245931
            }, {
                "code": 500,
                "msg": "管理员关闭了游客上传!",
                "data": null,
                "time": 1544245931
            }]
        },
        methods: {}
    });
</script>
</body>
</html>
例如
<body>
<div id="root">
    <ul>
        <li v-for="(i, j, k) in obj">{{i}},{{j}},{{k}}</li>
    </ul>
</div>
<script type="text/javascript">
    const vm = new Vue({
        el: "#root",
        data: {
            obj: {
                name: "admin",
                age: 18,
                address: "China"
            }
        },
        methods: {

        }
    })
</script>
</body>
输出结果为:
admin,name,0
18,age,1
China,address,2
Axios
一个异步通信框架
<script src="https://cdn.jsdelivr.net/npm/axios/dist/axios.js">

</script>
绑定class样式
格式:
<标签 class="指定的样式" :class = "属性名“></标签>
正常的样式使用正常的方式写(使用class="样式"),可变的样式使用:class="变量",可变样式中的变量可以是一个数组,如果是数组,那么会应用数组中所有的样式,也可以在数组中随意添加删除新的样式,适用于样式不确定、样式的个数不确定的情况
可以随意的改变这个标签的样式,例如
<!DOCTYPE html>
<html lang="zh-cn">
<head>
    <meta charset="UTF-8">
    <title>Title</title>
    <script src="https://cdn.jsdelivr.net/npm/vue@2/dist/vue.js">

    </script>
    <script src="https://cdn.jsdelivr.net/npm/axios/dist/axios.js">

    </script>
    <style>
        .div1{
            width: 300px;
            height: 400px;
            background-color: black;
        }
        .div2{
            width: 300px;
            height: 400px;
            background-color: red;
        }
        .div3{
            border: 5px gray solid;
        }
    </style>

</head>
<body>
<div id="root">
    <div :class="flag" class="div3">
    </div>
    <button @click = "changeStyle1">样式改为div1</button>
    <button @click = "changeStyle2">样式改为div2</button>
</div>
<script type="text/javascript">
    const vm = new Vue({
        el: "#root",
        data: {
            flag: "div1"
        },
        methods: {
            changeStyle1(){
                this.flag = "div1"
            },
            changeStyle2(){
                this.flag = "div2"
            }
        }
    })
</script>
</body>
</html>
v-text
可以替换某个标签中的值,不如插值语法灵活
<div id="root">
    <p v-text="val"></p>
</div>
<script type="text/javascript">
    const vm = new Vue({
        el: "#root",
        data: {
            val: 12333
        },
        methods: {

        }
    })
</script>
v-html
在v-text或者插值语法中,如果所填写的变量使用的html语法,此时按照字符串进行输出
例如
<div id="root">
    <div v-text="val"></div>
</div>
<script type="text/javascript">
    const vm = new Vue({
        el: "#root",
        data: {
            val: "<h1>这是H1</h1>"
        },
        methods: {

        }
    })
</script>
输出的内容为:<h1>这是H1</h1>
如果使用v-html,那么此时作为HTML显示在页面上
<!DOCTYPE html>
<html lang="zh-cn">
<head>
<meta charset="UTF-8">
<title>Title</title>
<style>
.box{
width: 300px;
height: 300px;
background-color: red;
}
</style>
<script src="./js/vue.js"></script>
</head>
<body>
<div id="root">
<div>{{info}}</div>
<div v-text="info"></div>
<div v-html="info"></div>
</div>
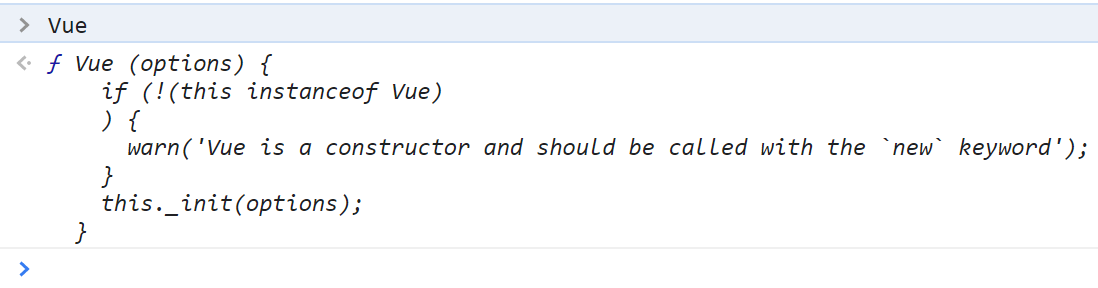
<script>
new Vue({
el: "#root",
data:{
info: '<div class="box"></div>'
}
});
console.log(Vue);
</script>
</body>
</html>
即此时只有第三个会将div显示在页面上
在模板渲染语法中支持js语句
v-once
这个属性没有值,可以将插值语法的值保存下来,无论再次修改,值都不变
<标签 v-once></标签>
v-pre
这个属性也没有值,如果这个标签有vue的语法,那么这个语法不生效
<标签 v-pre></标签>
组件
组件可以实现代码的复用,类似于jsp中公共导航栏的引入
分为非单文件组件和单文件组件
- 非单文件组件:
- 也就是一个文件中有多个组件
- 单文件组件:
- 一个文件中只有一个组件
在写组件时,不能指定这个组件是为哪个容器使用的,data需要写成函数的样式进行返回,写成函数的目的是每次调用时都会返回一个全新的对象,多个对象之间不会相互影响,如果多个地方使用固定值,那么同一个组件,一个地方的组件发生改变,其他地方也会发生改变
组件的创建
const 组件名 = Vue.extend({
    template:`
		一些标签之类的
	`,
    //除了el,其他的都能写
    //data需要写成函数形式
    data(){
        return{

    	}
    },
    methods: {
    }
});
组件的注册(使用vm引入)
const vm = new Vue({
    el: "选择器",
    components{
      //格式 vm中的组件名: 外部的组件名
      //如果内部的组件名和外部的组件名重名,可以只写一个组件名
	}
})
组件的使用
在容器中使用<vm中的组件名></vm中的组件名>
<!DOCTYPE html>
<html lang="zh-cn">
<head>
    <meta charset="UTF-8">
    <title>Title</title>
    <script src="https://cdn.jsdelivr.net/npm/vue@2/dist/vue.js">

    </script>
    <script src="https://cdn.jsdelivr.net/npm/axios/dist/axios.js">

    </script>

</head>
<body>
<div id="root">
    <component-name></component-name>
    <br>
    <component2></component2>
</div>
<script type="text/javascript">
    const component = Vue.extend({
        template:`
        <div>
            {{val}}
        </div>
        `
        ,
        data(){
            return{
                val: "value"
            }
        },
        methods: {
        }
    });
    const component2 = Vue.extend({
        template:`
            <div>
              {{val2}}
            </div>
        `,
        data(){
            return{
                val2: "value222"
            }
        }
    });
    const vm = new Vue({
        el: "#root",
        components:{
            //格式 vm中的组件名: 外部的组件名
            //如果内部的组件名和外部的组件名重名,可以只写一个组件名
            componentName: component,
            component2
        }
    })
</script>
</body>
</html>
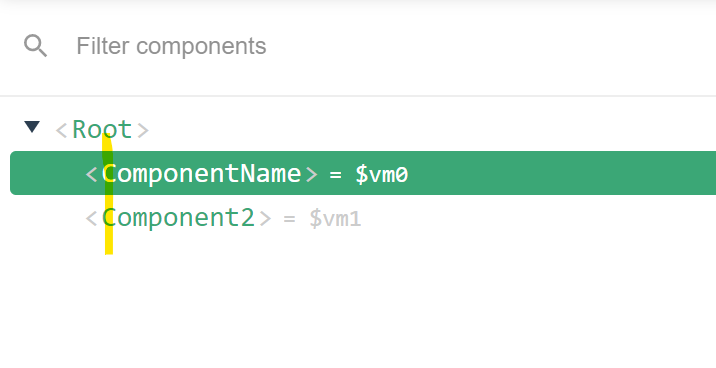
组件名的注意事项
组件名如果是由一个单词组成的,那么直接写
如果是多个单词:
- 引号引起来,使用
-进行连接 - 也可以使用小驼峰规则,但在容器中使用时,需要使用
-进行连接,如上例的<component-name></component-name>,而在开发者工具中,vue又会显示为大驼峰的形式
即使定义的组件名的首字母是小写的,而Vue都会给转成大写的
尽量不要使用HTML保留的标签名,例如h1
也可以在创建组件时,新增一个name属性,指定了这个属性后和之前在容器中的用法不变,变的是vue开发者工具,无论注册组件时起的什么名字,在开发者工具中,名字就是name属性后的值
也可以使用单标签,例如上例中18行的(需要在脚手架环境中才能使用,普通环境中可能会报错)
<component2></component2>
可以写为
<component2 />
简写
可以不用在创建组件时写Vue.extend({...})
例如
const component2 = {
    template:`
        <div>
          {{val2}}
        </div>
    `,
    data(){
        return{
            val2: "value222"
        }
    }
};
组件的嵌套
- 子组件要在父组件之前定义
- 如果父组件要嵌套子组件,父组件中需要添加一个组件属性,属性为
components,这个属性的写法和vm的组件属性一致,把需要的组件名写进去,父组件的template属性中,可以写子组件的标签名 - 在vm中的
components属性中,把父组件和子组件都写进去
<!DOCTYPE html>
<html lang="zh-cn">
<head>
    <meta charset="UTF-8">
    <title>Title</title>
    <script src="https://cdn.jsdelivr.net/npm/vue@2/dist/vue.js">

    </script>
    <script src="https://cdn.jsdelivr.net/npm/axios/dist/axios.js">

    </script>

</head>
<body>
<div id="root">
    <father></father>
</div>
<script type="text/javascript">
    const son = {
        template:`
            <div>
              <p>名字:{{name}}</p>
              <p>年龄:{{age}}</p>
            </div>
        `
        ,
        data(){
            return {
                name: "儿子",
                age: 15
            }
        }
    }
    const father = {
        template: `
            <div>
              <p>名字:{{name}}</p>
              <p>年龄:{{age}}</p>
              <son></son>
            </div>
        `,
        data(){
            return {
                name: "baba",
                age: 80
            }
        },
        components: {
            son
        }
    }
    const vm = new Vue({
        el: "#root",
        components:{
            father
        }
    })
</script>
</body>
</html>
此时页面上的内容为
名字:baba

年龄:80

名字:儿子

年龄:15
vue的开发者工具中的内容为
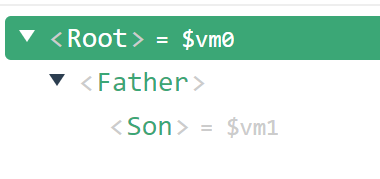
此时,son组件在father组件中
通常一个页面中需要一个名为app的组件管理所有的组件
最精简的写法:页面中不包含任何相关的代码,代码都交给vue进行管理
<!DOCTYPE html>
<html lang="zh-cn">
<head>
<meta charset="UTF-8">
<title>Title</title>
<script src="https://cdn.jsdelivr.net/npm/vue@2/dist/vue.js">
</script>
<script src="https://cdn.jsdelivr.net/npm/axios/dist/axios.js">
</script>
</head>
<body>
<div id="root">
</div>
<script type="text/javascript">
const son = {
template: `
<div>
<p>名字:{{ name }}</p>
<p>年龄:{{ age }}</p>
</div>
`
,
data() {
return {
name: "儿子",
age: 15
}
}
}
const father = {
template: `
<div>
<p>名字:{{ name }}</p>
<p>年龄:{{ age }}</p>
<son></son>
</div>
`,
data() {
return {
name: "baba",
age: 80
}
},
components: {
son
}
}
const app = {
template: `
<div>
<father></father>
</div>
`,
components: {
father
}
}
const vm = new Vue({
template:`
<app></app>
`
,
el: "#root",
components: {
app
}
})
</script>
</body>
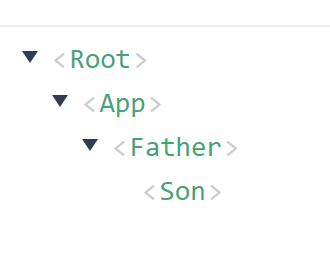
</html>
此时结构为
单文件组件
文件后缀为.vue
基本的结构
<template>
	<div>

    </div>
</template>

<script>
// 组件交互的代码
</script>

<style>
    /*css样式*/
</style>
只支持这3个根标签
需要暴露组件
idea快速生成vue基本代码框架:vbase-css,并按tab键
生成的框架为
<template>
    <div>

    </div>
</template>

<script>
export default {

}
</script>

<style scoped>

</style>
school.vue
<template>
<!--    组件的结构-->
    <div class="div1">
        <p>名字:{{name}}</p>
        <p>位置:{{position}}</p>
        <button @click="clickMe">点我</button>
    </div>
</template>
<script>
// 组件交互的代码
export default {
    name: "school",
    data(){
        return {
            name: "学校",
            position: "China"
        }
    },
    methods:{
        clickMe(){
            alert("名字:" + this.name + "位置:" + this.position)
        }
    }
}
</script>

<style>
    /*css样式*/
    .div1{
        background-color: gray;
    }
</style>
app.vue
<template>
    <div>
        <school></school>
    </div>
</template>

<script>
// 引入school
import school from './school'
export default {
    name: "app",
    components:{
        school
    }
}
</script>

<style scoped> <!--代表此时引入的css有局部作用域,避免了c-->

</style>
还需要写一个入口的.js文件
// 将app引入
import app from "./app";

const vm = new Vue({
    template: `
            <app></app>
    `,
    el: "#root",
    components: {
        app
    }
})
index.html
<!DOCTYPE html>
<html lang="zh-cn">
<head>
    <meta charset="UTF-8">
    <title>Title</title>
    <script src="https://cdn.jsdelivr.net/npm/vue@2/dist/vue.js">

    </script>
    <script src="https://cdn.jsdelivr.net/npm/axios/dist/axios.js">

    </script>

</head>
<body>
<div id="root">

</div>
<script src="./main.js">

</script>
</body>
</html>
此时还不能运行,需要脚手架才能运行
Vue脚手架 Vue-CLI
是官方提供的标准化开发工具
CLI英文全称为Command Line Interface
cd到一个文件夹,使用vue create 脚手架名
Windows PowerShell
版权所有(C) Microsoft Corporation。保留所有权利。

安装最新的 PowerShell,了解新功能和改进!https://aka.ms/PSWindows

PS C:\Users\singx\Desktop\file\vue_test> vue create vue_test
?  Your connection to the default yarn registry seems to be slow.
   Use https://registry.npm.taobao.org for faster installation? Yes


Vue CLI v4.5.15
? Please pick a preset: Default ([Vue 2] babel, eslint)
? Pick the package manager to use when installing dependencies: NPM


✨  Creating project in C:\Users\singx\Desktop\file\vue_test\vue_test.
🗃  Initializing git repository...
⚙️  Installing CLI plugins. This might take a while...


added 1272 packages in 27s

15 packages are looking for funding
  run `npm fund` for details
🚀  Invoking generators...
📦  Installing additional dependencies...


added 55 packages in 5s

15 packages are looking for funding
  run `npm fund` for details
⚓  Running completion hooks...

📄  Generating README.md...

🎉  Successfully created project vue_test.
👉  Get started with the following commands:

 $ cd vue_test
 $ npm run serve
可以进入到脚手架目录下,使用npm run serve运行
在生成的文件的/src目录下的结构为
│  App.vue  +====这个文件一般放在最外边
│  main.js
│
├─assets  +====用来存放静态资源
│      logo.png
│
└─components  +=====通常用来放其他的组件
        HelloWorld.vue
每次执行npm run serve就相当于执行src/main.js
main.js中的内容为
// 这个文件是入口文件

// 引入vue
import Vue from 'vue'
// 引入app组件,是所有组件的父组件
import App from './app.vue'
// 关闭生产环境提示
Vue.config.productionTip = false

// 创建vm实例对象
new Vue({
  // 将app组件放入到容器中
  render: h => h(App),
}).$mount('#root')
如果使用之前的main.js进行引入
// 将app引入
import app from "./app";

const vm = new Vue({
    template: `
            <app></app>
    `,
    el: "#root",
    components: {
        app
    }
})
在浏览器的控制台中会收到以下的错误信息
You are using the runtime-only build of Vue where the template compiler is not available. Either pre-compile the templates into render functions, or use the compiler-included build.
您正在使用 Vue 的仅运行时构建,其中模板编译器不可用。要么将模板预编译为渲染函数(使用render函数),要么使用包含编译器的构建(即引入完整版的Vue)
也就是说,默认引入的vue是残缺版的vue,没有包含模板解析器,默认引入的是node_modules\vue\dist\vue.runtime.esm.js,可以在node_modules\vue\package.json中的"module": "dist/vue.runtime.esm.js",可以看出
-
解决方式1:使用完整版的vue(带有模板解析的)
-
将最开始的导入语句更改为
-
import Vue from 'vue/dist/vue.js'
-
render负责将信息返回到页面,在自动生成的例子中,render: h=>h(app)是一个箭头函数,它的全称为
    render(h){
        return h(app);
    }
参数h是一个函数,负责添加组件
打包命令:mpm run build
打包配置(文件名为vue.config.js)文件位于创建的vue项目的根目录下,文件的内容为
module.exports = {
    publicPath: './'
}
如果不进行配置,打包后打开会空白
默认是带有语法检查的,也就是如果有没有使用的变量会报错的,可以手动的关闭
Vue通过main.js把App.vue渲染到index.html的指定区域
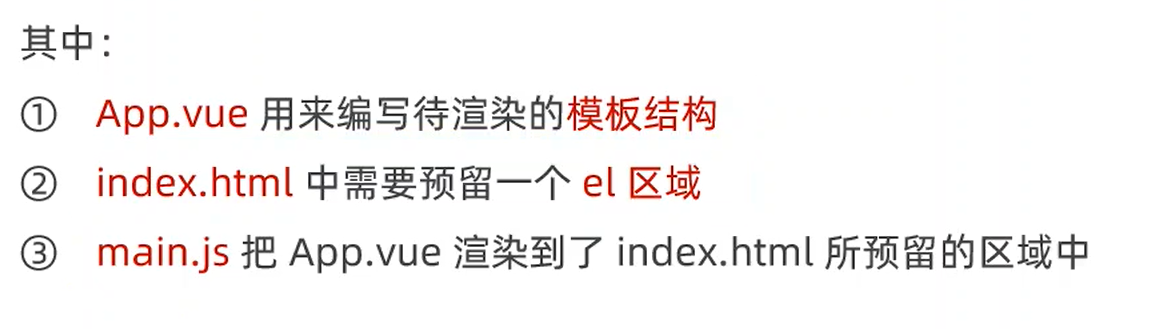
index中的
<div id="app"></div>
会被App.vue中的<template></template>中的根标签替换掉
原因:
-
在
main.js中,有如下的语句new Vue({ render: h => h(App), }).$mount('#app') -
此时代表着使用
App.vue替换id为#app的标签 -
$mount的作用和el:的作用相同
在Vue组件中this就是组件实例
全局组件
通过components属性注册的组件是私有的子组件
一个组件被用到多次,可以考虑将其注册为全局组件
全局组件在main.js中注册:
- 使用
import导入组件 - 调用
Vue.component("组件名", 导入的组件)
组件的props
props中文为道具,是组件的自定义属性,封装通用的组件时,使用这个特性能够提高组件的复用性
需求:
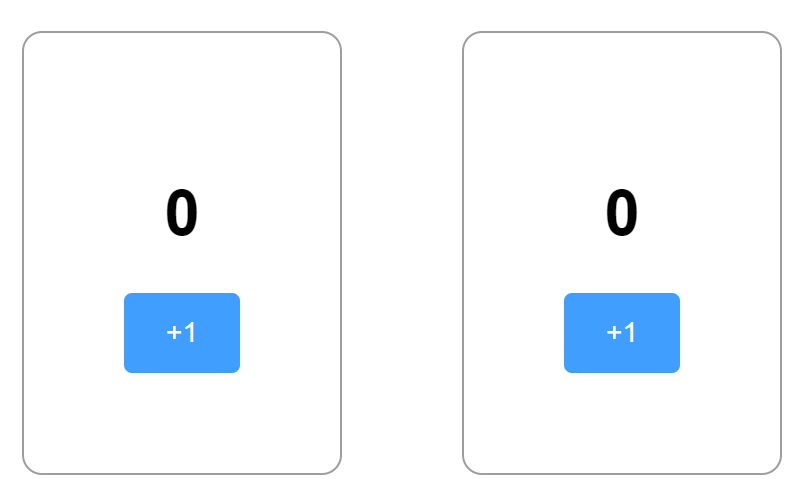
有如图所示的一个计数器,现要求两个计数器初始的值不相同,例如第一个计数器要求初始值为1,第二个计数器初始值为7
所以要使用props
使用方式
在定义组件时,添加和data平级的属性props,值为一个数组,在这个数组中可以自定义任何的属性,写法如下:
props: ['属性名1', ..., 属性名n]
<template>
    <div class="root">
        <h1>{{initValue}}</h1>
        <el-button type="primary" @click="initValue++">+1</el-button>
    </div>
</template>

<script>
export default {
    name: "Count",
    props:['initValue'], // 指定一个初始值
    data(){
        return {
            // count: this.initialValue
        }
    }
}
</script>

<style scoped>
.root {
    text-align: center;
}
</style>
<template>
    <div id="app">
        <!--使用初始值-->
        <Count class="box1" init-value="9"></Count>
        <Count class="box1" init-value="100"></Count>
    </div>
</template>

<script>
import HelloWorld from './components/HelloWorld.vue'
import Count from "@/components/Count";

export default {
    name: 'App',
    components: {
        HelloWorld,
        Count
    }
}
</script>

<style scoped>
#app {
    font-family: Avenir, Helvetica, Arial, sans-serif;
    text-align: center;
}

.box1 {
    display: inline-block;
    margin: 30px;
    padding: 50px;
    border: 1px solid rgb(159, 157, 157);
    border-radius: 10px;
}
</style>
以上方式使用的初始值初始值为字符串,如果想要使用整型数值可以添加一个冒号,即第4行修改为<Count class="box1" :init-value="9"></Count>,如果还想传递字符串可以写为<Count class="box1" init-value="'字符串'"></Count>
Vue不建议直接修改props中的值,可以将props看作是只读的,修改其中的值会在浏览器控制台报错
props默认值
将props后的值由数组变成一个对象,然后对象中的每个属性也是对象,为每个属性提供一个default属性,值为默认值,此时经过修改后的文件变成了:
<template>
    <div class="root">
        <h1>{{count}}</h1>
        <el-button type="primary" @click="count++">+1</el-button>
    </div>
</template>

<script>
export default {
    name: "Count",
    props:{
        initValue: {
            default: 0
        }
    },
    data(){
        return {
            count: this.initValue
        }
    }
}
</script>

<style scoped>
.root {
    text-align: center;
}
</style>
<template>
    <div id="app">
        <!--设置一个值-->
        <Count class="box1" :initValue="2"></Count>
<!--        使用默认值-->
        <Count class="box1"></Count>
    </div>
</template>

<script>
import HelloWorld from './components/HelloWorld.vue'
import Count from "@/components/Count";

export default {
    name: 'App',
    components: {
        HelloWorld,
        Count
    }
}
</script>

<style scoped>
#app {
    font-family: Avenir, Helvetica, Arial, sans-serif;
    text-align: center;
}

.box1 {
    display: inline-block;
    margin: 30px;
    padding: 50px;
    border: 1px solid rgb(159, 157, 157);
    border-radius: 10px;
}
</style>
props的type属性
使用type属性可以强制用户传递的值必须为相应的类型,值为类型
props:{
    initValue: {
        default: 0,
        type: Number
    }
},
props的require属性
如果有这个属性,代表必须要在标签上写这个参数,如果不写就报错
require值为true或者false
生命周期
是指一个组件从创建->运行->销毁的整个阶段
生命周期函数:是内置的函数,会随着组件的生命周期自动按照次序执行
分为3个阶段
- 组件创建阶段
beforeCreate,创建之前- 此时
props、data、method都不可用
- 此时
created,在内存中创建好了- 此时
props、data、method被创建,此时可用 - 这个阶段比较重要,实际开发经常使用,这个阶段可以发送
Ajax请求读取数据 - 此时还未渲染到页面,因此无法获取页面元素
- 此时
beforeMount,在渲染之前- 在执行之前,会将编译好的
HTML结构放到内存中 - 依旧无法获取页面元素
- 在执行之前,会将编译好的
mounted,渲染到页面- 在渲染到页面之前,会替换
el所指向的标签 - 此时页面中有了
HTML元素,可以通过DOM进行获取了
- 在渲染到页面之前,会替换
- 组件运行阶段,如果没有数据发生变化的话,这两个函数最少执行0次
beforeUpdate- 当数据改变时会触发
updated
- 组件销毁阶段,这两个函数只执行一次
beforeDestroy- 例如当页面上一个元素将要被使用
v-if隐藏时会执行这个函数
- 例如当页面上一个元素将要被使用
destroyed- 在此之前,会移除相应元素的数据侦听器、子组件、事件监听
- 此时这个组件对应的
DOM在浏览器中完全移除
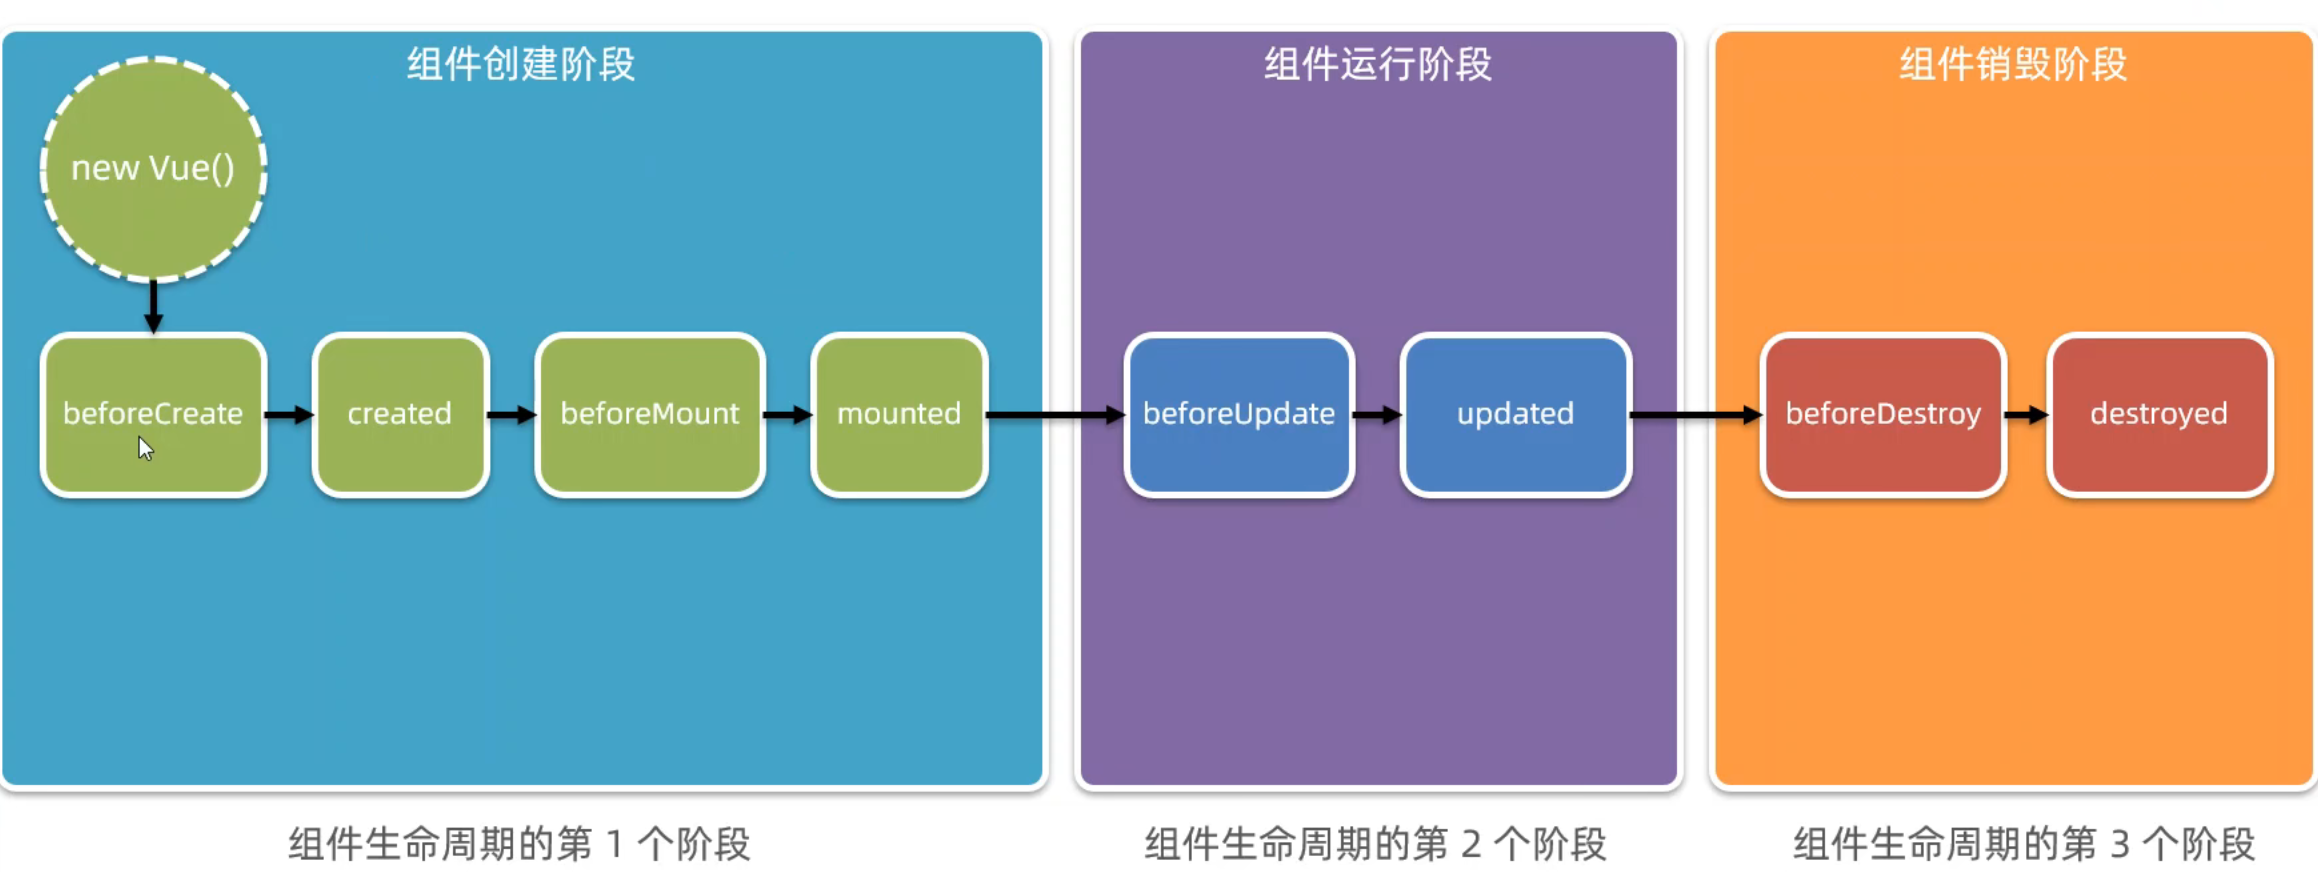
官方文档提供的生命周期图片:

生命周期函数的定义与data平级
组件之间的数据共享
分为:
- 父组件向子组件传值
- 子组件向父组件传值
- 兄弟组件与兄弟组件传值
父组件向子组件传值
父向子传数据使用props自定义属性就可以传递数据
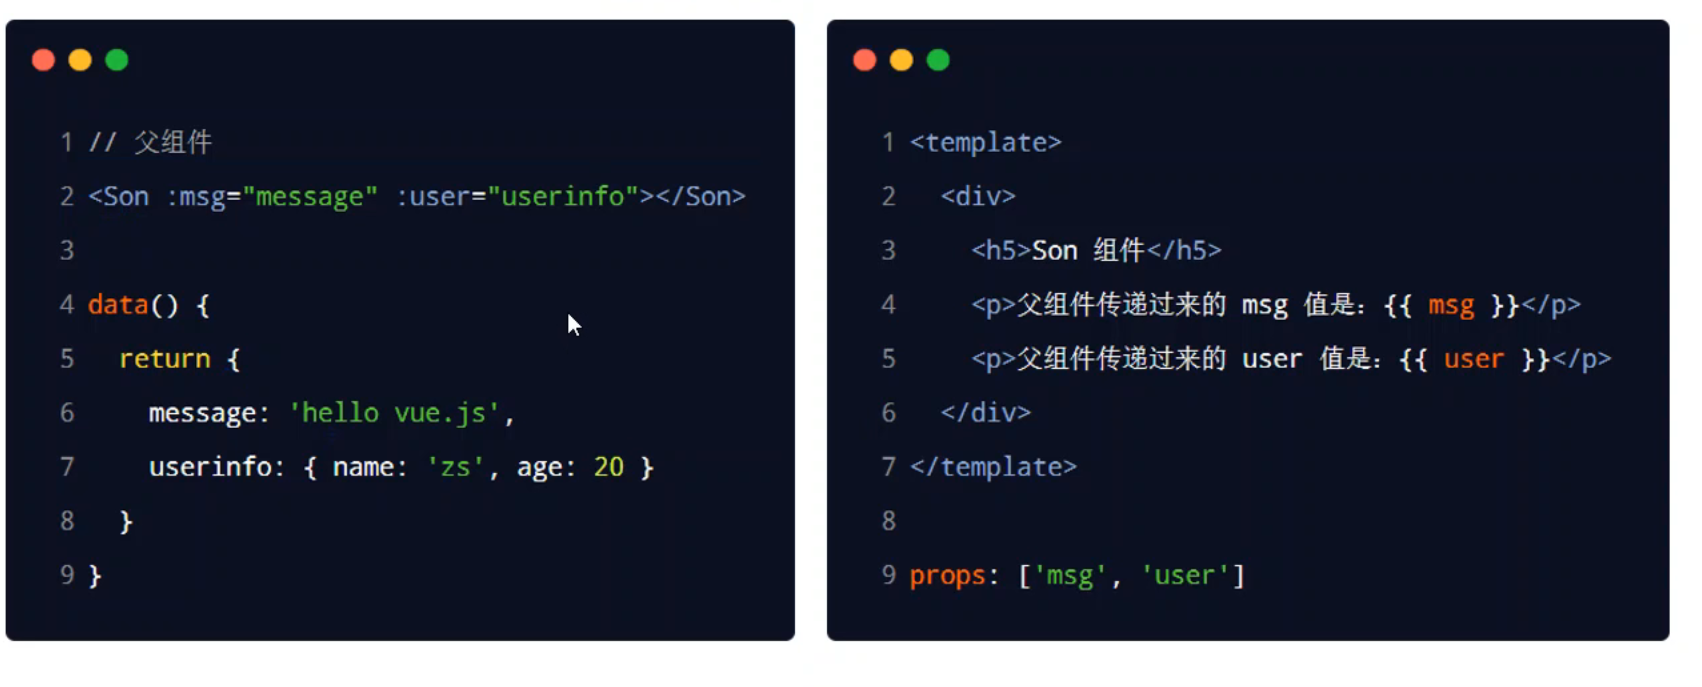
例如
<template>
    <div id="app">
        <son :msg="msg" :msg2="msg2"></son>
        <son></son>
    </div>
</template>

<script>
import HelloWorld from './components/HelloWorld.vue'
import Count from "@/components/Count";

export default {
    name: 'App',
    components: {
        HelloWorld,
        Son: Count
    },
    data() {
        return {
            msg: "这是一条消息",
            msg2: {
                content: "这是内容",
                test: 1111
            }
        }
    }
}
</script>

<style scoped>
#app {
    font-family: Avenir, Helvetica, Arial, sans-serif;
    text-align: center;
}

.box1 {
    display: inline-block;
    margin: 30px;
    padding: 50px;
    border: 1px solid rgb(159, 157, 157);
    border-radius: 10px;
}
</style>
<template>
    <div class="root">
        <p>msg = {{msg}}</p>
        <p>msg2 = {{msg2}}</p>
    </div>
</template>

<script>


export default {
    name: "Count",
    props: {
        msg: {
            default: "没收到任何内容"
        },
        msg2: {
            default: "没收到任何内容"
        }
    },
    data() {
        return {

        }
    },
    methods: {

    }
}
</script>

<style scoped>
.root {
    text-align: center;
}
</style>
此时是将对象的引用传递过去的
子组件向父组件传值
需要使用到自定义事件
子组件
<template>
    <div class="root">
        <p>{{count}}</p>
        <el-button type="primary" @click="add">+1</el-button>
    </div>
</template>

<script>


export default {
    name: "Count",
    props: {
    },
    data() {
        return {
            count: 0
        }
    },
    methods: {
        add(){
            this.count++;
            // 触发自定义事件
            this.$emit("countChange", this.count);
        }
    }
}
</script>

<style scoped>
.root {
    text-align: center;
}
</style>
父组件
<template>
    <div id="app">
        father:{{dataFromSon}}
        <br>son:

        <son @countChange="getCount"></son>
    </div>
</template>

<script>
import HelloWorld from './components/HelloWorld.vue'
import Count from "@/components/Count";

export default {
    name: 'App',
    components: {
        HelloWorld,
        Son: Count
    },
    data() {
        return {
            dataFromSon: 0
        }
    },
    methods: {
        getCount(val){
            this.dataFromSon = val
        }
    }
}
</script>

<style scoped>
#app {
    font-family: Avenir, Helvetica, Arial, sans-serif;
    text-align: center;
}
</style>
emit中文为发出,$emit("事件名称", 传递的值),代表触发一个事件
父组件在子组件上添加@相应的事件名称="处理函数",含义是监测到相应的事件后调用相应的处理函数
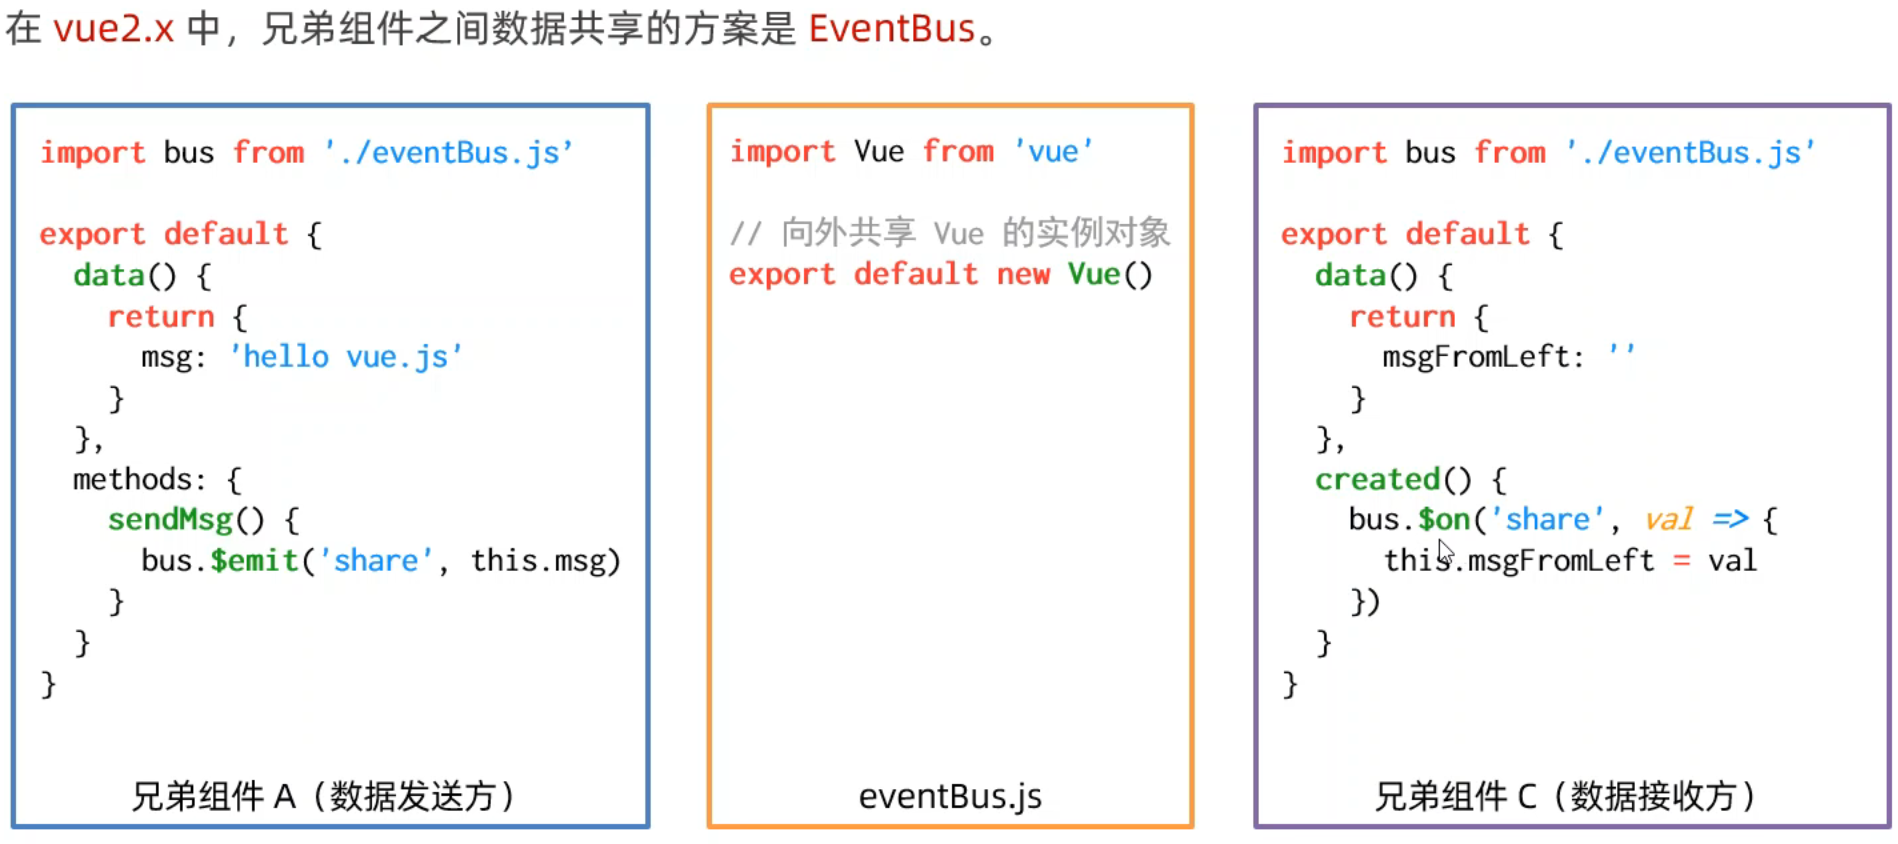
兄弟组件之间数据共享
在Vue2中解决方案是EventBus
$on可以接收数据
- 新建一个js文件,这个js不负责页面渲染,只负责数据共享
- 名称随意,导入
Vue - 实例化一个
Vue,将其声明为默认暴露
- 名称随意,导入
- 发送消息和接收消息的组件引入新建的文件
- 发送消息的组件在一个方法中,使用
引入名称.$emit("事件名称", 传递的值)发送数据 - 接收消息的组件在
created()方法中使用引入名称.$on("事件名称", msg => {处理发送过来的数据})接收数据
eventBus.js
import Vue from "vue";
export default new Vue()
发送消息的组件
<template>
    <div id="app">
        <button @click="send">发送</button>
        <Brother></Brother>
    </div>
</template>

<script>
import HelloWorld from './components/HelloWorld.vue'
import Count from "@/components/Count";
import eventBus from "@/eventBus";

export default {
    name: 'App',
    components: {
        HelloWorld,
        Brother: Count
    },
    data() {
        return {
            msg: "发送的内容"
        }
    },
    methods: {
        send(){
            eventBus.$emit("sendMsg", this.msg)
        }
    }
}
</script>

<style scoped>
#app {
    font-family: Avenir, Helvetica, Arial, sans-serif;
    text-align: center;
}
</style>
接收消息的组件
<template>
    <div class="root">
        接收到的信息:{{acceptMsg}}
    </div>
</template>

<script>
import eventBus from "@/eventBus";

export default {
    name: "Count",
    props: {
    },
    data() {
        return {
            acceptMsg: "未接收到信息"
        }
    },
    methods: {

    },
    created() {
        eventBus.$on("sendMsg", m => this.acceptMsg = m)
    }
}
</script>

<style scoped>
.root {
    text-align: center;
}
</style>
ref引用
可以用来获取DOM或者组件的引用,在每个组件实例上都有一个$refs对象,里边存储着对应的DOM或者组件的引用,默认情况下指向一个空对象
可以在需要获取DOM的标签上添加ref="名称"的属性,再通过this.refs.名称可以获取到这个DOM
<template>
    <div id="app">
        <h1 ref="myH1">H1</h1>
        <el-button @click="changeColor">改变颜色</el-button>
    </div>
</template>

<script>
import Count from "@/components/Count";

export default {
    name: 'App',
    components: {
        Brother: Count
    },
    data() {
        return {
            msg: "发送的内容"
        }
    },
    methods: {
        changeColor(){
            this.$refs.myH1.style.backgroundColor = "red";
        }
    }
}
</script>

<style scoped>
#app {
    font-family: Avenir, Helvetica, Arial, sans-serif;
    text-align: center;
}
</style>
尽量ref设置的名称不冲突,如果有多个相同的名字,那么以最后一个为准
如果在组件上添加ref属性值,那么此时通过this.$refs.名称获取到的是这个组件,所以可以直接调用这个组件上的方法,例如下例中,子组件有msg属性,并且有setMsg方法可以用自定义的值改变msg的值,通过this.$refs.名称.setMsg("字符串")可以修改值
<template>
    <div class="root">
        接收到的信息:{{msg}}
    </div>
</template>

<script>
import eventBus from "@/eventBus";

export default {
    name: "Count",
    props: {
    },
    data() {
        return {
            msg: "未接收到信息"
        }
    },
    methods: {
        setMsg(s){
            this.msg = s;
        }
    }
}
</script>

<style scoped>
.root {
    text-align: center;
}
</style>
<template>
    <div id="app">
        <Brother ref="brother"></Brother>
        <br>
        <el-button @click="change">改变</el-button>
    </div>
</template>

<script>
import Count from "@/components/Count";

export default {
    name: 'App',
    components: {
        Brother: Count
    },
    data() {
        return {
            msg: "发送的内容"
        }
    },
    methods: {
        change(){
            this.$refs.brother.setMsg("abcd");
        }
    }
}
</script>

<style scoped>
#app {
    font-family: Avenir, Helvetica, Arial, sans-serif;
    text-align: center;
}
</style>
数字显示为两位小数
变量.toFixed(2)
fix,中文为修复
fixed,中文为固定
动态组件
动态的切换组件的显示和隐藏
Vue提供了内置的<compoent>组件,专门实现动态组件的渲染,这个标签可以被当作占位符,可以给这个组件提供一个属性,用来表明要显示的组件
使用:<compoent is="组件名称"></compoent>
例如
com1
<template>
    <div>
        <h1>COM1</h1>
    </div>
</template>

<script>
export default {
    name: "Com1"
}
</script>

<style scoped>

</style>
com2
<template>
    <div>
        COM2
    </div>
</template>

<script>
export default {
    name: "Com2"
}
</script>

<style scoped>

</style>
app
<template>
    <div id="app">
        <component :is="value"></component>
        <el-button type="primary" @click="value='Com1'">1</el-button>
        <el-button type="primary" @click="value='Com2'">2</el-button>
    </div>
</template>

<script>
import Com1 from "@/components/Com1";
import Com2 from "@/components/Com2";
export default {
    name: 'App',
    components: {
        Com1,
        Com2
    },
    data() {
        return {
            value: "Com1"
        }
    },
    methods: {

    }
}
</script>

<style scoped>
#app {
    font-family: Avenir, Helvetica, Arial, sans-serif;
    text-align: center;
}
</style>
keep-alive
如果按照以上的方式使用动态组件会出现一个问题,当组件切换为其他的组件时,之前的组件上的数据会丢失
原因:在切换到其他组件时,之前的组件被销毁了,可以使用destoryed()方法验证
解决方法:将<component></component>标签放到<keep-alive></keep-alive>标签中,此时会将<component></component>标签进行缓存,是Vue内置的标签
<template>
    <div id="app">
        <keep-alive>
            <component :is="value"></component>
        </keep-alive>
        <el-button type="primary" @click="value='Com1'">1</el-button>
        <el-button type="primary" @click="value='Com2'">2</el-button>
    </div>
</template>

<script>
import Com1 from "@/components/Com1";
import Com2 from "@/components/Com2";
export default {
    name: 'App',
    components: {
        Com1,
        Com2
    },
    data() {
        return {
            value: "Com1"
        }
    },
    methods: {

    }
}
</script>

<style scoped>
#app {
    font-family: Avenir, Helvetica, Arial, sans-serif;
    text-align: center;
}
</style>
<keep-alive></keep-alive>也是有生命周期的:
- 当被缓存时调用
deactivated生命周期函数,中文为停用 - 当被激活时,会调用
activated生命周期函数
这两个生命周期函数和data平级:
<template>
    <div>
        <h1>{{ value }}</h1>
        <el-button type="primary" @click="value++">+1</el-button>
    </div>
</template>

<script>
export default {
    name: "Com1",
    data() {
        return {
            value: 0
        }
    },
    deactivated() {
        console.log("组件被缓存了")
    },
    activated() {
        console.log("组件被激活了")
    }
}
</script>

<style scoped>
*{
    margin: 10px;
}
</style>
指定组件缓存 exclude、include
可以指定组件进行缓存,如果没有指定,默认是所有组件都被缓存
使用:
<keep-live include="需要缓存的组件1, ..., 组件n">

</keep-live>
<keep-live exlude="不需要缓存的组件1, ..., 组件n">

</keep-live>
以上两个属性不能同时使用,只能用一个
解决打包后空白的问题
新建vue.config.js,内容为
module.exports = {

    publicPath: "./"
}
插槽 slot
slot中文为投币口 读音为slɑːt,插槽是指将不确定的、由用户指定的部分定义为插槽
即
<组件名>插槽中可以放其他的标签</组件名>
可以实现ui结构的复用,可以把插槽看作是占位符
只需要在.vue文件中的<template></template>中需要填充的地方写上<slot></slot>标签即可
vue规定,每个<slot></slot>都会有一个name属性,如果省略了就相当于<slot name="default"></slot>
使用插槽时,默认会填充到name为default插槽中
如果给一个插槽指定了名称,必须使用<template v-slot:插槽名></template>
如果<slot></slot>标签的中间有内容,代表当未填充时显示的内容,官方名称:后备内容
v-slot可以简写为#,例如
			<template v-slot:slot1>
                <c2></c2>
                <c2></c2>
                <c2></c2>
            </template>
简写为
			<template #slot1>
                <c2></c2>
                <c2></c2>
                <c2></c2>
            </template>
<template>
    <div id="app">
        <c1>
            <template v-slot:slot1>
                <c2></c2>
                <c2></c2>
                <c2></c2>
            </template>
        </c1>
    </div>
</template>

<script>
import Com1 from "@/components/Com1";
import Com2 from "@/components/Com2";

export default {
    name: 'App',
    components: {
        c1: Com1,
        c2: Com2
    },
    data() {
        return {
            value: "c1"
        }
    },
    methods: {}
}
</script>

<style scoped>
#app {
    font-family: Avenir, Helvetica, Arial, sans-serif;
    text-align: center;
}
</style>
<template>
    <div>
        <h1>{{ value }}</h1>
        <el-button type="primary" @click="value++">+1</el-button>
        <slot name="slot1">
            <h1>未填充</h1>
        </slot>
    </div>
</template>

<script>
export default {
    name: "Com1",
    data() {
        return {
            value: 0
        }
    },
    deactivated() {
        console.log("组件被缓存了")
    },
    activated() {
        console.log("组件被激活了")
    }
}
</script>

<style scoped>
*{
    margin: 10px;
}
</style>
简写
<template>
    <div id="app">
        <c1>
            <template #slot1>
                222
                <c2></c2>
                <c2></c2>
                <c2></c2>
            </template>

        </c1>
    </div>
</template>

<script>
import Com1 from "@/components/Com1";
import Com2 from "@/components/Com2";

export default {
    name: 'App',
    components: {
        c1: Com1,
        c2: Com2
    },
    data() {
        return {
            value: "c1"
        }
    },
    methods: {}
}
</script>

<style scoped>
#app {
    font-family: Avenir, Helvetica, Arial, sans-serif;
    text-align: center;
}
</style>
具名插槽:带有具体名称的插槽
插槽作为子组件向父组件传值(作用域插槽)
只需要在<slot></slot>标签上添加属性=值就可以,属性名可以随意,例如
<slot a="bbb" c="ddd" :aaa="对象" name="指定的名称"></slot>
在填充插槽时
<template #指定的名称="对象">
	只能在这里取出值
</template>
例如
<template>
    <div>
        <h1>{{ value }}</h1>
        <el-button type="primary" @click="value++">+1</el-button>
        <slot name="slot1" aaa = "go" bb="gun" :ccc="obj">
        </slot>
    </div>
</template>

<script>
export default {
    name: "Com1",
    data() {
        return {
            value: 0,
            obj: {
                name: "gogo",
                sex: false
            }
        }
    },
    deactivated() {
        console.log("组件被缓存了")
    },
    activated() {
        console.log("组件被激活了")
    }
}
</script>

<style scoped>
*{
    margin: 10px;
}
</style>
<template>
    <div id="app">
        <c1>
            <template #slot1 ="obj">
<!--                222-->
<!--                <c2></c2>-->
<!--                <c2></c2>-->
<!--                <c2></c2>-->
                {{obj}}
            </template>

        </c1>
    </div>
</template>

<script>
import Com1 from "@/components/Com1";
import Com2 from "@/components/Com2";

export default {
    name: 'App',
    components: {
        c1: Com1,
        c2: Com2
    },
    data() {
        return {
            value: "c1"
        }
    },
    methods: {}
}
</script>

<style scoped>
#app {
    font-family: Avenir, Helvetica, Arial, sans-serif;
    text-align: center;
}
</style>
此时取出的值为
{ "aaa": "go", "bb": "gun", "ccc": { "name": "gogo", "sex": false } }
如果没有传值,此时取出来的内容为{},空对象
也可以解构赋值,在上例中,如果只想要取出ccc,可以写成以下的形式:
<c1>
    <template #slot1 ="{ccc}">
        {{ccc}}
    </template>
</c1>
自定义指令
v-for等都属于内置指令,开发者可以自定义指令
分为私有自定义指令和全局自定义指令
- 私有自定义指令是指只能一个组件中使用
- 全局自定义指令是指所有组件都能使用
私有自定义属性
定义方式:在与data平级的地方使用directives属性
directives: {
	名称: {
        //el为绑定的原生的dom元素
        bind(el){
            //操作
        }
	}
}
使用时,需要在标签上使用v-名称
<template>
    <div id="app">
        <h1 v-color>你好</h1>
    </div>
</template>

<script>
import Com1 from "@/components/Com1";
import Com2 from "@/components/Com2";

export default {
    name: 'App',
    components: {
        c1: Com1,
        c2: Com2
    },
    data() {
        return {
            value: "c1"
        }
    },
    methods: {},
    directives: {
        color: {
            bind(el){
                el.style.background = "red";
            }
        }
    }
}
</script>

<style scoped>
#app {
    font-family: Avenir, Helvetica, Arial, sans-serif;
    text-align: center;
}
</style>
第一次绑定时会调用
以上的用法是最基本的用法
带有值的自定义属性
在bind函数中加个参数,可以通过参数2获取到一个对象,在这个对象中可以使用参数2.value获取到传进去的值
传值:v-属性名="js语句",既然都是js语句了,所以可以写一个对象,如果传字符串值可以使用'字符串'
<template>
    <div id="app">
        <!--传值-->
        <h1 v-color="color">你好</h1>
    </div>
</template>

<script>
import Com1 from "@/components/Com1";
import Com2 from "@/components/Com2";

export default {
    name: 'App',
    components: {
        c1: Com1,
        c2: Com2
    },
    data() {
        return {
            value: "c1",
            color: "blue" //设置为蓝色
        }
    },
    methods: {},
    directives: {
        color: {
            bind(el, binding){
                // 取值
                el.style.background = binding.value;
            }
        }
    }
}
</script>

<style scoped>
#app {
    font-family: Avenir, Helvetica, Arial, sans-serif;
    text-align: center;
}
</style>
当数据发生变化时更新视图
如果使用以上代码,当值发生改变时,默认不会改变视图,因为bind()函数只会在初始化时调用一次
解决方法:添加一个与bind()平级的update()函数,函数的参数、内容都与bind()一致
例如上例实现点击按钮更换背景颜色
<template>
    <div id="app">
        <h1 v-color="color">你好</h1>
        <el-button type="primary" @click="color = 'orange'">改变</el-button>
    </div>
</template>

<script>
import Com1 from "@/components/Com1";
import Com2 from "@/components/Com2";

export default {
    name: 'App',
    components: {
        c1: Com1,
        c2: Com2
    },
    data() {
        return {
            value: "c1",
            color: "blue"
        }
    },
    methods: {},
    directives: {
        color: {
            bind(el, binding) {
                el.style.background = binding.value;
            },
            update(el, binding) {
                el.style.background = binding.value;
            }
        }
    }
}
</script>

<style scoped>
#app {
    font-family: Avenir, Helvetica, Arial, sans-serif;
    text-align: center;
}
</style>
update()仅在值更新时调用
如果bind()函数和update()函数内容一致时,可以直接的将指令名所谓函数
directives: {
    指令名(el, binding){
        // 操作
    }
}
以下代码为上例的简写形式
<template>
    <div id="app">
        <h1 v-color="color">你好</h1>
        <el-button type="primary" @click="color = 'orange'">改变</el-button>
    </div>
</template>

<script>
import Com1 from "@/components/Com1";
import Com2 from "@/components/Com2";

export default {
    name: 'App',
    components: {
        c1: Com1,
        c2: Com2
    },
    data() {
        return {
            value: "c1",
            color: "blue"
        }
    },
    methods: {},
    directives: {
        color(el, binding){
            el.style.background = binding.value;
        }
    }
}
</script>

<style scoped>
#app {
    font-family: Avenir, Helvetica, Arial, sans-serif;
    text-align: center;
}
</style>
全局自定义指令
在main.js中,使用以下方式:
Vue.directive("指令名", 处理函数/对象);
处理函数就是在bind()和update()内容相同时使用的,如果不同时,可以使用对象
即
Vue.directive("指令名", {
    bind(el, binding) {
        // 语句
    },
    update(el, binding) {
        // 语句
    }
});
例如之前的改变颜色的例子:
Vue.directive("color", (el, binding) => {
    el.style.backgroundColor = binding.value;
})
优化Axios
在之前的请求中需要每次都要导入Axios包,并且每次都要写完整的请求地址,会比较麻烦
可以将其挂载到Vue中
在main.js中,导入axios,并将其加入到原型中
import Axios from "axios";
Vue.prototype.axios = Axios
之后再需要用到axios的地方直接使用this.axios即可,导入时,Axios周围不能加{},也就是说不能写成import {Axios} from "axios"
还存在一个问题,此时的请求地址一旦发生改变,需要将每个地方的地址都要修改一遍
设置默认请求地址
Axios.defaults.baseURL = "地址";
Axios.defaults而不是default!!!
baseURL后的URL必须是大写的!!!
之后在请求时,只需要写请求的具体的路径就可以,例如
this.axios.get("/api/xxx")
综上,此时内容为
import Axios from "axios";
Axios.defaults.baseURL = "地址";
Vue.prototype.axios = Axios
这种方式也是有缺点的:
- 无法实现接口复用,例如多个页面都要请求同一个数据,需要写多次相同的请求函数
路由 router
router中文为路由器,读音为ˈraʊtər
前端中的路由是指地址栏上的地址和需要展示的组件的关系
工作方式:
- 用户点击了路由链接
- 地址栏地址发生变化
- 路由监听到地址变化
- 将相应的组件渲染到浏览器
vue-router
vue官方给出的解决方案,对于vue2,需要安装3版本的路由
npm install vue-router@3
步骤:
-
安装
vue-router包 -
创建路由模块
- 在
src下新建一个文件夹为router - 在从
router文件夹中新建一个文件index.js
- 在
-
导入并挂载路由模块
-
此时的
index.js文件的内容为 -
// 导入Vue和Vue-router import Vue from 'vue'; import Router from 'vue-router'; // 将vue-router安装为vue的插件 Vue.use(Router) // 创建router的实例对象 const router = new Router(); // 将router暴露出去 export default router -
在
main.js中挂载 -
导入之前的文件
-
在
new Vue()中添加一个router: 导入的对象,也可以采取简写的形式 -
此时
main.js中的内容为-
import Vue from 'vue'
import App from './App.vue'
import Axios from "axios";
import ElementUI from "element-ui"
import 'element-ui/lib/theme-chalk/index.css';
// 相当于 import router from "./router/index.js"
import router from "@/router";

Axios.defaults.baseURL = "http://liulongbin.top:3006";
Vue.prototype.axios = Axios

Vue.use(ElementUI)
Vue.config.productionTip = false

Vue.directive("color", (el, binding) => {
    el.style.backgroundColor = binding.value;
})

new Vue({
    render: h => h(App),
    // 此时为router: router的简写
    router
}).$mount('#app')
-
-
-
声明路由链接和占位符
使用
在router/index.js的Router构造函数中传入一个对象,对象包含内容为
const router = new Router({
    routes: [
        {
            path:"/路径",
            component: 组件名
        }
    ]
})
组件名需要使用import导入
在需要用到路由的地方使用<router-view></router-view>标签作为占位符
在<a></a>标签中的href属性值中,写为#/路径
// 导入Vue和Vue-router
import Vue from 'vue';
import Router from 'vue-router';
import one from "@/components/one";
import two from "@/components/two";
import three from "@/components/three";

// 将vue-router安装为vue的插件
Vue.use(Router)

// 创建router的实例对象
const router = new Router({
    routes: [
        {
            path: '/first',
            component: one
        },
        {
            path: '/second',
            component: two
        },
        {
            path: '/third',
            component: three
        }
    ]
});

// 将router暴露出去
export default router
<template>
    <div id="app">
        <el-link href="#/first" type="primary" class="link">第一个</el-link>
        <el-link href="#/second" type="success" class="link">第二个</el-link>
        <el-link href="#/third" type="warning" class="link">第三个</el-link>

        <a href="#/second">222</a>
        <router-view></router-view>
    </div>
</template>

<script>


export default {
    name: 'App',
    components: {},
    data() {
        return {}
    },
    methods: {}
}
</script>

<style scoped>
#app {
    font-family: Avenir, Helvetica, Arial, sans-serif;
    text-align: center;
}

.link {
    margin: 20px;
}
</style>
也可以把#去掉,只需要将路由的模式修改为history,即在router/index.js的Router构造函数传递的对象中增加一个属性mode,值为history
// 导入Vue和Vue-router
import Vue from 'vue';
import Router from 'vue-router';
import one from "@/components/one";
import two from "@/components/two";
import three from "@/components/three";

// 将vue-router安装为vue的插件
Vue.use(Router)

// 创建router的实例对象
const router = new Router({
    mode: "history",
    routes: [
        {
            path: '/first',
            component: one
        },
        {
            path: '/second',
            component: two
        },
        {
            path: '/third',
            component: three
        }
    ]
});

// 将router暴露出去
export default router
在<a></a>标签中的href的属性值可以使用/路径
<template>
    <div id="app">
        <el-link href="/first" type="primary" class="link">第一个</el-link>
        <el-link href="/second" type="success" class="link">第二个</el-link>
        <el-link href="/third" type="warning" class="link">第三个</el-link>

        <a href="/second">222</a>
        <router-view></router-view>
    </div>
</template>

<script>


export default {
    name: 'App',
    components: {},
    data() {
        return {}
    },
    methods: {}
}
</script>

<style scoped>
#app {
    font-family: Avenir, Helvetica, Arial, sans-serif;
    text-align: center;
}

.link {
    margin: 20px;
}
</style>
可以使用<router-link></router-link>替代<a></a>,<router-link></router-link>标签中有一个属性为to,作用和href相同,如果路由模式为hash,也无需在to后添加#
例如
<router-link to="/first">router-link1</router-link>
重定向 redirect
访问某个地址时,重定向时某个页面
{
    path: '/路径',
    redirect: "/路径"
}
嵌套路由
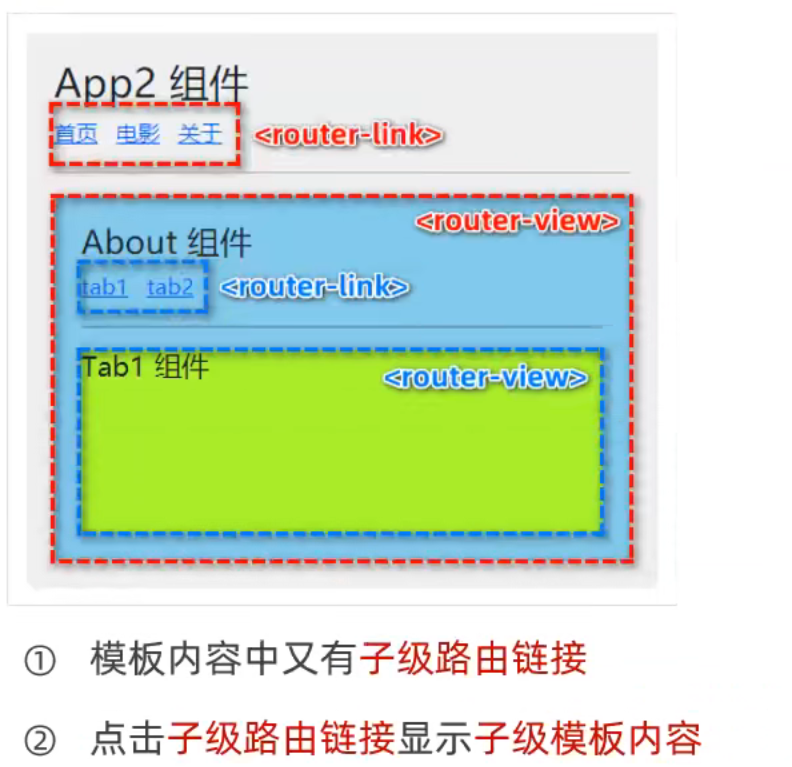
在原有的routes:[]中的对象中增加一个children属性,属性值是一个数组,数组中仍然包含对象,只不过包含的对象的路径不能够有/
例如
// 导入Vue和Vue-router
import Vue from 'vue';
import Router from 'vue-router';
import one from "@/components/one";
import two from "@/components/two";
import three from "@/components/three";
import four from "@/components/four";

// 将vue-router安装为vue的插件
Vue.use(Router)

// 创建router的实例对象
const router = new Router({
    mode: "hash",
    routes: [
        {
            path: '/first',
            component: one
        },
        {
            path: '/second',
            component: two
        },
        {
            path: '/third',
            component: three,
            children: [
                {
                    path: "fourth", // 不能有斜杠
                    component: four
                },
                {
                    path: "", // 代表默认
                    component: one
                }]
        },
    ]
});

// 将router暴露出去
export default router
当嵌套的子路由的路径为空时,就是默认子路由,即上例的33行
动态路由匹配
将地址中可变的一部分声明为参数,提高路由的复用性,类似于resful中的GET
可以在路径中使用/路径:名称,例如
path: "/search/:id/:ib
此时访问地址为:http://localhost:8080/#/search/22/33
调试工具中的信息为:
可以通过this.$route.params拿到这个对象
$route为路由的参数对象
方式2 使用props
需要在router/index.js中手动开启,即:
{
    path: "/search/:id/:ib",
    component: search,
    props: true
}
此时可以通过this.属性访问到值
查询参数
http://localhost:8080/#/search/223/33?name=go&text=123是一个标准的get请求的参数,可以通过this.$route.query获取到,上个链接获取到的内容为{ "name": "go", "text": "123" }
this.$route.fullPath可以获取到完整的请求路径(包含请求参数),例如上个链接的fullPath为/search/223/33?name=go&text=123
this.$route.path可以获取到请求路径(仅包含路径,不包含参数),例如上个链接的path为/search/223/33
导航
点击链接(a标签),导致页面上的组件的切换,称为声明式导航
调用API实现页面的跳转称为编程式导航
vue-router也提供了许多的编程式导航的API
-
this.$router.push("hash地址"),使用这种方法会增加一条历史记录,例如-
goto() {
    this.$router.push('/first');
}
-
-
this.$router.replace("hash地址"),不会生成历史记录,会替换当前的历史记录 -
this.$router.go(数字),可以使页面前进或者后退,数字为整数表示前进相应的次数,数字为负数表示后退相应的次数- 如果只前进或者后退一个页面,vue也有提供的方法
this.$router.back(),回退一个页面this.$router.forward(),前进一个页面
- 如果只前进或者后退一个页面,vue也有提供的方法
<template>
    <div id="app">
        <el-link href="#/first" type="primary" class="link">第一个</el-link>
        <el-link href="#/second" type="success" class="link">第二个</el-link>
        <el-link href="#/third" type="warning" class="link">第三个</el-link>
        <el-button type="primary" @click="goto">后退</el-button>
        <el-button type="primary" @click="to">前进</el-button>

        <router-view></router-view>
    </div>
</template>

<script>


export default {
    name: 'App',
    components: {},
    data() {
        return {}
    },
    methods: {
        goto() {
            this.$router.back();
        },
        to() {
            this.$router.forward();
        }
    }
}
</script>

<style scoped>
#app {
    font-family: Avenir, Helvetica, Arial, sans-serif;
    text-align: center;
}

.link {
    margin: 20px;
}
</style>
如果写在行内,必须要省略this
<el-button type="primary" @click="$router.back()">后退</el-button>
<el-button type="primary" @click="$router.forward()">前进</el-button>
导航守卫
控制路由的访问权限,例如控制访问某个页面的权限
全局前置导航守卫:
-
在
router/index.js中的router实例后,调用router.beforeEach(回调函数) -
代表每次通过路由跳转时调用的函数
-
回调函数有3个参数,可以写为
to, from, next-
to代表要访问的路由信息对象to和from都可以取出以下属性- fullPath
- hash
- matched
- meta
- name
- params
- path
- query
-
from是要离开的路由信息对象 -
next是一个函数,调用next()表示放行,调用方式有3种,分别是-
直接调用
next()-
router.beforeEach((to, from, next) => {
    next();
})
-
-
强制跳转到其他页面:
next('hash地址')-
router.beforeEach((to, from, next) => {
    console.log(to);
    console.log(from);
    if (to.path === "/first"){
        next("/search/22/33");
        return;
    }
    next();
})
-
-
不允许跳转到其他页面(停留在当前页面):
next(false)-
router.beforeEach((to, from, next) => {
    console.log(to);
    console.log(from);
    if (to.path === "/first") {
        next("/search/22/33");
        return;
    } else if (to.path === "/second") {
        next(false);
        return;
    }
    next();
})
-
-
-
-
如果声明了这个函数,而不调用
next(),此时所有的路由都会进行拦截
Q.E.D.